background image

                                                                                   TwinBox 430                                                                  Page 11/28 

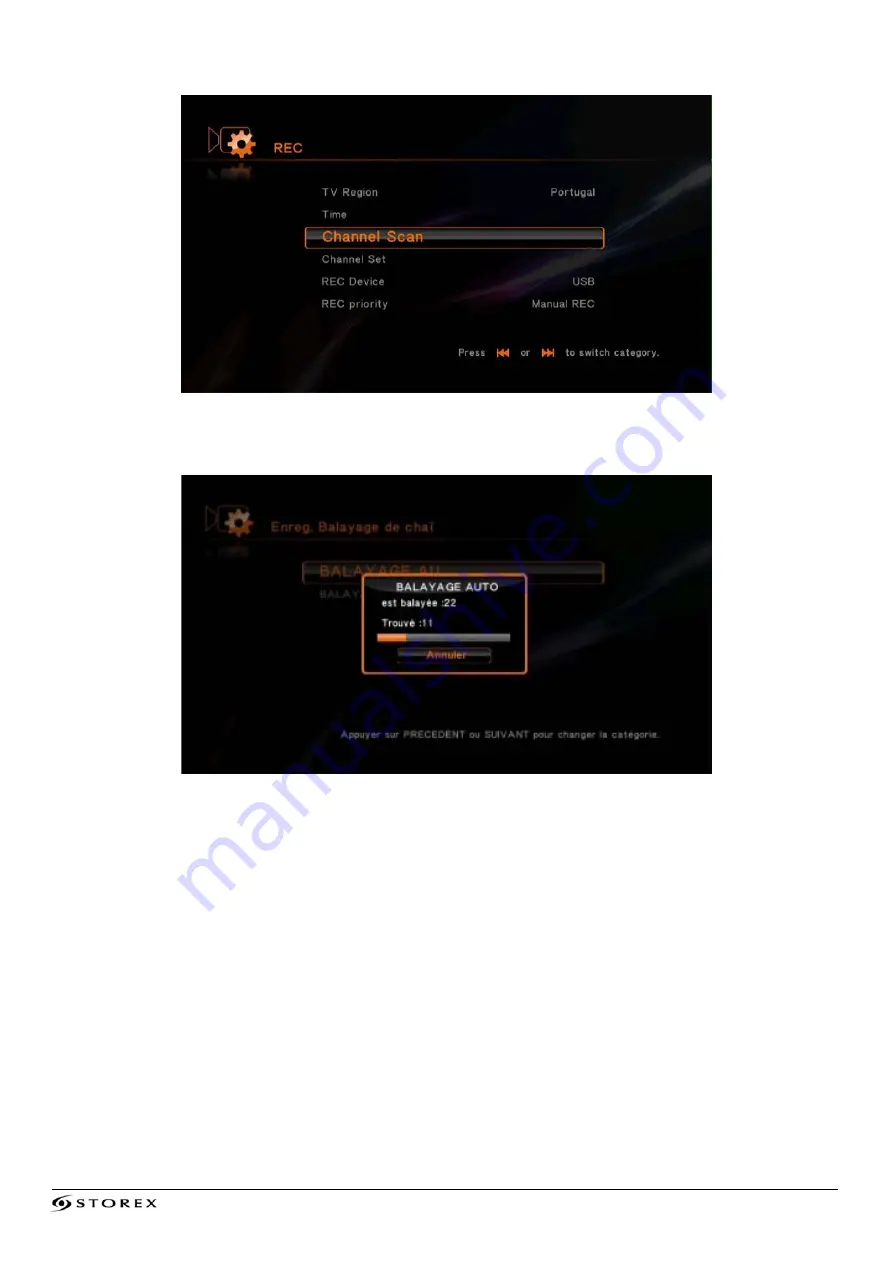
3. Select “

Channel Scan

” and then press 

ENTER

. Select "

Auto Scan

" and press 

ENTER


AUTO SCAN:

 To scan and automatically install the DVBT channels. 

MANUAL SCAN:

 To manually scan and install the DVBT channels. 


This progressing bar should appear. 

 
4. Once the channels scan is complete, press 

ENTER


Содержание TwinBox 430

Страница 1: ...TwinBox 430 Page 1 28 QUICK INSTALLATION GUIDE TwinBox 430 ...

Страница 2: ...TwinBox 430 Page 2 28 ...

Страница 3: ... VIEW AND RECORD DVBT CHANNELS 12 VIEWING DVBT CHANNELS 12 LIVE RECORDING 12 SCHEDULED RECORDING 14 USE OF STORAGE DEVICE 16 ENJOY THE MULTIMEDIA WORLD 17 SETTINGS 18 DISPLAY AND LANGUAGE 18 NETWORK 19 TECHNICAL SUPPORT 22 WARRANTY REGISTRATION 22 GUARANTEE CONDITIONS 23 SECURITY INFORMATION 23 GENERAL 24 SAFETY 24 PRODUCT S POWER SUPPLY 24 PLACING OF THE PRODUCT 24 CLEANING 24 IMPORTANT HINT 25 S...

Страница 4: ...TwinBox 430 Page 4 28 ...

Страница 5: ...tenna socket you can view DVBT channels and HD DVBT channels Connect an USB device external hard drive or USB key to be able to record DVBT and HD DVBT programs MAIN FEATURES Dual Tuner DVBT HD DVBT USB Host Connections x2 Video Connections Composite YPbPr and HDMI Audio Connection Coaxial Power supply 100V 240V Supported formats Video Avi Xvid HD MPEG HD MKV WMV HD RMVB and VOB Audio MP3 WMA AAC ...

Страница 6: ...0 Page 6 28 DESCRIPTION OF REMOTE CONTROL Remote control 1 Remote control 2 Remote control 1 Corresponds to the real remote control Remote control 2 Corresponds to the numeration of the remote control s keys 1 2 ...

Страница 7: ...imedia files Allows to validate your choice and to see the list of DVBT channels 20 EXIT Exits return to the previous page 21 HOME Allows direct access to the main page 22 PREVIEW 1 Return to previous page when you browse media files 2 Returns to the previous file when playing media files 23 24 FR FR Rewind the media file with a read speed of 2x 4x 8x Fast forward the media file with a read speed ...

Страница 8: ...ternal hard drives REAR VIEW 1 ANTENNA IN To connect an antenna cable from the wall outlet to TwinBox 430 ANTENNA OUT To connect an antenna cable from the TwinBox 430 to the TV 2 Y Pb Pr To connect an YUV cable to your TV 3 AV OUT To Connect the AV cable from the TwinBox 430 to your TV 4 COAXIAL To connect a S PDIF coaxial cable 5 HDMI To connect the HDMI cable to your TV 6 LAN To connect a networ...

Страница 9: ... wall antenna socket to enjoy the DVBT and HD DVBT channels 2 Connect TwinBox 430 to the TV using the AV cable depending on your configuration 3 Connect the power cord into your wall power socket Antenna Cable AV Cable HDMI Cable 2 3 YUV Cable 4 1 Antenna wall socket Rear TV Male Female ...

Страница 10: ...TwinBox 430 Page 10 28 INSTALL THE DVBT CHANNELS Press HOME on the remote control and select Setup by pressing ENTER 1 Select REC 2 Choose the geographic area that corresponds to your position ...

Страница 11: ...en press ENTER Select Auto Scan and press ENTER AUTO SCAN To scan and automatically install the DVBT channels MANUAL SCAN To manually scan and install the DVBT channels This progressing bar should appear 4 Once the channels scan is complete press ENTER ...

Страница 12: ...ect DTV Use to change channels Press to display the signal strength Press to change the subtitles Press to display the Electronic Program Guide LIVE RECORDING To be able to record DVBT HD DVBT channels you must have previously connected an USB device to the TwinBox 430 1 Select DTV ...

Страница 13: ...our remote control to start recording 4 Press to stop recording the current program HINT Records are stored directly on the device connected USB or external hard drive in the REC folder at the root of the device You can record one channel and watch another simultaneously simply proceed in the same way as for normal viewing of a channel ...

Страница 14: ...ter the interface below and add a scheduled program 1 1 Select the recording source 1 2 Select the recording date 1 3 Select the start time of the record 1 4 Select the end time of the record 1 5 To select the recording repeat frequency press RED on your remote control Once From Monday to Friday Sunday Tuesday Thursday Saturday Everyday From Monday to Saturday Monday Wednesday Friday ...

Страница 15: ...vice 3 Press ENTER a confirmation message will appear If the settings are right for you select Confirm and press ENTER HINT You can record one channel and watch another simultaneously simply proceed in the same way as for normal viewing of a channel ...

Страница 16: ...OST ports that allow you to connect an USB key or an external hard drive to the TwinBox 430 to browse it and thus read the multimedia content stored in 1 Select File Manager and then press ENTER 2 Select your storage device and press ENTER select the file you want to view and press ENTER ...

Страница 17: ... THE MULTIMEDIA WORLD 1 Select File Manager on the homepage 2 Select your STOREX server that appears in the list by pressing ENTER and select the folder you want to browse or the file you want to read 3 Enjoy the Multimedia world ...

Страница 18: ...AND LANGUAGE 1 Turn on your TwinBox 430 2 After startup select Setup to configure your TwinBox 430 3 Select VIDEO and then select TV System to select the display resolution 4 Select SYSTEM and then select MENU LANGUAGE to change the language ...

Страница 19: ...orts at the back of the unit The WiFi wireless Network is available only if the WiFi USB device is connected to the unit and your WiFi router is activated 1 Select the type of network you wish to connect to your home network 2 Select LAN SETTING to connect with wired networking Press ENTER and then select OK to set your wired connection 3 If you wish to have a wireless connection WiFi follows the ...

Страница 20: ...e 20 28 5 The list of available names on your SSID network appears 6 Enter your key using the virtual keypad Select OK and then press ENTER to confirm 7 The connection test begins confirm your choice by pressing ENTER ...

Страница 21: ...to configure the network after you correctly connect the USB WiFi to the TwinBox 430 Please check that the anti virus or firewall is not blocking access of this unit to the network Perhaps you might experience a temporary break and the freeze of the AV content read through the WiFi network because of network speed video streams input capacity or AV files including HD codes In this case please copy...

Страница 22: ...dress http garantie storex eu For repairing contact your dealer to repair your TwinBow 430 under guarantee or send your request via email to the following address support storex eu or by phone at France 01 55 85 82 00 local call charge to Paris Spain 902 110 572 soporte es storex eu Monday to Thursday from 9 30 to 19 30 p m Friday from 9 30 to 18 30 p m For more details please read the full versio...

Страница 23: ...ion or replacement of a defective product In no case STOREX cannot be held responsible for any loss of data or its consequences induced by operational fault or a product failure In any case STOREX won t be bound to any financial responsibility for any amount exceeding the value of the product purchased by the end user This guarantee of your TwinBox 430 is defined and can t be modified decreased or...

Страница 24: ...ase you don t use the product for a long time or during a lightning storm unplug the unit from the outlet by grabbing the plug itself without pulling the cable The included power adapter is specific to the product Using a different adapter may cause damage or accidents PLACING OF THE PRODUCT Install the appliance away from any equipment with strong attraction such as microwave ovens big speakers P...

Страница 25: ...a TVs and projection televisions are sensitive SAFETY ENVIRONMENT Your STOREX product has been tested in laboratory and is consistent with corresponding European Directives for CE marking applicable during the time of marketing A traceability of the components of your STOREX product was performed it showed us that the product complies with Environmental Directive RoHS in effect at the time of its ...

Страница 26: ...____________________ __________________________ __________________________ __________________________ __________________________ __________________________ __________________________ __________________________ __________________________ __________________________ ...

Страница 27: ...TwinBox 430 Page 27 28 ...

Страница 28: ...TwinBox 430 Page 28 28 T Tw wiin nB Bo ox x 4 43 30 0 is a product range of STOREX www storex eu STOREX 2011 All trademarks are patended by their respective owners ...

Отзывы: