background image

                                                                                      SlimBox                                                                  P. 124/132 

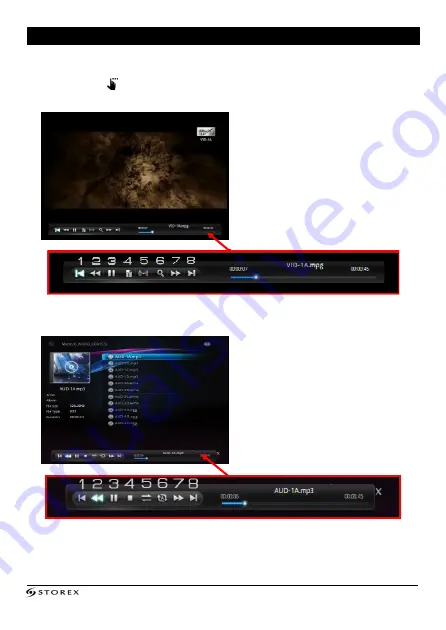
BARRA DE ATALHOS 


A barra de atalhos é apenas acessível durante a leitura de um ficheiro multimédia.  
 

1.


Pressione a tecla "

" para mostrar a barra de atalhos: 

1.


VIDEO 

1.


Anterior 

2.


Recuar 

3.


Reproduzir/Pausa 

4.


Legendas 

(permite ao utilizador mostrar 

ou alterar o ecrã de legendas).


5.


Audio 

(permite ao utilizador alterar a 

faixa áudio).


6.


Ampliar 

7.


Avanço rápido 

8.


Próximo 


2.


MUSIC 

1.


Anterior 

2.


Recuar 

3.


Reproduzir/Pausa 

4.


Parar 

5.


Reprodução sequencial ou aleatória 

6.


Repetir tudo, repetir pasta ou repetir 

um. 

7.


Avanço rápido 

8.


Próximo 


Содержание SlimBox

Страница 1: ...NSTALLATION RAPIDE P 6 QUICK INSTALLATION GUIDE P 23 GUÍA D INSTALACIÓN RÁPIDA P 45 KURZANLEITUNG INSTALLATION P 67 GUIDA RAPIDA PER L INSTALLAZIONE P 89 GUIA DE INSTALAÇÃO RÁPIDA P 111 S S S SLIM LIM LIM LIMB B B BOX OX OX OX ...

Страница 2: ...SlimBox P 2 132 ...

Страница 3: ...t la surface du boîtier dégage de la chaleur par conséquent placez le produit sur une surface plane et rigide et évitez de le couvrir ou de poser un quelconque objet dessus ALIMENTATION ÉLECTRIQUE DU PRODUIT En cas de non utilisation prolongée du produit ou en cas d orage débranchez l appareil de la prise murale en saisissant la prise elle même sans tirer sur le câble L adaptateur de courant fourn...

Страница 4: ... SÉCURITÉ ENVIRONNEMENT Votre produit STOREX a été testé en laboratoire il est conforme aux directives Européennes correspondant au marquage CE en vigueur au moment de sa commercialisation Une traçabilité des composants de votre produit STOREX a été réalisée elle nous a démontré la conformité du produit à la directive environnementale RoHS en vigueur au moment de sa commercialisation En fin de vie...

Страница 5: ...E 7 CÔTÉ 7 DÉTAIL DE LA TÉLÉCOMMANDE 8 CONNECTER LA PASSERELLE SLIMBOX Á LA TV 10 CONNECTER UN PÉRIPHÉRIQUE À VOTRE SLIMBOX 11 LECTURE D UN FICHIER 12 LECTURE À PARTIR D UNE CARTE MÉMOIRE 13 BARRE DE RACCOURCIS 14 PARAMÈTRES DE LA SLIMBOX 15 Réseau sans fil WIFI 16 CONDITIONS DE GARANTIE 19 SITE WEB STOREX 20 ENREGISTREMENT DE LA GARANTIE 20 ...

Страница 6: ...érique USB ou cartes mémoire SD MMC en haute définition Connectée au réseau la passerelle SlimBox vous permettra de visualiser votre contenu multimédia en haute définition CARACTÉRISTIQUES PRINCIPALES Connexions USB Host x2 et lecteur de cartes SD MMC Connexions vidéo Composite et HDMI Connexions audio Optique et Coaxial Alimentation électrique INPUT 100V 240V 50 60Hz 0 6A OUTPUT 12 0V 2000mA Form...

Страница 7: ...mBox à votre routeur 4 COAXIAL Pour connecter un câble coaxial de votre SlimBox à votre amplificateur audio 5 AV TV Pour connecter votre SlimBox à la TV grâce au câble AV fourni 6 HDMI Pour connecter un câble HDMI de votre SlimBox à votre TV 7 USB HOST Pour connecter un périphérique USB clé USB disque dur externe ou clé USB WiFi CÔTÉ 1 SD MMC Pour connecter une carte mémoire SD ou MMC 2 USB HOST P...

Страница 8: ...SlimBox P 8 132 DÉTAIL DE LA TÉLÉCOMMANDE TÉLÉCOMMANDE RÉELLE NUMÉRATION DES TOUCHES ...

Страница 9: ... aller à un point spécifique Temps 12 AUDIO Permet de sélectionner la piste audio 13 SUBTITLE Permet d afficher la fenêtre de modifications des sous titres 14 COPY Permet d activer la fonction COPIE 15 SETUP Permet d accéder directement à la page de configuration 16 DEVICE Permet de modifier le périphérique de lecture 17 REPEAT Vidéo et Musique Répète le fichier actuel ou répète tous les fichiers ...

Страница 10: ...onnectez une extrémité de votre câble HDMI derrière le produit et l autre extrémité à la TV voir l illustration ci dessus normalement un schéma vous guidera AV1 AV2 EXT1 EXT2 une fois connectée à la TV 3 Connectez l adaptateur d alimentation à SlimBox puis placez l interrupteur sous le produit sur ON 4 Appuyez sur la touche Standby de votre télécommande 5 Le menu de la page d accueil apparaît quel...

Страница 11: ...B directement sur la passerelle SlimBox de le parcourir et ainsi de lire le contenu multimédia qui y est stocké 1 Sélectionnez l un des icônes selon le type de fichier que vous souhaitez visualiser Vidéo Audio Photo ou Texte 2 Sélectionnez votre périphérique de stockage puis appuyez sur ENTER sélectionnez le fichier que vous souhaitez visualiser et appuyez sur ENTER ...

Страница 12: ...tilisation de la télécommande veuillez vous référer aux détails concernant la télécommande PAGE D ACCUEIL 2 Sélectionnez les répertoires et fichiers avec les touches directionnelles et validez la sélection en appuyant sur ENTER 3 Appuyez sur la touche pour faire apparaître la barre de raccourcis suivante Vous trouverez les raccourcis suivants dans l ordre respectif 1 Précédent 2 Pause 3 Rotation 4...

Страница 13: ...t se référer à la partie détails du produit 2 Appuyez sur la touche pour changer votre périphérique de lecture À chaque appui sur la touche le périphérique de lecture change puis s affiche en bleu 3 Sélectionnez les répertoires et fichiers avec les touches directionnelles et validez la sélection en appuyant sur ENTER ...

Страница 14: ... de raccourcis 1 VIDÉO 1 Précédent 2 Retour Rapide 3 Play Pause 4 Sous titres permet d afficher ou de changer l affichage des sous titres 5 Audio permet de changer de piste audio 6 Zoom 7 Avance Rapide 8 Suivant 2 MUSIQUE 1 Précédent 2 Retour Rapide 3 Play Pause 4 Stop 5 Lecture séquentielle ou aléatoire 6 Répéter tout répéter répertoire ou répéter un 7 Avance Rapide 8 Suivant ...

Страница 15: ...ENTER 3 Appuyez sur la touche pour faire disparaître la barre de raccourcis PARAMÈTRES DE LA SLIMBOX Sur cette page vous pouvez procéder à plusieurs réglages dont celui de la langue et de la résolution d affichage 1 Appuyez sur la touche SETUP de la télécommande pour entrer dans le menu de réglage 2 Utilisez les touches directionnelles pour sélectionner le réglage et appuyez sur la touche ENTER Su...

Страница 16: ...er le site http www e storex com pour acquérir une clé WiFi compatible 2 Connectez la clé USB WiFi en option sur l un des ports USB HOST Note Le réseau sans fil WiFi n est disponible que si la clé USB WiFi est connectée à l unité et que votre routeur WiFi est allumé et opérationnel 3 Appuyez sur la touche sélectionnez Paramètres Réseau puis Paramétrer réseau WiFi automatiquement en appuyant sur EN...

Страница 17: ... 5 Sélectionnez votre réseau WiFi puis appuyez sur la touche ENTER 6 Saisissez votre clé en fonction de la sécurité WEP pour l exemple à l aide du pavé numérique virtuel Appuyez sur le bouton ENTER pour valider 7 Une fois votre clé saisie sélectionnez SUBMIT puis appuyez sur ENTER ...

Страница 18: ...ecommandé de configurer le réseau après avoir correctement connecté la clé USB WiFi à la SlimBox o Veuillez vérifier que l anti virus ou le pare feu ne bloque pas l accès de cette unité au réseau Vous subirez peut être une coupure momentanée et un gel du contenu Av lu par le biais du réseau WiFi à cause de la vitesse du réseau de la capacité d entrée ou des fichiers AV incluant les fichiers HD ...

Страница 19: ...exhaustifs une chaleur ou une humidité excessive des pannes de courant ou une mauvaise installation désinstallation de SlimBox La seule obligation contractuelle de STOREX consiste en la réparation et le remplacement d un produit défectueux En aucun cas STOREX ne peut être tenu pour responsable des pertes de données ou de ses conséquences consécutives à un défaut de fonctionnement ou à une panne du...

Страница 20: ...nt peut être déjà recensés ENREGISTREMENT DE LA GARANTIE Afin de faciliter votre prise en charge lors d un éventuel entretien avec notre équipe de support nous vous invitons à enregistrer la garantie de votre SlimBox sur notre site Web à l adresse http garantie storex eu En cas de panne veuillez contacter votre revendeur pour faire réparer votre SlimBox sous garantie ou veuillez adresser votre dem...

Страница 21: ...SlimBox P 21 132 ...

Страница 22: ...SlimBox P 22 132 ...

Страница 23: ...SlimBox P 23 132 QUICK INSTALLATION GUIDE S S S SLIM LIM LIM LIMB B B BOX OX OX OX ...

Страница 24: ...SlimBox P 24 132 ...

Страница 25: ...ing it again While functioning the box s surface produces heat consequently place the product on a flat and hard surface and avoid covering it or placing anything over it PRODUCT S POWER SUPPLY If you don t plan to use the product for an extended period of time or if a storm occurs unplug the device from the wall socket by handling the plug itself not by pulling on the cable The power adaptor prov...

Страница 26: ...nsitive SAFETY ENVIRONMENT Your STOREX product has been laboratory tested it complies to European guidelines corresponding to the CE labelling in force at the time of its launch Your STOREX product s components are tracable this demonstrates the product s compliance to environmental guidelines RoHS in force at the time of its launch Once the product has reached the end of its lifespan don t throw ...

Страница 27: ... 29 REAR PANEL 29 SIDE 29 REMOTE CONTROL DETAILS 30 CONNECTING THE SLIMBOX GATEWAY TO THE TV 32 CONNECTING A PERIPHERAL TO YOUR SLIMBOX 33 READING A FILE 34 READING FROM A MEMORY CARD 35 SHORTCUT BAR 36 SLIMBOX SETTINGS 37 Wireless network WIFI 38 TERMS OF GUARANTEE 41 STOREX WEBSITE 42 GUARANTEE REGISTRATION 42 ...

Страница 28: ...y card in high definition on your SlimBox Connected to the network the SlimBox gateway will allow you to view your multimedia content in high definition MAIN FEATURES USB Host connexions x2 and SD MMC card reader Video connexions Composite and HDMI Audio connexions Optical and Coaxial Power supply INPUT 100V 240V 50 60Hz 0 6A OUTPUT 12 0V 2000mA Supported formats Vidéo Avi Rmvb Ts Vob Mkv Mov Audi...

Страница 29: ...x to your router 4 COAXIAL To connect a coaxial cable from your SlimBox to your audio amplifier 5 AV TV To connect your SlimBox to your TV using the provided AV cable 6 HDMI To connect a HDMI cable from your SlimBox to your TV 7 USB HOST To connect a USB peripheral USB stick external hard drive or WiFi USB stick SIDE 1 SD MMC To connect an SD or MMC memory card 2 USB HOST To connect a USB peripher...

Страница 30: ...SlimBox P 30 132 REMOTE CONTROL DETAILS REAL REMOTE CONTROL KEYPAD NUMBERING ...

Страница 31: ... the user to select an audio track 13 SUBTITLE Allows the user to display the subtitle modification window 14 COPY Allows the user to activate the COPY option 15 SETUP Allows the user to directly access the setup page 16 DEVICE Allows the user to modify the reading peripheral 17 REPEAT Vidéo and Music Repeats the current file or repeats all the files in the directory or cancels the repetition func...

Страница 32: ...nnected to the TV 2 Connect one end of your HDMI cable behind the product and the other end to the TV see diagram above normally a diagram will guide you AV1 AV2 EXT1 EXT2 once connected to the TV 3 Connect the power adaptor to the SlimBox and switch the commuter under the product to ON 4 Press the Standby key on your remote control 5 The homepage menu appears after a few seconds TV rear view AV C...

Страница 33: ...ser to connect a USB stick or a USB hard drive directly to the SlimBox to browse it and read the multimedia content stored in it 1 Select one of the icons according to the type of file you wish to view Video Audio Photo or Text 2 Select your storage peripheral and press ENTER select the file you wish to view and press ENTER ...

Страница 34: ... and press ENTER To use the remote control please refer to the remote control details HOMEPAGE 1 Select the directories and files with the directional pad and confirm the selection by pressing ENTER 2 Press the key to show the following shortcut bar You will be shown the following shortcuts in respective order 1 Previous 2 Pause 3 Rotation 4 Zoom 5 Background music 6 Photo display 7 Next ...

Страница 35: ...ignated place refer to product details 2 Press the key to change your reading peripheral Each time you press the key the reading peripheral will change and be displayed in blue 3 Select the directories and files with the directional pad and confirm the selection by pressing ENTER ...

Страница 36: ...rtcut bar 1 VIDEO 1 Previous 2 Rewind 3 Play Pause 4 Subtitles allows the user to display or change the subtitle display 5 Audio allows the user to change the audio track 6 Zoom 7 Fast Forward 8 Next 2 MUSIC 1 Previous 2 Rewind 3 Play Pause 4 Stop 5 Sequential or random play 6 Repeat all repeat directory or repeat one 7 Fast Forward 8 Next ...

Страница 37: ...ional pad and confirm by pressing ENTER 3 Press the key to hide the shortcut bar SLIMBOX SETTINGS On this page you can perform several adjustments including the language and the display resolution 1 Press the SETUP key on the remote control to enter the settings menu 2 Use the directional keypad to select the settings and press ENTER On this page you can choose the language ...

Страница 38: ...er or refer to the http www e storex com website to purchase a compatible WiFi key 2 Connect the USB WiFi key optional to one of the USB HOST ports Note The WiFi wireless network is only available if the USB WiFi key is connected to the unit and your WiFi router is turned on and operational 3 Press the key select Network and Auto wireless setup by pressing ENTER ...

Страница 39: ...your network is displayed 5 Select your WiFi network and press ENTER 6 Enter your key according to safety settings WEP in this example with the virtual digital number pad Press ENTER to confirm 7 Once you have entered your key select CONFIRM and press ENTER ...

Страница 40: ...epage NOTE o We recommend setting up the network after properly connecting the USB WiFi stick to the SlimBox o Please ensure that the antivirus or firewall aren t blocking this unit s access to the network You may experience a temporary cut and a freeze of the AV content via the WiFi network due to the network speed the input capacity or AV files including HD files ...

Страница 41: ...rs such as not exhaustive excessive heat or dampness power failures or bad installation uninstalling of SlimBox The only contractual obligation endorsed by STOREX pertains to the repair and replacement of a defective product In no case can STOREX be held responsible for loss of data or its consequences induced by an operational fault or a product failure In any case STOREX won t be bound to any fi...

Страница 42: ...RANTEE REGISTRATION In order to facilitate the management of your issue should you contact our support team we invite you to register your SlimBox guarantee on our website at the following address http garantie storex eu Should you experience a product failure please contact your retailer in order to repair your guaranteed SlimBox or send your request via email to the following address support sto...

Страница 43: ...n t install my external hard drive Remote handling Using the STORwebEX platform allows the Hotline technicians to connect remotely to the customer s computer in order to resolve installation issues pertaining to a STOREX product ...

Страница 44: ...SlimBox P 44 132 ...

Страница 45: ...SlimBox P 45 132 GUÍA D INSTALACIÓN RÁPIDA S S S SLIM LIM LIM LIMB B B BOX OX OX OX ...

Страница 46: ...SlimBox P 46 132 ...

Страница 47: ... a usar Mientras esté funcionando la superficie de la carcasa produce calor por lo tanto ubique el producto sobre una superficie firme y plana y evite cubrirlo o poner algo sobre éste ALIMENTACIÓN DEL PRODUCTO Si planea no utilizar el producto por un largo período de tiempo o si hay tormentas desconecte el dispositivo de la toma de corriente a través del conector como tal no tirando del cable El a...

Страница 48: ...ducto STOREX ha sido probado en laboratorio éste cumple con las normas europeas correspondientes a la etiquete CE de acuerdo a su fecha de fabricación Los componentes de su producto STOREX son identificables esto demuestra la conformidad del producto con respecto a las directrices ambientales RoHS de acuerdo a su fecha de fabricación Una vez que el producto haya sobrepasado su vida útil no lo tire...

Страница 49: ... LATERAL 51 DETALLES DEL CONTROL REMOTO 52 CONEXIÓN DE LA PASARELA SLIMBOX AL TV 54 CONEXIÓN DE UN DISPOSITIVO EXTERNO A SU SLIMBOX 55 LECTURA DE UN ARCHIVO 56 LECTURA DESDE UNA TARJETA DE MEMORIA 57 BARRA DE ACCESO DIRECTO 58 AJUSTES DE SLIMBOX 59 RED INALÁMBRICA WIFI 60 TÉRMINOS DE LA GARANTÍA 63 SITIO WEB DE STOREX 64 REGISTRO DE LA GARANTÍA 64 ...

Страница 50: ...ta definición a través de su SlimBox Conectada a la red la pasarela SlimBox le permitirá ver su contenido multimedia en alta definición CARACTERÍSTICAS PRINCIPALES Dos 2 conexiones USB y lector de tarjeta SD MMC Conexiones de video Compuesto y HDMI Conexiones de audio Óptica y coaxial ENTRADA de alimentación 100V 240V 50 60Hz 0 6A SALIDA 12 0V 2000mA Formatos compatibles Vídeo Avi Rmvb Ts Vob Mkv ...

Страница 51: ...ia un enrutador 4 COAXIAL Para conectar un cable coaxial desde su SlimBox hacia su aplificador de audio 5 AV TV Para conectar su SlimBox a su TV utilizando el cable AV suministrado 6 HDMI Para conectar un cable HDMI desde su SlimBox hacia su TV 7 USB HOST Para conectar un USB externo memoria USB disco duro externo o memoria USB WiFi PANEL LATERAL 1 SD MMC Para conectar una tarjeta de memoria SD o ...

Страница 52: ...SlimBox P 52 132 DETALLES DEL CONTROL REMOTO CONTROL REMOTO REAL TECLADO NUMÉRICO ...

Страница 53: ...io seleccionar una pista de audio 13 SUBTÍTULOS Permite al usuario mostrar la ventana de modificación de subtítulos 14 COPIAR Permite al usuario activar la opción COPIAR 15 CONFIGURACIÓN Permite al usuario acceder directamente a la página de configuración 16 DISPOSITIVO Permite al usuario modificar la lectura externa 17 REPETIR Video y música Repite el archivo actual repite todos los archivos en e...

Страница 54: ...n extremo de su cable HDMI detrás del producto y el otro extremo al TV ver diagrama arriba Normalmente el diagrama lo guiará HDMI1 HDMI2 EXT1 EXT una vez conectado al TV 3 Conecte el adaptador de energía al SlimBox y cambie el conmutador debajo del producto a la posición ON 4 Presione la tecla Standby Inactivo en su mando a distancia 5 Después de algunos segundos aparecerá el menú de la página de ...

Страница 55: ...o un disco duro extraíble directamente a la pasarela multimedia SlimBox para explorarlos y reproducir el contenido multimedia que estos contienen 1 Seleccione uno de los iconos de acuerdo al tipo de archivo que desea ver Vídeo Música Fotos o Texto 2 Seleccione el dispositivo de almacenamiento externo y presione ENTER seleccione el archivo que desea ver y presione ENTER ...

Страница 56: ...TER Para utilizar el control remoto consulte los detalles descritos en esta guía PÁGINA DE INICIO 1 Seleccione los directorios y archivos con el panel direccional y confirme la selección presionando ENTER 2 Presione la tecla para mostrar la barra de acceso directo a continuación Podrá observar los siguientes accesos directos en el siguiente orden 1 Anterior 2 Pausa 3 Rotación 4 Zoom 5 Música de fo...

Страница 57: ...n el lugar designado consulte Detalles del producto 2 Presione la tecla para cambiar su lectura externa Cada vez que presiona la tecla la lectura externa cambiará y será mostrada en azul 3 Selecione los directorios y archivos con el panel direccional y confirme la selección presionando ENTER ...

Страница 58: ...ecto 1 VIDEO 1 Anterior 2 Retroceder 3 Reproducir Pausar 4 Subtítulos permite al usuario mostrar o cambiar los subtítulos 5 Audio permite al usuario cambiar la pista de audio 6 Zoom 7 Avance rápido 8 Siguiente 2 MÚSICA 1 Anterior 2 Retroceder 3 Reproducir Pausar 4 Detener 5 Reproducción aleatoria o secuencial 6 Repetir todo repetir directorio o repetir una 7 Avance rápido 8 Siguiente ...

Страница 59: ...ara ocultar la barra de acceso directo AJUSTES DE SLIMBOX En esta página podrá realizar varios ajustes incluido el ajuste del idioma y la resolución de pantalla 1 Presione la tecla SETUP Configuración en el control remoto para ingresar al menú de ajuste 2 Utilice el teclado direccional para seleccionar los ajustes y presione ENTER En esta página podrá seleccionar el idioma En esta página podrá mod...

Страница 60: ...rex com para adquirir una llave WiFi USB compatible 2 Conecte la llave WiFi USB opcional a uno de los puertos USB HOST Nota La red inalámbrica WiFi sólo está disponible si la llave WiFi está conectada a la unidad y su enrutador WiFi está encendido y funciona normalmente 3 Presione la tecla seleccione Network y Auto wireless setup presionando ENTER ...

Страница 61: ...ibles 5 Seleccione su red WiFi y presione ENTER 6 Ingrese su clave de acuerdo a los ajustes de seguridad WEP en este ejemplo con el panel de número digital virtual Presione ENTER para confirmar 7 Una vez que haya ingresado su clave seleccione CONFIRMAR y presione ENTER ...

Страница 62: ...OTA o Recomendamos configurar la red después de conectar correctamente la llave WiFi USB al SlimBox o Asegúrese de que el antivirus o firewall no estén bloqueando el acceso de la unidad a la red Es posible que experimente un corte temporal o parada del contenido AV a través de la red WiFi debido a la velocidad de la red la capacidad de entrada o los archivos AV incluyendo los archivos HD ...

Страница 63: ... calor o humedad excesivos fallas eléctricas o mala instalación desinstalación del SlimBox La única obligación contractual por parte de STOREX recae sobre la reparación y reemplazo de un producto defectuoso En ningún caso STOREX será reponsable por pérdida de datos o sus consecuencias generadas por una falla operacional o falla de un producto En ningún caso STOREX responderá ante asuntos financier...

Страница 64: ...icados REGISTRO DE LA GARANTÍA Para facilitar la administración de su problema y el contacto con nuestro equipo de soporte lo invitamos a que registre la garantía de su SlimBox en nuestro sitio web en la siguiente dirección http garantie storex eu Si experimenta una falla del producto comuníquese con su distribuidor para hacer reparar su Slimbox en garantía o envíe una solicitud a través del corre...

Страница 65: ...i disco externo Asistencia remota A través de la plataforma STORwebEX usted podrá conectarse remotamente con la línea directa de técnicos desde su computador para resolver problemas de instalación relacionados con cualquier producto de STOREX ...

Страница 66: ...SlimBox P 66 132 ...

Страница 67: ...SlimBox P 67 132 KURZANLEITUNG INSTALLATION S S S SLIM LIM LIM LIMB B B BOX OX OX OX ...

Страница 68: ...SlimBox P 68 132 ...

Страница 69: ...zierten Techniker untersuchen bevor Sie es erneut in Betrieb nehmen Während des Betriebs wird das Gehäuse warm Stellen Sie deshalb das Produkt auf einen flachen und festen Untergrund und decken Sie es nicht ab STROMVERSORGUNG DES GERÄTS Ziehen Sie bei längerer Nichtbenutzung und während eines Gewitters den Netzstecker des Geräts Ziehen Sie das Netzkabel stets am Stecker aus der Steckdose ziehen Si...

Страница 70: ...ICHERHEIT UMWELT Ihr STOREX Produkt wurde im Labor getestet und erfüllt die europäischen Richtlinien bezüglich der CE Kennzeichnung zum Zeitpunkt der Vermarktung Die Komponenten Ihres STOREX Produkts sind wiederverwertbar Das Symbol weist darauf hin dass das Produkt der Umwelt Richtlinie RoHS zum Zeitpunkt der Vermarktung entspricht Am Ende der Lebensdauer des Produkts entsorgen Sie es nicht mit d...

Страница 71: ...ENUNGSDETAILS 74 ANSCHLUSS DES SLIMBOX GATEWAYS AN DEN FERNSEHER 76 ANSCHLUSS EINES PERIPHERIEGERÄTS AN IHRE SLIMBOX 77 WIEDERGABE EINER DATEI 78 VON EINER SPEICHERKARTE WIEDERGEBEN 79 SCHNELLTASTENLEISTE 80 SLIMBOX EINSTELLUNGEN 81 DRAHTLOSES NETZWERK WI FI 82 GARANTIEBEDINGUNGEN 85 STOREX WEBSITE 86 REGISTRIERUNG DER GARANTIE 86 ...

Страница 72: ...der einer SD MMC Speicherkarte wiedergeben Nach dem Anschluss an das Netzwerk können Sie über den SlimBox Gateway Sie Ihre Multimediainhalte in Hoch Auflösung wiedergeben HAUPTMERKMALE USB Hostanschlüsse x 2 und SD MMC Kartenleser Videoanschlüsse Composite und HDMI Audioanschlüsse Optisch und koaxial Stromversorgung EINGANG 100V 240V 50 60Hz 0 6A AUSGANG 12 0V 2000mA Unterstützte Formate Video Avi...

Страница 73: ...XIAL Anschluss eines koaxialen Kabels von Ihrer SlimBox an Ihren Audioverstärker 5 AV TV Anschluss Ihrer SlimBox an Ihren Fernseher mittels des mitgelieferten AV Kabels 6 HDMI Anschluss eines HDMI Kabels von Ihrer SlimBox an Ihren Fernseher 7 USB HOST Zum Anschluss eines USB Geräts USB Memory Stick externe Festplatte oder Wi Fi USB Stick usw SEITE 1 SD MMC Kartenleser 2 USB HOST Zum Anschluss eine...

Страница 74: ...SlimBox P 74 132 FERNBEDIENUNGSDETAILS REALE FERNBEDIENUNG NUMMERIERTE TASTEN ...

Страница 75: ... die Wiedergabe von Mediendateien 11 GEHE ZU Springt zu einem bestimmten Zeitpunkt 12 AUDIO Auswahl eines Audiotracks 13 UNTERTITEL Anzeige des Änderungsfensters für Untertitel 14 KOPIE KOPIER Option aktivieren 15 SETUP Setupseite direkt aufrufen 16 GERÄT Ändern des Eingabegeräts 17 WIEDERHOLEN Video und Musik Wiederholung der aktuellen Datei aller Dateien im Verzeichnis oder beendet die Wiederhol...

Страница 76: ...ießen Sie ein Ende des HDMI Kabels auf der Rückseite des Geräts und das andere Ende am Fernseher an Siehe Abbildung oben Normalerweise wird ein Diagramm als Leitfaden angezeigt AV1 AV2 EXT1 EXT2 usw sobald das Gerät am Fernseher angeschlossen wird 3 Schließen Sie den Netzadapter an die SlimBox an und stellen Sie den Ein Ausschalter unter dem Produkt in die Stellung ON Ein 4 Drücken Sie Standby auf...

Страница 77: ...atte direkt an den SlimBox Gateway angeschlossen werden kann um diese zu durchsuchen und die darauf gespeicherten Multimedia Inhalte wiederzugeben 1 Wählen Sie entsprechend zum Dateityp den Sie wiedergeben möchten eines der Symbole Video Musik oder Foto 2 Wählen Sie Ihr Speichergerät und drücken Sie ENTER Anschließend wählen Sie die gewünschte Datei und drücken Sie erneut ENTER ...

Страница 78: ... oder Netzwerk aus und drücken Sie ENTER Weitere Einzelheiten zur Benutzung der Fernbedienung finden Sie im Abschnitt Fernbedienungsdetails HAUPTSEITE 1 Wählen Sie Ordner und Dateien mit den Pfeiltasten und bestätigen Sie die Auswahl mit ENTER 2 Zeigen Sie mit folgende Schnelltastenleiste an Folgende Schnelltasten werden in der Reihe nach angezeigt 1 Zurück 2 Pause 3 Drehen 4 Zoomen 5 Hintergrundm...

Страница 79: ...icherkarte in den dafür vorgesehenen Kartenleser siehe Produktdetails 2 Wechseln Sie mit das Eingabegerät Das Eingabegerät wird mit jedem Tastendruck gewechselt und wird blau markiert 3 Wählen Sie Ordner und Dateien mit den Pfeiltasten und bestätigen Sie die Auswahl mit ENTER ...

Страница 80: ...leiste an 1 VIDEO 1 Zurück 2 Schneller Rücklauf 3 Play Pause 4 Untertitel Untertitel anzeigen und ändern 5 Audio Audiotrack ändern 6 Zoomen 7 Schneller Vorlauf 8 Weiter 2 MUSIK 1 Zurück 2 Schneller Rücklauf 3 Play Pause 4 Stopp 5 Sequentielle oder zufällige Wiedergabe 6 Alle wiederholen Ordner wiederholen oder Einmal wiederholen 7 Schneller Vorlauf 8 Weiter ...

Страница 81: ... Verbergen Sie die Schnelltastenleiste mit SLIMBOX EINSTELLUNGEN Auf dieser Seite können Sie verschiedene Einstellungen anpassen einschließlich Sprache und Displayauflösung 1 Rufen Sie das Setupmenü mit SETUP auf der Fernbedienung auf 2 Wählen Sie mit den Pfeiltasten die Einstellung und drücken Sie ENTER Auf dieser Seite können Sie die Sprache einstellen Auf dieser Seite können Sie die die Display...

Страница 82: ...ompatiblen Wi Fi Stick zu erwerben 2 Stecken Sie den USB Wi Fi Stick optional in eine der USB Hostschnittstellen Anmerkung Das drahtlose Wi Fi Netzwerk ist nur verfügbar wenn der USB Wi Fi Stick an das Gerät angeschlossen wurde und Ihr Wi Fi Router betriebsbereit ist 3 Drücken Sie wählen Sie mit ENTER die Optionen Network setup Netzwerksetup und Auto wireless setup Autom Funksetup ...

Страница 83: ...Wi Fi Netzwerk und drücken Sie ENTER 6 Geben Sie Ihren Schlüssel entsprechend zu den Sicherheitseinstellungen WEP in diesem Beispiel mit der virtuellen digitalen Tastatur ein Bestätigen Sie mit ENTER 7 Sobald Sie Ihren Schlüssel eigegeben haben wählen Sie CONFIRM Bestätigen und drücken Sie ENTER ...

Страница 84: ...ach ordnungsgemäßem Anschluss des USB Wi Fi Sticks an der SlimBox einzurichten o Bitte achten Sie darauf dass Antivirus oder Firewall Software den Zugriff des Geräts auf das Netzwerk nicht blockiert Es könnte wegen der Netzwerkgeschwindigkeit und der Übertragungskapazität von AV Dateien über das Wi Fi Netzwerk einschließlich Dateien im HD Format zu einem vorübergehenden Anhalten und Einfrieren der...

Страница 85: ...lle fehlerhafte Installation oder Deinstallation der SlimBox Die einzige vertragliche Verpflichtung von STOREX betrifft die Reparatur oder der Austausch eines fehlerhaften Produkts In keinem Fall kann STOREX für den Datenverlust oder seine Folgen verantwortlich gemacht werden der durch einen Bedienungsfehler oder einen Ausfall des Produkts verursacht wurde STOREX ist in jedem Fall von der finanzie...

Страница 86: ...den REGISTRIERUNG DER GARANTIE Um die Verwaltung Ihrer Fragen zu erleichtern sollten Sie sich an unser Supportteam wenden Wir laden Sie ein die Garantie Ihrer SlimBox auf unserer Website unter der folgenden Adresse zu registrieren http garantie storex eu Sollte das Produkt defekt sein wenden Sie sich für eine Garantiereparatur der SlimBox bitte an Ihren Händler oder senden Sie Ihre Anfrage per E M...

Страница 87: ...emotely to the customer s computer in order to resolve installation issues pertaining to a STOREX product Hallo Ich kann meine externe Festplatte nicht installieren Die Benutzung der STORwebEX Plattform ermöglicht den Hotline Technikern die Fernverbindung mit dem Computer des Kunden um Installationsprobleme bezüglich eines STOREX Produkts zu beheben ...

Страница 88: ...SlimBox P 88 132 ...

Страница 89: ...SlimBox P 89 132 GUIDA RAPIDA PER L INSTALLAZIONE S S S SLIM LIM LIM LIMB B B BOX OX OX OX ...

Страница 90: ...SlimBox P 90 132 ...

Страница 91: ...nte il funzionamento la superficie del prodotto produce calore di conseguenza posizionare il prodotto su una superficie piana e rigida e evitare di coprirlo o di posizionare alcunché sotto di esso ALIMENTAZIONE ELETTRICA DEL PRODOTTO Se pensate di non usare il prodotto per un lungo periodo di tempo o si verifica una tempesta scollegate il prodotto dalla presa di corrente impugnando la spina non ti...

Страница 92: ...ibili SICUREZZA AMBIENTE Il vostro prodotto STOREX è stato testato in laboratorio segue le linee guida europee corrispondenti all etichetta CE in vigore al momento del lancio I componenti del vostro prodotto STOREX sono tracciabili ciò dimostra che il prodotto rispetta le linee guida ambientali RoHS in vigore al momento del lancio del prodotto Quando il prodotto giunge al termine del suo periodo d...

Страница 93: ...O POSTERIORE 95 DETTAGLI DEL TELECOMANDO 96 COLLEGARE IL GATEWAY SLIMBOX ALLA TV 98 COLLEGARE UNA PERIFERICA AL VOSTRO SLIMBOX 99 LETTURA DI UN FILE 100 LETTURA DA SCHEDA DI MEMORIA 101 BARRA SCORCIATOIE 102 IMPOSTAZIONI DI SLIMBOX 103 RETE SENZA FILI WIFI 104 TERMINI DI GARANZIA 107 SITO INTERNET STOREX 108 REGISTRAZIONE DELLA GARANZIA 108 ...

Страница 94: ...MC in alta definizione sul vostro SlimBox Collegato alla rete il gateway SlimBox permette di visualizzare i vostri contenuti multimediali in alta definizione CARATTERISTICHE PRINCIPALI Connessioni USB Host x2 e lettore schede SD MMC Connessioni video Composito e HDMI Connessioni audio Ottica e Coassiale Alimentazione elettrica INGRESSO 100V 240V 50 60Hz 0 6A USCITA 12 0V 2000mA Formati supportati ...

Страница 95: ...thernet da SlimBox al router 4 COASSIALE Collegamento di cavo coassiale da SlimBox all amplificatore audio 5 AV TV Collegamento di SlimBox alla TV tramite il cavo AV in dotazione 6 HDMI Collegamento di cavo HDMI da SlimBox alla TV 7 USB HOST Collegamento di periferiche USB penna USB disco rigido esterno o USB WiFi LATO 1 SD MMC Collegamento di scheda di memoria SD o MMC 2 USB HOST Collegamento di ...

Страница 96: ...SlimBox P 96 132 DETTAGLI DEL TELECOMANDO TELECOMANDO REALE NUMERAZIONE TASTI ...

Страница 97: ...nte di selezionare una traccia audio 13 SOTTOTITOLO Permette all utente di visualizzare la finestra di modifica sottotitoli 14 COPIA Permette all utente di attivare l opzione COPIA 15 PREFERENZE Permette all utente di accedere direttamente alla pagina di impostazione 16 MEDIA Permette all utente di modificare la periferica di lettura 17 RIPETI Video e Musica Ripete il file corrente o ripete tutti ...

Страница 98: ...egata la TV 2 Collegare un estremità del cavo HDMI sul retro del prodotto e l altra sul retro della TV vedi diagramma sovrastante di norma verrete guidati da un diagramma AV1 AV2 EXT1 EXT2 una volta collegata la TV 3 Collegare l alimentatore di corrente a SlimBox e posizionare l interruttore sotto il prodotto su ON 4 Premere il tasto Standby sul telecomando 5 Il menu principale compare entro pochi...

Страница 99: ... un disco rigido USB direttamente al gateway SlimBox esplorarne i contenuti e leggere i contenuti multimediali immagazzinati 1 Selezionare una delle icone a seconda del tipo di file che desiderate visualizzare Video Audio Foto o Testo 2 Selezionare la periferica desiderata e premere ENTER selezionare il file che si desidera visualizzare e premere ENTER ...

Страница 100: ... Per utilizzare il telecomando si prega di far riferimento ai dettagli del telecomando PAGINA PRINCIPALE 1 Selezionare le cartelle e i file con i tasti direzione e confermare la selezione premendo ENTER 2 Premere il tasto Per visualizzare la seguente barra scorciatoie Verranno mostrate le seguenti scorciatoie nel seguente ordine 1 Precedente 2 Pausa 3 Rotazione 4 Zoom 5 Musica di sottofondo 6 Visu...

Страница 101: ...mento fare riferimento a dettagli del prodotto 2 Premere il tasto per cambiare la periferica selezionata Ogni volta che si preme il tasto si passerà ad un altra periferica ed essa verrà visualizzata in blu 3 Selezionare le cartelle e i file con i tasti direzione e confermare la selezione premendo ENTER ...

Страница 102: ...IDEO 1 Precedente 2 Riavvolgi 3 Play Pausa 4 Sottotitoli permette all utente di visualizzare o cambiare i sottotitoli su schermo 5 Audio permette all utente di cambiare la traccia audio 6 Zoom 7 Avanti Veloce 8 Successivo 2 MUSICA 1 Precedente 2 Riavvolgi 3 Play Pausa 4 Stop 5 Riproduzione sequenziale o casuale 6 Ripeti tutti ripeti cartella o ripeti uno 7 Avanti Veloce 8 Successivo ...

Страница 103: ...o per nascondere la barra scorciatoie IMPOSTAZIONI DI SLIMBOX In questa pagina è possibile operare su svariate regolazioni incluse la lingua e la risoluzione dello schermo 1 Premere il tasto SETUP sul telecomando per entrare nel menu impostazioni 2 Utilizzare i tasti direzione per selezionare le impostazioni e premere ENTER In questa pagina è possibile selezionare la lingua In questa pagina è poss...

Страница 104: ...w e storex com per l acquisto di una chiavetta WiFi compatibile 2 Collegare la chiavetta USB WiFi opzionale a una delle porte USB HOST Nota La rete senza fili WiFi è disponibile solamente se la chiavetta USB WiFi è collegata all unità e il vostro router WiFi è acceso e operativo 3 Premere il tasto selezionare Network e Auto wireless setup premendo ENTER ...

Страница 105: ...5 Selezionare la vostra rete WiFi e premere ENTER 6 Digitare la propria parola chiave a seconda delle impostazioni di sicurezza in questo esempio WEP con la tastiera digitale virtuale Premere ENTER per confermare 7 Dopo aver inserito la parola chiave selezionare CONFIRM e premere ENTER ...

Страница 106: ...e NOTA o Si raccomanda di impostare la rete dopo aver collegato la chiavetta USB WiFi a SlimBox o Si prega di assicurarsi che l antivirus o il firewall non stiano bloccando l accesso alla rete dell unità Potrebbe verificarsi una temporanea interruzione dei contenuti AV trasmessi via rete WiFi a causa della velocità della rete della capacità di ingresso o di file AV inclusi quelli ad alta definizio...

Страница 107: ...ente calore o umidità eccessivi cali di corrente o installazione disinstallazione scorretta di SlimBox Unico obbligo contrattuale di STOREX è la riparazione o la sostituzione del prodotto difettoso STOREX non è responsabile di perdite di dati o delle conseguenze nate dall operatività difettosa o dalla rottura del prodotto In qualsiasi condizione la responsabilità monetaria di STOREX non può essere...

Страница 108: ...frontate REGISTRAZIONE DELLA GARANZIA Per facilitare la gestione del vostro problema se doveste contattare il nostro servizio di supporto vi invitiamo a registrare la garanzia del vostro SlimBox sul nostro sito al seguente indirizzo http garantie storex eu Se il prodotto dovesse cessare di funzionare si prega di contattare il vostro rivenditore per riparare il vostro SlimBox in garanzia o inviare ...

Страница 109: ...re il mio disco rigido esterno Gestione remota Utilizzare la piattaforma STORwebEX permette ai tecnici del servizio telefonico di collegarsi via remoto al computer dell utente per poter risolvere problemi di installazione legati a prodotti STOREX ...

Страница 110: ...SlimBox P 110 132 ...

Страница 111: ...SlimBox P 111 132 GUIA DE INSTALAÇÃO RÁPIDA S S S SLIM LIM LIM LIMB B B BOX OX OX OX ...

Страница 112: ...SlimBox P 112 132 ...

Страница 113: ...sar de novo Durante o funcionamento a superfície do produto aquece consequentemente coloque o produto numa superfície rija e plana e evite cobri lo ou colocar alguma coisa sobre o mesmo ALIMENTAÇÃO DO PRODUTO Caso não pense usar o produto durante um período longo ou durante uma trovoada desligue a ficha do dispositivo da tomada de parede puxando pela própria fixa e não pelo cabo O adaptador de pot...

Страница 114: ...URANÇA AMBIENTE O seu produto STOREX foi testado em laboratório cumpre todas as linhas de orientação Europeias correspondente ao rótulo CE em vigor na altura do seu lançamento As componentes do seu produto STOREX estão sinalizadas isto demonstra o cumprimento do produto nas linhas de orientação ambientais RoHS em vigor na altura do seu lançamento Uma vez que o produto termine o seu ciclo de vida n...

Страница 115: ...EL POSTERIOR 117 LATERAL 117 DETALHES DO CONTROLO REMOTO 118 LIGAÇÃO DA GATEWAY SLIMBOX À TV 120 LIGAÇÃO DE UM PERIFÉRICO À SUA SLIMBOX 121 LEITURA DE UM FICHEIRO 122 LEITURA DE UM CARTÃO DE MEMÓRIA 123 BARRA DE ATALHOS 124 DEFINIÇÕES DA SLIMBOX 125 REDE SEM FIOS WIFI 126 TERMOS DE GARANTIA 129 PÁGINA STOREX 130 REGISTO DA GARANTIA 130 ...

Страница 116: ... de memória SD MMC em alta definição na sua SlimBox Ligado à rede a gateway SlimBox irá permitir lhe visualizar o seu conteúdo multimédia em alta definição CARACTERÍSTICAS PRINCIPAIS Ligações USB x2 e leitor de cartões SD MMC Ligações vídeo Composto e HDMI Ligações áudio Óptica e coaxial ENTRADA de alimentação 100V 240V 50 60Hz 0 6A SAÍDA 12 0V 2000mA Formatos suportados Vídeo Avi Rmvb Ts Vob Mkv ...

Страница 117: ...limBox para o seu router 4 COAXIAL Para ligar a um cabo coaxial da sua SlimBox para o seu amplificador 5 AV TV Para ligar a sua SlimBox à sua TV com o cabo AV fornecido 6 HDMI Para ligar um cabo HDMI da sua SlimBox para a sua TV 7 ENTRADA USB Para ligar um periférico USB pen USB disco rígido externo ou pen USB WiFi LATERAL 1 SD MMC Para ligar a um cartão de memória SD ou MMC 2 ENTRADA USB Para lig...

Страница 118: ...SlimBox P 118 132 DETALHES DO CONTROLO REMOTO CONTROLO REMOTO REAL NUMERAÇÃO DO TECLADO ...

Страница 119: ...ra 12 AUDIO Permite ao utilizador seleccionar uma faixa áudio 13 SUBTITLE Permite ao utilizador mostrar a janela de modificação de legendas 14 COPY Permite ao utilizador activar a opção COPIA 15 SETUP Permite aaceder à página de configuração 16 DEVICE Permite ao utilizador modificar o periférico de leitura 17 REPEAT Vídeo e Música Repete o ficheiro actual ou repete todos os ficheiros no directório...

Страница 120: ... 2 Ligue uma ponta do seu cabo HDMI atrás do produto e outra ponta à saída da TV consulte o diagrama acima normalmente o diagrama irá conduzi lo AV1 AV2 EXT1 EXT2 uma vez ligado à TV 3 Ligue o adaptador de potência à SlimBox e ligue o comutador por baixo do produto para LIGADO 4 Pressione a tecla Standby do seu controlo remoto 5 Aparece o menu da página inicial após alguns segundos Vista da trasei...

Страница 121: ...de armazenamento USB ou um disco rígido USB directamente para a visualizar e ler o conteúdo multimédia aí armazenado 1 Seleccione um dos ícones de acordo com o tipo de ficheiro que deseja visualizar Vídeo Audio Photo ou Texto 2 Seleccione o seu periférico de armazenamento e pressione ENTER seleccione o ficheiro que deseja visualizar e pressione ENTER ...

Страница 122: ...sionando ENTER Para usar o controlo remoto consulte os detalhes do mesmo PÁGINA INICIAL 1 Seleccione os directórios e ficheiros com o teclado direccional e confirme a selecção pressionando ENTER 2 Pressione a tecla para mostrar a seguinte barra de atalhos Ser lhe ão mostrados os seguintes atalhos pela ordem respectiva 1 Anterior 2 Pausa 3 Rotação 4 Ampliar 5 Música de fundo 6 Exibição de imagens 7...

Страница 123: ...gnado consulte detalhes do produto 2 Pressione a tecla para mudar o seu periférico para leitura Cada vez que pressionar a tecla o periférico para leitura irá mudar e será mostrado em azul 3 Seleccione os directórios e ficheiros com o teclado direccional e confirme a selecção pressionando ENTER ...

Страница 124: ...s 1 VIDEO 1 Anterior 2 Recuar 3 Reproduzir Pausa 4 Legendas permite ao utilizador mostrar ou alterar o ecrã de legendas 5 Audio permite ao utilizador alterar a faixa áudio 6 Ampliar 7 Avanço rápido 8 Próximo 2 MUSIC 1 Anterior 2 Recuar 3 Reproduzir Pausa 4 Parar 5 Reprodução sequencial ou aleatória 6 Repetir tudo repetir pasta ou repetir um 7 Avanço rápido 8 Próximo ...

Страница 125: ...ccional e confirme pressionando ENTER 3 Pressione a tecla para ocultar a barra de atalhos DEFINIÇÕES DA SLIMBOX Nesta página pode efectuar vários ajustes incluindo o idioma e a resolução de exibição 1 Pressione a tecla SETUP do controlo remoto para entrar no menu de definições 2 Use o teclado direccional para seleccionar as definições e pressione ENTER Nesta página pode escolher o idioma ...

Страница 126: ...te o endereço http www e storex com para comprar um adaptador WiFi compatível 2 Ligue o adaptador WiFi USB opcional a uma das portas USB Nota A rede sem fios WiFi está apenas disponível se o adaptador WiFi USB estiver ligado à unidade e o seu router WiFi estiver ligado e operacional 3 Pressione a tecla seleccione Rede e Parametros WiFi automatico pressionando em ENTER ...

Страница 127: ...strada 5 Seleccione a sua rede WiFi e pressione ENTER 6 Introduza a sua chave de acordo com as definições de segurança WEP por exemplo com o teclado numérico digital virtual Prima ENTER para confirmar 7 Uma vez introduzida a sua chave seleccione CONFIRMAR e pressione ENTER ...

Страница 128: ...NOTA o Recomendamos que configure a rede depois de ligar correctamente o adaptador WiFi USB à SlimBox o Assegure se de que o antivírus ou a firewall não estão a bloquear o acesso desta unidade à rede Poderá experienciar um corte temporário e um congelamento do conteúdo AV através da rede WiFi devido à velocidade da rede capacidade de entrada ou ficheiros AV incluindo ficheiros HD ...

Страница 129: ...não exaustivos falhas de alimentação ou má instalação desinstalação da SlimBox A única obrigação contratual endossada pela STOREX está relacionada com a reparação e substituição de um produto com defeito Em caso algum deve a STOREX ser considerada responsável pela perda de dados e as suas consequências derivadas por uma falha de funcionamento ou falha de produto Em qualquer caso a STOREX não ficar...

Страница 130: ... REGISTO DA GARANTIA Para facilitar a gestão da sua questão deverá contactar a nossa equipa de apoio convidamo lo a registar a sua garantia SlimBox na nossa página no endereço seguinte http garantie storex eu Caso experiencie alguma falha de produto contacte por favor o seu vendedor para reparar a sua SlimBox em garantia ou envie o seu pedido por email para o endereço seguinte support storex eu ou...

Страница 131: ...r o meu disco rígido externo Manuseamento remoto A utilização da plataforma STORwebEX permite aos técnicos da linha de assistência ligar remotamente ao computador do cliente para resolver questões relacionadas com segurança a um produto STOREX ...

Страница 132: ... www storex eu STOREX 2010 Toutes les marques citées sont déposées par leurs propriétaires respectifs All mentioned brand names are patented by their respective owners Todas las marcas mencionadas están patentadas por sus respectivos propietarios Alle erwähnten Markennamen wurden von den jeweiligen Eigentümern geschützt Tutti i marchi menzionati sono registrati dai rispettivi proprietari Todas as ...

Отзывы: