5. Locating Your HA3969U
Warning
Hard drive data will be erased!
Default management port address: 10.0.0.2 (Controller A) / 10.0.0.3 (Controller B)
Default username: admin Default password: admin
Turning off Windows firewall:
To turn off Wind
ows firewall, please refer to the instructions below.
Windows 8 / 7 / Vista
:
Click on the Start
button > Control Panel > Security > Windows Firewall > turn off Firewall.
You may be prompted for an administrator password or confirmation, type the password or
click OK to confirm.
Windows XP:
Click on the
Start butt
on > Control Panel > Windows Firewall > turn off Firewall.
Highlight your HA3969U device and proceed to the next step.
5-6.
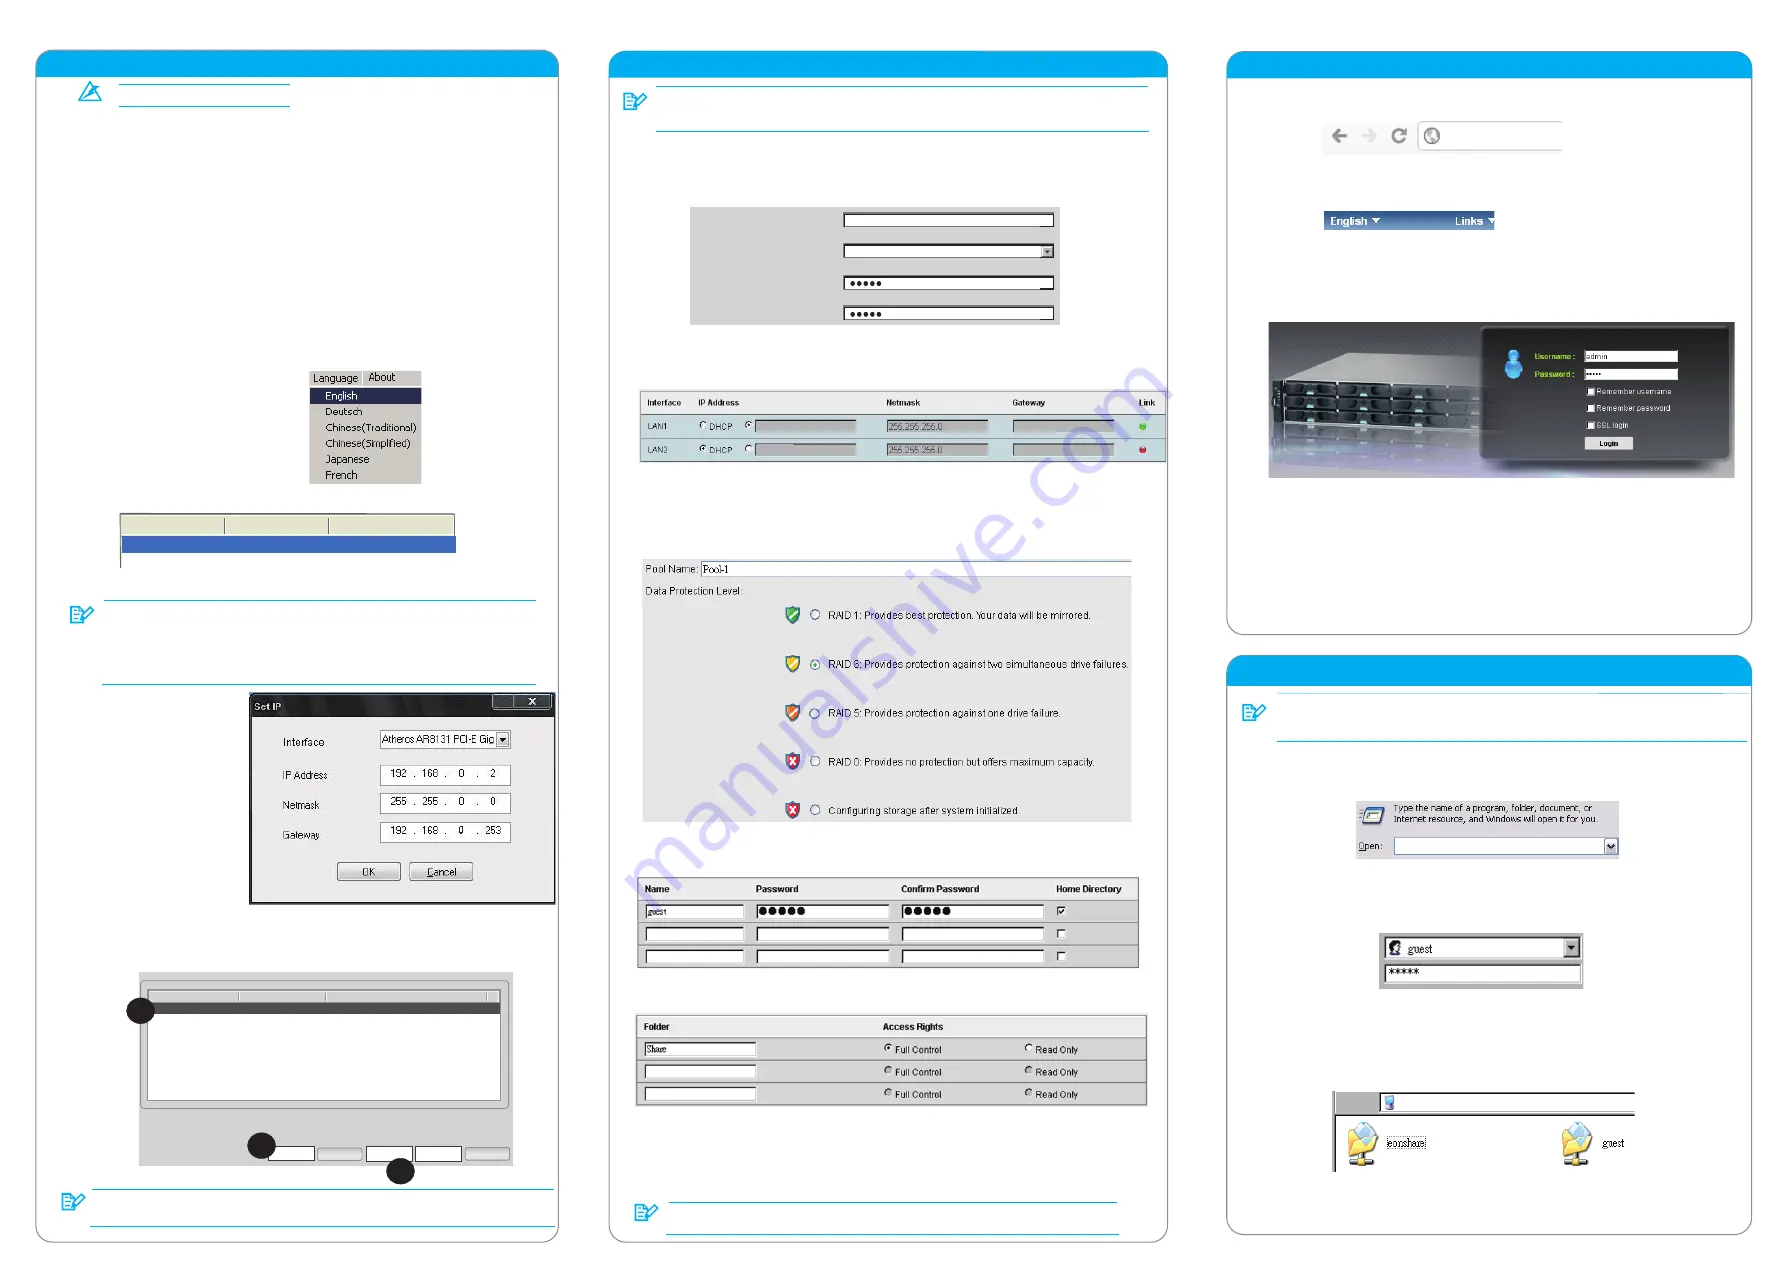
When the “Set IP” button lights up,
click on it and HA3969U will
automatically assign an IP
address for your HA3969U. Wait for
an IP settings window to appear.
You may be prompted for a
password. If so, please enter
“admin” and click OK.
Miscellaneous
SELECT
\\192.168.0.2
\\192.168.0.2
The web interface provides file upload and download functions. Should the user want to
access upload and download functions using the Windows File Manager, please refer to
the following procedure.
Approximately 5 minutes after pressing the power button (if the user is near the system,
a beep will sound after 2 minutes and two beeps will sound 3 minutes thereafter) double
click on HA3969U.exe found in the “fscommand" folder on the CD
.
Select your preferred language.
5-1.
5-2.
5-3.
5-4.
5-5.
5-7.
Refresh the existing browser or open a new browser and enter the IP address of
your HA3969U system.
7. Using the Web Interface
\\192.168.0.2
For troubleshooting, advance settings or other initialization methods, please refer
to the documents on the CD-ROM.
Enter the administrator login account and click Login.
Username: admin
Password: password set during “6. Configuring Your HA3969U” (default: admin)
Select the preferred language.
7-1.
7-2.
7-3.
Note
6. Configuring Your HA3969U
Host Name
Timezone
Password
Confirm Password
HA3969U
(GMT-05:00)Canada/Toronto
Configure System Settings
Hos
t
Name:
Enter a unique name for your HA3969U system
Timez
one:
Select your local timezone.
Passwo
rd: E
nter a new password for the admin account (default password: admin).
Configure the Network Interface
Unless you want to change the IP address, leave the current settings and click the Next button.
Interfaces may vary depending on your system.
Create a Storage Pool
Enter pool name, select a RAID configuration and click the Next button.
Redundant systems have Controller A and B pool creation options. If Controller A is set to:
(1) Configure storage after initialization > This selection will also apply to Controller B.
(2) Create a storage pool > Controller B can choose to or not to create pool at this stage.
Add Users
Add at least one user account for accessing the new storage pool and click the Next button.
(The default user account is username: guest, password: guest.)
Share
Change the default shared folder settings or add a new folder and click the Next button.
Summary
Check the configuration summary. Click Back to modify the parameters or Apply to complete
the initialization process. Press OK to initialize or reboot when prompted!
Upon reboot, a beep will sound to indicate successful startup and when you hear two beeps,
you may log into and use your HA3969U system (process takes approximately 10 minutes).
Remember to turn back on your Windows and antivirus’ firewall. Setting can be
found in the same location as the turn-off option.
6-1.
6-2.
6-3.
6-4.
6-5.
6-6.
192.168.0.2
10.0.0.3
For dual controller systems, additional settings may appear for Controller B. You may
enter Controller B’s settings during “6. Configuring Your HA3969U” or choose to enter
them after the system has been initialized using Controller A.
Note
Note
Note
If no HA3969U device was found
• Make sure your PC and HA3969U are connected to the same switch / router.
• Turn off the antivirus’ firewall (please refer to its manual) then close
HA3969U and start from step 5-2 again.
• If
y
ou are still unable to detect your HA3969U system, please refer to the setup
instructions in the User Manual on the CD.
Note
Name
Model
IP Address
Storageflex
HA3969U
10.0.0.2
Wait for 5 seconds and
a. Click the “Find” butto
n
on your HA3969U.
b. Highlight the HA3969U sy
st
em that matches
the IP address set previously.
c. Click the “Connect” butt
on
.
Storageflex
HA3969U
192.168.0.2
Connect
Set IP
Name
Model
IP Address
Close
Find
a
b
c
Detail
Press both the Windows key and r key (W r) to bring up the Run Command
interface. Enter “\\IP address” (of your HA3969U system) and click OK.
Enter the user account information that was created during "6. Configuring Your
HA3969U” and click OK. Here the default Guest user is used as an example.
Username: guest
Password: guest
You should be able to access shared folders in your HA3969U system. Copy and
paste data to and from your HA3969U as if you were using Windows File Manager.
Wait for your HA3969U system to appear in the List.


