background image

Initial Configuration 

17

shown in the console and, after some time, the Engine 

Configuration Wizard starts.

To select the configuration method

1.

Do one of the following:

To import a saved configuration, highlight 

Import

 using the arrow 

keys and press E

NTER

.

To skip the import, highlight 

Next

 and press E

NTER

.

2.

If you selected the Import option, select the configuration file.

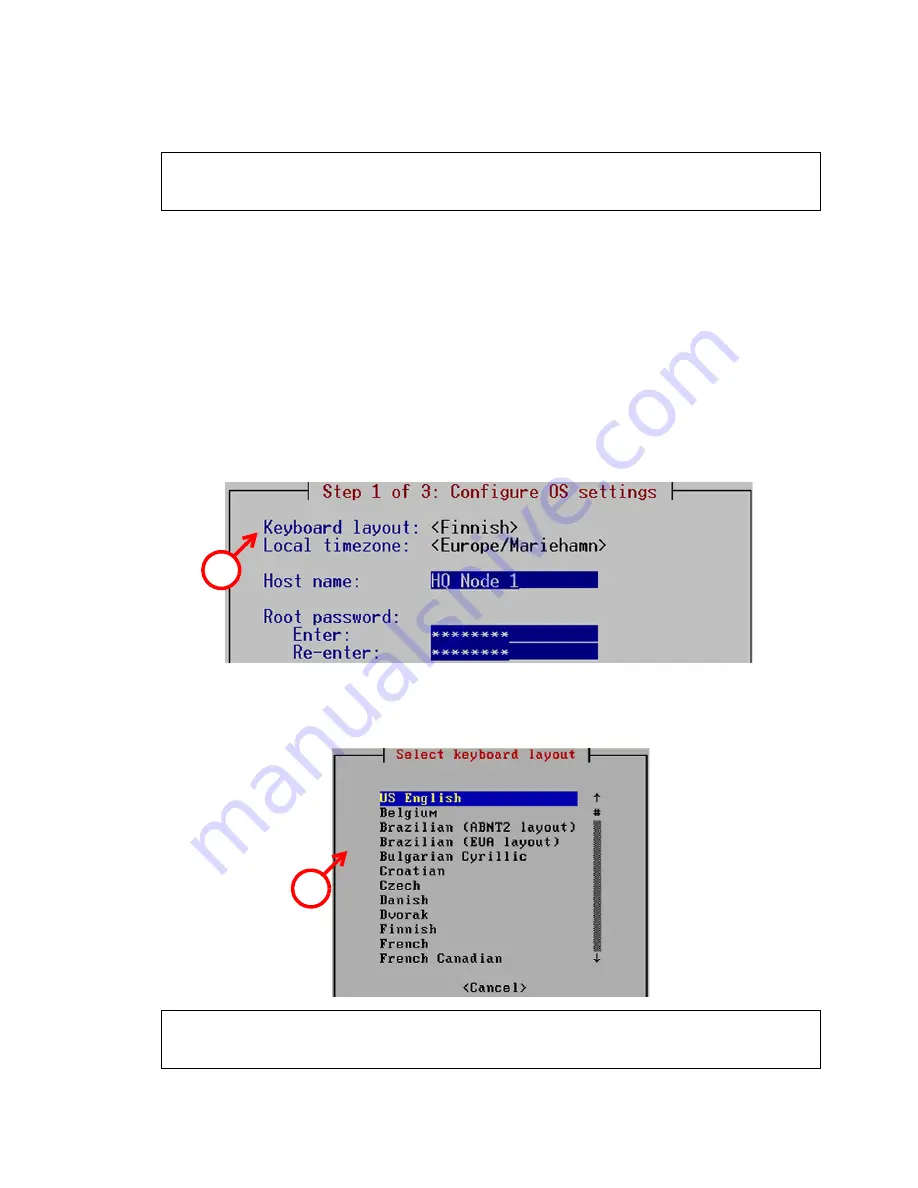
To set the keyboard layout

1.

Highlight the entry field for 

Keyboard Layout

 using the arrow keys 

and press E

NTER

. The Select Keyboard Layout dialog opens.

2.

Highlight the correct layout and press E

NTER

.

Tip: 

Type in the first letter to move forward more quickly in the list of keyboard 

layouts.

Note – 

You can (re)start the Engine Configuration Wizard at any time 

using the 

sg-reconfigure

 command on the engine command line.

Note – 

If the desired keyboard layout is not available, use the best-

matching available layout, or select US_English.

1

2

Содержание FW-105 series

Страница 1: ...Appliance Installation Guide FW 105 Series 8 8 71...

Страница 2: ...nce services for the products described in these materials are provided pursuant to the general terms for support and maintenance services and the related service description which can be found at the...

Страница 3: ...esoft website Contents Installation Procedure 4 Product Documentation 5 Safety Precautions 5 Unpacking the Appliance 7 Front Panel 8 Back Panel 10 Connecting Antennas and Cables 11 Initial Configurati...

Страница 4: ...ting the Antennas page 11 4 Connect the cables to the appliance see Connecting the Cables page 11 The appliance starts up and the initial configuration is transferred to the appliance If the initial c...

Страница 5: ...that may be associated with your appliance Electrical Safety Precautions Basic electrical safety precautions should be followed to protect yourself from harm and the appliance from damage Be aware of...

Страница 6: ...tional restrictions and requirements for authorization may apply to wireless devices Check the latest status of national regulations with the local authorities Operating Precautions Care must be taken...

Страница 7: ...in any way If the appliance itself shows damage file a damage claim with the carrier who delivered it Confirm that the Stonesoft anti tamper tape on the appliance is intact Caution Do not change the...

Страница 8: ...different parts of the system The front panel indicator lights are explained below On some FW 105 Series appliances the Power indicator is on the back panel See Back Panel page 10 Power connector Lef...

Страница 9: ...ion ACT Green A modem connection is up DSL Green A cable is plugged in to the DSL port PWR Green Power is being supplied to the system s power supply unit Table 2 Port Indicators Indicator Status Expl...

Страница 10: ...on the back panel on some FW 105 Series appliances Table 3 Power Indicator Indicator Status Explanation PWR Green Power is being supplied to the system s power supply unit Some models Power indicator...

Страница 11: ...rmly to the appliance 3 Orient the antennas Connecting the Cables To connect network cables 1 Connect network cables to the Ethernet ports The Ethernet ports are numbered 2 0 from left to right You ar...

Страница 12: ...onnect the power cable to the power connector on the front of the appliance 2 Plug the power cord into a grounded high quality power strip that offers protection from electrical noise and power surges...

Страница 13: ...are required before you can configure the appliance 1 The Firewall element must be defined in the Management Center 2 Engine specific configuration information must be available from the Management S...

Страница 14: ...e see Connecting Antennas and Cables page 11 The appliance automatically tries to contact the Stonesoft Installation Server If the contact succeeds the appliance downloads the initial configuration fr...

Страница 15: ...must match the interface IDs and other interface settings in the Management Client If attempts to connect to the Installation Server through the 3G modem DSL port and Ethernet 0 port have failed the a...

Страница 16: ...u can check for the reason in the log sg_autoconfig log written on the USB stick If you see a connection refused error message ensure that the Management Server IP address is reachable from the engine...

Страница 17: ...onfiguration file To set the keyboard layout 1 Highlight the entry field for Keyboard Layout using the arrow keys and press ENTER The Select Keyboard Layout dialog opens 2 Highlight the correct layout...

Страница 18: ...t the rest of the OS settings 1 Type in the name of the firewall 2 Type in the password for the user root This is the only account for engine command line access Note The timezone setting affects only...

Страница 19: ...the Media column for the physical interfaces and optionally the wireless interface and press ENTER to match the speed duplex settings to those used in each network Make sure that the speed duplex sett...

Страница 20: ...on in the Prepare for Management Contact window is filled in This task has two parts First you activate an initial configuration on the firewall The initial configuration contains the information that...

Страница 21: ...policy that allows only administration related connections and blocks everything else In the second part of the configuration you define the information needed for establishing a trust relationship b...

Страница 22: ...hat the one time password is correct and the Management Server IP address is reachable from the node Save a new initial configuration if you are unsure about the password If the engine is unable to co...

Страница 23: ...No Policy Installed and the connection state is Connected indicating that the Management Server can connect to the node If a firewall policy was included in the initial configuration the policy is au...

Страница 24: ...the front or at the back 4 Attach the bracket to the bottom of the appliance with the two screws included in the delivery 5 Attach the bracket to a wall with two screws through the larger holes in the...

Страница 25: ...status is switched between the partitions when the upgrade is ready to be activated If the appliance does not start up with the new version it automatically switches to the previous configuration at t...

Страница 26: ...ns 4 Select System Restore Options and press Enter 5 Type 1 and press Enter to clear the settings A confirmation prompt is shown 6 Type YES and press Enter to perform the reset If you decide to cancel...

Страница 27: ...r using the 3G modem fails and a cable is plugged in to the DSL port the appliance tries to connect to the Installation Server using predefined ADSL settings It tries all the predefined settings until...

Страница 28: ...to 2004 108 EC FCC Marking The following conformity mark is added to the appliance in accordance with FCC Part 15 regulations Compliance Information This section contains information on the FW 105 mod...

Страница 29: ...nd is subject to the regulatory approval alone with the resided devices The requirements for any country or area may evolve We recommend that you check the latest status of national requirements for 2...

Страница 30: ...non overlapping channels 36 40 44 48 52 56 60 64 100 104 108 112 116 120 124 128 132 136 140 149 153 157 161 Major European country 802 11b g n 13 1 13 802 11n 19 non overlapping channels 36 40 44 48...

Страница 31: ...9 4075 fax 1 770 668 1131 Copyright 2013 Stonesoft Corporation Stonesoft Appliance Installation Guide This booklet covers the initial installation and configuration tasks specific to your Stonesoft Ap...

Отзывы: