background image

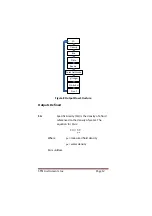
STM Instruments Inc                                                    Page 15 


Chapter 5…Maintenance 

Cleaning 

After testing is complete flush the 

eDrometer

 with distilled 

water or alcohol, then draw out the fluid that remains in the 
sensor with the syringe.  

NOTE:  It is not necessary to completely dry out the sensor 
for storage. If you prefer to completely dry out the sensor, 
this can be done with an “air in a can” product.   Be careful 
to restrain the drain tube when blowing out the sensor with 
compressed air, it may spray fluid. 

NOTE: NEVER USE HIGH 

PRESSURE TO DRY OUT THE SENSOR AS IT MAY DAMAGE 
THE SENSOR. 

Long Term Storage 

If the 

eDrometer

 is not going to be used for more than a 

month it is suggested to remove the battery from the unit. 
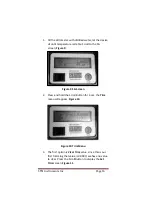
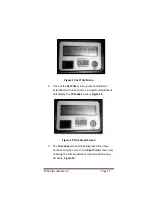
Trimming   

There may be a time when the unit may need to have the 
output trimmed (remove output deviations). To determine if 
the eDrometer needs to be trimmed fill the unit with 
distilled water at room temperature, let the unit stabilize, 
the SG value should read 1.0000±.0015, if the SG value is 
outside the spec value, ±.0015 perform a trim. 

Note:

 The 

unit can be trimmed on deviations as small as ±.0001; we do 
not recommend trimming with deviations less than ±.0005. 
Once it has been determined a trim is required follow the 
following procedure: 
 

Содержание eDrometer

Страница 1: ...s Manual NOTE READ CHAPTER 3 METER CHECK BEFORE TAKING MEASUREMENTS Nov 2015 Rev 13 11 15 2013 STM Instruments Inc All rights reserved Printed in U S A All product names are trademarks of their respe...

Страница 2: ...SELLER S OBLIGATION AND YOUR REMEDY ARE FURTHER LIMITED AS FOLLOWS 30 Day Money Back Refund or Replacement If you are not completely satisfied with the performance of the eDrometer for any reason you...

Страница 3: ...LIABILITY FOR LOSS OF PROFITS ARISING FROM THE SALE OR USE OF THIS PRODUCT SOME STATES IN THE U S AND SOME CANADIAN PROVINCES DO NOT ALLOW THE EXCLUSION OR LIMITATION OF INCIDENTAL OR CONSEQUENTIAL DA...

Страница 4: ...STM Instruments Inc Page iv Notes...

Страница 5: ...ing on the eDrometer 3 Chapter 3 Meter Check 4 Chapter 4 Taking Measurements 5 Filling the eDrometer 5 Filling Non Carbonated Room Temperature Fluids 5 Filling Hot or Cold Fluids 7 Filling Carbonated...

Страница 6: ...STM Instruments Inc Page 3 Cleaning 15 Long Term Storage 15 Trimming 15 Chapter 6 Specifications 21 Chapter 7 Troubleshooting 22 Notes 23...

Страница 7: ...ometer with the battery door or portions of the cover removed or loosened To avoid false readings replace the batteries as soon as the eDrometer display begins to dim Use only a 9 volt battery properl...

Страница 8: ...ox you will find the following x eDrometer Digital Hydrometer x Syringe x 9 Volt Battery x Certificate of Calibration x Operation Manual Refer to Figure 1 to familiarize yourself with your eDrometer 1...

Страница 9: ...compartment The battery should lay flat 6 Insert the tongue of the battery cover 5 into the compartment slot close the cover until the latch engages and secures the battery CAUTION IF THE BATTERY COV...

Страница 10: ...y to turn it on 1 Locate the Power Switch 1 on the front panel press the switch and the Output Display 3 will become active The initial reading will display STM Instruments 2 After a few seconds the d...

Страница 11: ...ture stabilize x The SG reading should be 1 0000 0 0015 If the reading is outside these limits perform a Trim This process is discussed in Chapter 5 Note a Trim can be performed within the 0 0015 limi...

Страница 12: ...ll drain tubes 4 Figure 1 and can be filled from either side Once you have decided which tube is the fill tube place the end of the drain tube in a receptacle e g a cup beaker etc Figure 2 Figure 2 St...

Страница 13: ...into the fill tube and begin to depress the syringe plunger Figure 4 it should take approximately 5 seconds to empty the syringe IMPORTANT After filling the eDrometer leave the syringe attached to the...

Страница 14: ...erature The greater the difference between the fluid temperature and room temperature the quicker the indicated temperature will change during the first few minutes then the rate of change will slow F...

Страница 15: ...han if you were filling at room temperature empty the syringe in 3 5 seconds The reason for filling at a faster rate with hot cold fluids is how the internal components distribute the temperature Wait...

Страница 16: ...may not be optimal Now if the temperature is out of the operating range 5 C 41 F to 35 C 95 F a TOR will flash between the temperatures Figure 7 indicating you are out of the operating temperature ra...

Страница 17: ...nd refill the syringe At this point follow the procedures to fill the eDrometer as described above Re filling the eDrometer There may be times when it is necessary to measure several samples one after...

Страница 18: ...h your next sample and proceed as stated above Viewing Results Once the eDrometer is on and filled with your fluid sample several outputs are available Press the Scroll Button to view the different ou...

Страница 19: ...e Outputs Defined SG Specific Gravity SG is the density of a fluid referenced to the density of water The equation for SG is Where m measured fluid density w water density SG is unitless SG Density Br...

Страница 20: ...scale is an empirically derived scale to measure the density of beer wort in terms of percentage of extract by weight Baume Degrees Baume is a system for measuring the sugar content of grape juice by...

Страница 21: ...gar per liter of fluid Alcohol The Alcohol by volume ABV measurement is only displayed for fluids with a density less than 1 0 and is only used for distilled fluids Proof Another alcohol measure this...

Страница 22: ...Y OUT THE SENSOR AS IT MAY DAMAGE THE SENSOR Long Term Storage If the eDrometer is not going to be used for more than a month it is suggested to remove the battery from the unit Trimming There may be...

Страница 23: ...the SG screen Figure 9 Figure 9 SG Screen 2 Press and hold the Scroll Button for 3 sec the Trim menu will appear Figure 10 Figure 10 Trim Menu 3 The first option is Clear Trim value since this is our...

Страница 24: ...the Scroll Button for 3 seconds a successful adjustment will display the Trim Save screen Figure 12 Figure 12 Trim Saved Screen 5 The Trim Save screen will be displayed for a few seconds and then ret...

Страница 25: ...set press the Scroll Button twice and you will go back to the standard output screen Clearing the Trim Value Return to factory settings To clear the trimmed value and return to the factory settings fo...

Страница 26: ...menu will appear Figure 15 Figure 15 Trim Menu 3 Displayed on the top line of the Trim screen is the amount of trim currently being used press and hold the Scroll Button for 3 seconds at which point...

Страница 27: ...Confirm Trim Cleared 5 Now to return to the normal display press the Scroll button twice NOTE If the fluid in the eDrometer differs by more than 0 05 SG of the calculated value the trim will be rejec...

Страница 28: ...C to 35 C Relative Humidity 0 to 90 0 C to 35 C Battery Type 9v Battery Life 60 hours continuous use Size 4 wide x 6 deep x 8 tall Weight 1 lb Fluid SG Range 0 7 to 1 5 Table 2 Physical Specifications...

Страница 29: ...e not completely filled or air bubbles are in the fluid make sure the fluid is de gassed Make sure the temperature is not high or low Output values are incorrect Fill the eDrometer with room temperatu...

Страница 30: ...STM Instruments Inc Page 23 Notes...

Страница 31: ...STM Instruments Inc Page 24...

Отзывы: