background image

10

MODEL: SWC46 | PRODUCT CODE: 54317 | 08/2016

Installation Cont.                            

•   Suggested ambient temperatures: 

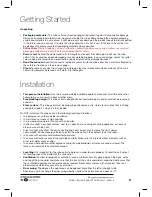
Choose a well ventilated area for the wine cellar with temperatures 

above 16°C and below 32°C. Ambient temperatures above or below this range may affect the 
performance of the unit. 

•   Settling:


Before connecting the wine cellar to the power source, let it stand upright for approximately 

4 hours. 

This will allow any refrigerant gasses that may have been disturbed during the transportation 

process to settle and reduce the possibility of a malfunction in the cooling system from handling during 
transport. 

•   Electrical  connection:

 Plug the wine cellar into a dedicated, properly installed wall outlet. Do not under 

any circumstances cut or remove the third (earth) prong from the power cord. Any questions concerning 
power and/or earthing should be directed toward a licensed electrician or our after sales support centre. 

•   After plugging the wine cellar in, turn the unit on and allow it to cool down for 3–4 hours before placing 

wine bottles or beverages in the appliance.

Instructions                                


First use
•  Powering on: 

Press and hold the POWER button for three seconds to turn the appliance on. 

•   First cooling down:

 When you first switch on the wine cellar, the compressor will run continuously until 

the wine cellar reaches the set temperature. During this period of time, try not to open the door frequently 
or place bottles inside the appliance. After about 3–4 hours, you can start loading the wine cellar. 

•   Odour: 

You may notice an odour when you first switch on the wine cellar. This is due to the parts being 

new and is no cause for concern. The odour will subside as the wine cellar starts to cool. 

IMPORTANT

•   When you use the wine cellar for the first time or restart it after it has been turned off for a long time, there 

could be a few degrees variance between the temperature you select and the one indicated on the LED 
display. This is normal and it is due to the length of activation time. Once the wine cellar has been running 
for a few hours, everything will return back to normal. 

•   When loading several bottles of wine at once, it will take longer for the appliance to cool the individual 

bottles than when adding a bottle at a time. 

•   If the unit is switched off or unplugged, you must allow at least 5 minutes before restarting the wine cellar 

or reconnecting it to your mains supply.

Temperature Control

This wine cellar enables you to store your wine in a stable temperature environment and free from light 
exposure and vibrations. These are most important factors when it comes to storing wine. A stable, 
temperature-appropriate environment will help maintain the quality of your wine and prevent spoilage. 
•   Selecting the right temperature: You can store your wine at the most appropriate serving temperature (see 

the table below). Set the temperature according to the type of wine that is mostly stored in the wine cellar. 

Wine Type

Recommended Storage Temperature

Bordeaux Red

18ºC

Burgundy / Bordeaux Red

16ºC

Port

15ºC

Young Burgundy Red

14ºC

Young Red Wines / Rosé

12ºC

Aged White Wines / Chardonnay

10ºC

Sherry

7–9ºC

Young White Wines

5–7ºC

Содержание SWC46

Страница 1: ...MODEL SWC46 PRODUCT CODE 54317 08 2016 Issue Date 08 2016 IM Version No V1 1 46 Bottle Wine Cellar Model Number SWC46 INSTRUCTION MANUAL...

Страница 2: ...roducts brought to you by STIRLING are manufactured to the highest standards of performance and safety and as part of our philosophy of customer service and satisfaction are backed by our comprehensiv...

Страница 3: ...ome 4 Warranty 5 General Safety Instructions 7 Product Overview 9 Getting Started 9 Installation 10 Instructions 12 Specifications 13 FAQ s and Troubleshooting 14 Other Useful Information 18 Repair an...

Страница 4: ...ll rights and remedies in respect of the product that the consumer has under the Competition and Consumer Act 2010 and similar state and territory laws Our goods come with guarantees that cannot be ex...

Страница 5: ...ngling Secure it at the back of the appliance so no one steps on or places anything on the cord or against it Keep the cord out of reach of children When moving the appliance make sure not to damage t...

Страница 6: ...mpt to alter or modify this wine cellar in any way Repair Do not attempt to repair or replace any part of your wine cellar unless it is specifically recommended in this manual All other servicing shou...

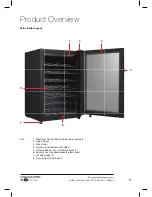
Страница 7: ...duct Overview 5 7 1 2 6 3 4 1 Electronic Control Panel inside top of cabinet 2 Hinge Cover 3 Glass Door 4 Recessed Handle on both sides 5 Chrome Shelves 5 Chrome Basket 1 6 Security Lock centred benea...

Страница 8: ...intervals 2 LED Display Displays the current temperature inside the wine cellar cabinet 3 Light Control Button Press the light control button to turn the interior light ON and OFF 4 Power Control But...

Страница 9: ...anding only and should not be recessed or built in Floor surface This wine cellar must be properly positioned on a dry sturdy level surface that is strong enough to support it when it is fully loaded...

Страница 10: ...ding the wine cellar Odour You may notice an odour when you first switch on the wine cellar This is due to the parts being new and is no cause for concern The odour will subside as the wine cellar sta...

Страница 11: ...n together for approximately 5 seconds 2 The temperature value will change and the F indicator will be illuminated on the control panel Loading the wine cellar Standard bottle capacity Your wine cella...

Страница 12: ...s leave the light off during normal operation Note If the light is not working or needs to be replaced please call our After Sales Support on 1300 11 4357 for further guidance Door Lock Your wine cell...

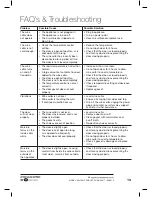
Страница 13: ...ed properly and for any obstructions preventing the door closing properly Check temperature setting and decrease if required Replace gasket Vibrations Wine cellar is not level Wine cellar is touching...

Страница 14: ...et seal clean to keep the unit running efficiently Wash the shelves and the outside of the cabinet with a mild detergent solution Wipe dry with a clean soft cloth Dust or anything else blocking the ve...

Страница 15: ...oper steps to protect the contents Service and Repair Do not attempt to alter or modify this wine cellar in any way Do not attempt to repair or replace any part of the wine cellar unless it is specifi...

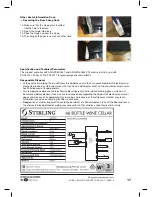
Страница 16: ...all parts you remove from the wine cellar for installation on the other side 1 Remove the hinge cap from the top of the door 2 Unscrew the hinge and place screws in a safe place as they will be used l...

Страница 17: ...with your household rubbish Electrical and electronic products contain substances that can have a detrimental effect on the environment and human health if disposed of inappropriately This refrigerat...

Страница 18: ...ay be lost We recommend you save this data elsewhere prior to sending the product for repair You should also be aware that rather than repairing goods we may replace them with refurbished goods of the...

Страница 19: ...19 MODEL SWC46 PRODUCT CODE 54317 08 2016...

Страница 20: ...20 MODEL SWC46 PRODUCT CODE 54317 08 2016...

Отзывы: