background image

10

AFTER SALES SUPPORT

1300 886 649

[email protected]

AUS

MODEL: GSTT1100   PRODUCT CODE:  705577   07/2021

1300 112 534

NOTE: 

Due to continued product improvement, images and illustrations in this manual 

may vary slightly from the product purchased. All images in this manual are for reference 

purposes only. Parts are not necessarily pictured to scale.

Product Overview (Cont.)

Individual parts and accessories 

(Fig. 2)

17  Poles 
18  Pressure injector
19  Ironing board
20  Main steamer unit with water tank 

(the steam supply hose with steam head and 
the power cord are attached to this unit but 
these parts are not shown here)

21  Brush attachment
22  Steam defender attachment
23  Steam head rest
24  Hanger
25  Base
26  Measuring beaker
Shoulder strap (not pictured)

17

18

19

20

21

22

24

25

26

23

Содержание 705577

Страница 1: ...Garment Steamer with Ironing Board Model Number GSTT1100 INSTRUCTION MANUAL po org MODEL GSTT1100 PRODUCT CODE 705577 07 2021 AFTER SALES SUPPORT info tem AUS 1300 112 534 ...

Страница 2: ...ions on choosing to buy a STIRLING product All products brought to you by STIRLING are manufactured to the highest standards of performance and safety and as part of our philosophy of customer service and satisfaction are backed by our comprehensive 1 Year Warranty We hope you will enjoy using your purchase for many years to come ...

Страница 3: ...RODUCT CODE 705577 07 2021 1300 112 534 Contents 02 Welcome 04 Warranty Details 05 General Safety Instructions 09 Product Overview 11 Getting Started 17 Instructions 23 FAQs Troubleshooting Guide 24 Other Useful Information 27 Repair and Refurbished Goods or Parts Notice ...

Страница 4: ...on to all rights and remedies in respect of the product that the consumer has under the Competition and Consumer Act 2010 and similar state and territory laws Our goods come with guarantees that cannot be excluded under the Australian Consumer Law You are entitled to a replacement or refund for a major failure and to compensation for any other reasonably foreseeable loss or damage You are also ent...

Страница 5: ...pose the electrical connections to water or other liquid Should liquids enter the housing unplug the appliance from the power socket immediately and arrange for it to be repaired by a qualified technician Protect from moisture Do not use the appliance outdoors or expose it to humidity Never use the appliance adjacent to water contained in a bath shower wash basin or other vessel The proximity of m...

Страница 6: ...and only use it as described in this manual All other use is deemed improper use Common sense These instructions are not intended to cover every possible condition and situation As with any electrical household appliance common sense and caution are therefore always recommended when assembling operating and maintaining the unit Assembly and accessories Ensure that all parts are correctly assembled...

Страница 7: ...ve or oven mitt before attempting to install or remove the brush during use WARNING Do not steam clothes that are being worn Never use the garment steamer on clothing that you are or someone else is wearing Storage Put the appliance away after every use to prevent anyone tripping over it Before storage let the appliance cool down for at least 30 minutes Store the appliance in a cool dry indoor are...

Страница 8: ...fire electric shock and or injury We accept no responsibility for any eventual injury or damages caused by improper use or inappropriate handling or by any other noncompliance with the instructions in this manual CAUTION Always check the care instructions Should the care instructions in an item to be steamed forbid ironing do not use the garment steamer on it or you could cause permanent damage to...

Страница 9: ...4 2 5 6 8 9 7 10 11 12 13 14 15 16 1 Hanger 2 Twin telescopic poles 3 Iron rest lock 4 Steam head 5 Steam switch 6 Insulated steam supply hose 7 Horizontal metal rod 8 Ironing board fixing lock 9 Wheels 10 Base 11 Ironing board leg support 12 Platform 13 Power switch 14 Water tank 15 Main steamer unit 16 Ironing board Documentation not shown Instruction manual Quick start guide Warranty certificat...

Страница 10: ...purposes only Parts are not necessarily pictured to scale Product Overview Cont Individual parts and accessories Fig 2 17 Poles 18 Pressure injector 19 Ironing board 20 Main steamer unit with water tank the steam supply hose with steam head and the power cord are attached to this unit but these parts are not shown here 21 Brush attachment 22 Steam defender attachment 23 Steam head rest 24 Hanger 2...

Страница 11: ...h and disposed of safely Inspection Unwind and straighten the power cord Inspect the cord and plug for damage or wear before each use Do not use the appliance if the appliance or its cord has been damaged or is not working properly In case of damage please contact our after sales support centre for advice Instructions Make sure you have read and understood all instructions and warnings in this man...

Страница 12: ...on the base as pictured Fig 4 Make sure the board and the base wheels are facing the same position Tighten the locks 5 To attach the main steamer unit with water tank to the platform rest it securely on the lug wide metal hook Fig 7 6 Put the steam hose through the guide s as pictured Fig 8 3 Fix the hanger to the poles Fig 5 Loosen the pole locks one at a time and extend both parts to the appropr...

Страница 13: ... brush or steam defender to the soleplate of the steam head push the respective part into place as pictured Fig 9 2 The main steamer unit with water tank may also be used without the upright board structure A shoulder strap is supplied for carrying it conveniently thus allowing more freedom of movement To attach the belt insert the buckles into the slots at the sides of the unit slightly pushing t...

Страница 14: ... Started Cont 2 When folding slightly lift the board fold the leg then fold the board with an upright force Fig 12 The plastic clips at the side of the poles must clip onto the horizontal metal rod 3 Lean the board 15 to let the wheels contact the floor then roll it carefully to move the appliance Fig 13 Fig 12 Fig 13 ...

Страница 15: ...port To unfold the ironing board pull it gently then extend the front leg by pushing it out with your foot to the maximum level see Fig 11 page 13 Assembling the appliance for vertical garment steaming Pull out the telescopic poles to the desired height then fasten the locks securely Hang the garment on the garment hanger at the top of the poles Attach the main steamer unit to the platform with wa...

Страница 16: ...ter every longer period 5 6 months of non use To adjust the water pressure proceed as follows 1 Assemble the appliance and position it on a secure level surface 2 Fill the water tank as described on page 17 Do not close the tank leave it open 3 Instead of the water tank cap install the pressure injector in the opening of the water tank Fig 14 4 Plug in the appliance switch the power on at the outl...

Страница 17: ... of electric shock NOTE To extend the product life we recommend using purified water distilled demineralised or cold boiled water Tap water may be used if it is rated very soft in your locality If you are unsure about the water hardness level in your area please inquire at your local water services provider Fig 17 Fig 18 Using the appliance 1 Filling the water tank Before resting the main steamer ...

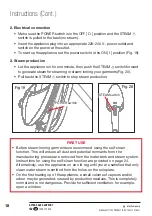
Страница 18: ...ing your garments Fig 20 Pull back the STEAM switch to stop steam production FIRST USE Before steam ironing garments we recommend using the self clean function This will ensure all dust and potential remnants from the manufacturing process are removed from the water tank and steam system Instructions for using the self clean function are provided on page 24 Alternatively use the appliance on an ol...

Страница 19: ...mp or create small wet spots Always leave the steamed garment on a clothes hanger to cool down and fully dry before wearing it or putting it away 4 With one hand pull the garment flat then steam it from top to bottom CAUTION The steam is hot take utmost care to avoid scalding 5 Hold the steam head upright and direct the steam towards the creases in the fabric 6 To remove stubborn creases from fabr...

Страница 20: ...steam will be emitted continuously and you may start ironing Guide the iron smoothly over the garment to remove creases and wrinkles Fig 23 5 To steam iron keep the switch in the pushed forward steam position To dry iron pull the switch back to the dry ironing position The steam emission will stop To add a burst of steam when dry ironing push the switch forward briefly when the temperature light i...

Страница 21: ...e appliance is switched off disconnected from the power supply and has cooled down for safe handling To attach an accessory to the steam head hold the accessory at the soleplate of the steam head and push it firmly onto the front part of the soleplate To use the steam head with an accessory hold the steam head and guide it slowly over the garment with the brush bristles or the steam defender surfa...

Страница 22: ...shings in situ please refer to page 13 for strap attachment instructions WARNING Please ensure that everyone who is using this appliance is well aware of the operating methods Improper operation may result in hot water and scale residues being sprayed onto the items to be steamed or causing scalding Storage To fold up the ironing board slightly lift the board fold the leg then fold the board with ...

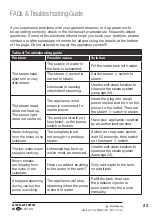
Страница 23: ...rer Water is dripping from the holes in the soleplate The soleplate is not hot enough to produce steam Switch on the power switch wait 50 seconds then switch on the steam switch The low water alarm stopped working Limescale has built up which must be removed Use the self clean function to clean out the steam system see page 24 Brown streaks are dripping from the holes in the soleplate Have you add...

Страница 24: ...its limescale left by water inside the appliance The appliance is equipped with a self cleaning system for this purpose To clean the steam system proceed as follows 1 Set up the garment steamer near a sink Alternatively keep a bucket close by 2 Fill the water tank with water 3 Set the power switch to the ON I position Push the STEAM switch forward 4 Set the switch at the underside of the main stea...

Страница 25: ...est measuring beaker pressure injector To purchase a part call the centre on 1300 112 534 or email us at parts tempo org Technical specifications Model GSTT1100 Rated voltage frequency 220 240 V 50 60 Hz Motor power 1200 W Steam flow 25 g min Water tank capacity 800 mL Steam generation time approx 60 s Working time approx 30 min Working environment requirements 5 50 C for indoor use Dimensions ass...

Страница 26: ... local regulations regarding the disposal of electrical consumer goods and dispose of it appropriately for recycling Contact your local authorities for advice on recycling facilities in your area Other Useful Information Cont Compliance This appliance has been fully tested and meets all requirements as set out by standards AS NZS 60335 1 and AS NZS 60335 2 3 and AS NZS 60335 2 85 The RCM Mark Regu...

Страница 27: ...all of your stored data may be lost We recommend you save this data elsewhere prior to sending the product for repair You should also be aware that rather than repairing goods we may replace them with refurbished goods of the same type or use refurbished parts in the repair process Please be assured though refurbished parts or replacements are only used where they meet ALDI s stringent quality spe...

Страница 28: ...ions make sure to contact our After Sales Support Centre on 1300 112 534 for advice For an electronic copy of this manual go to www stirlingappliances com au and download a copy or contact our after sales support centre Instruction Manual Revision Index Version No Issue Date Description V1 0 16 March 2021 Original release V1 1 29 March 2021 Minor updates pages 19 25 V1 2 29 April 2021 Minor update...

Отзывы: