background image

8

9

StingerElectronics.com

StingerElectronics.com

®

®

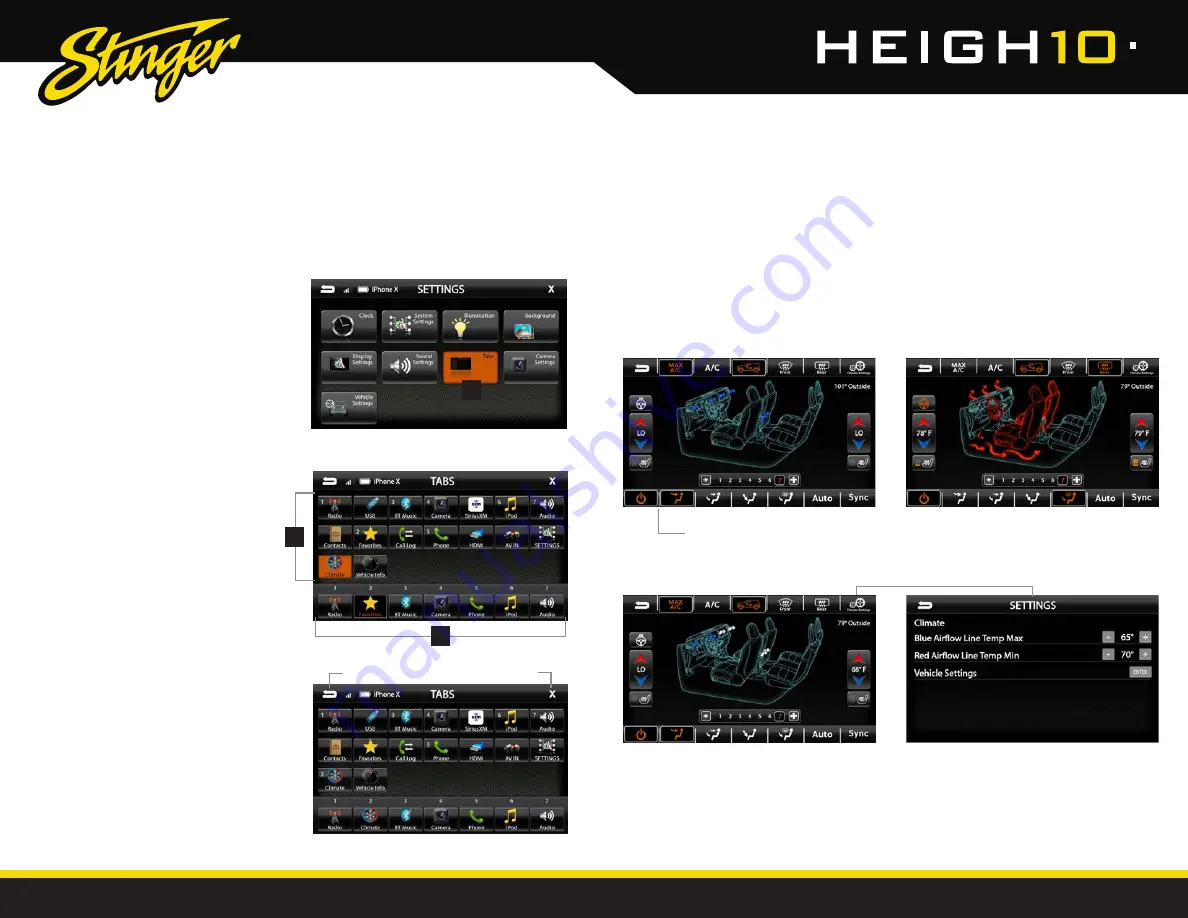
The Tabs can be configured to provide quick access to your favorite sources 

or settings. The steps below show changing Favorites to Climate. Vehicle Info is 

another option to consider adding to the Tabs.

CUSTOMIZING THE 

TABS

CLIMATE 

CONTROL

HOME BUTTON > SETTINGS > TABS

HOME BUTTON > CLIMATE

To Program a Tab:

1) Press the HOME button and select SETTINGS

2) From the SETTINGS menu, select TABS [1]

3) Select a Tab postition (1–7) on the 

bottom row. [2]

4) Select the desired source or setting 

from the options on the top rows. [3]

Now Favorites in position 2 is replaced 

with Climate. Continue customizing or 

touch EXIT (X) to return to current source

or the BACK arrow to return to SETTINGS.

1

3

 2

BACK 

EXIT

If your Jeep is equipped with Automatic Climate Controls, you can view and adjust 

the climate control settings from the touchscreen display as well as operate the 

heated seats and heated steering wheel, if equipped. The factory climate controls 

located below the display continues to function, and any changes made with the 

factory controls are reflected on the screen. 

All climate control functions are explained in your Jeep Owner's Manual if you need 

more information.

Selecting 

Climate Settings

 will allow you to personalize the climate display by entering 

the temperature values that indicate hot, cold and in between. The settings shown 

above will display Blue Airflow up to 65

°

, and White Airflow from 66

°

-69

°

 and Red 

Airflow from 70

°

 and up. If no White Airflow is preferred, set the temperatures 1

°

 apart 

and the display will switch from Blue to Red only.

Current settings will be highlighted. You can change the 

highlight color in HOME > Settings > Illumination on Page 37.

Содержание HEIGH 10

Страница 1: ...PN UN1810 USER GUIDE INTEGRATED MULTIMEDIA DISPLAY FOR JEEP WRANGLER JL GLADIATOR JT SRK JW18EH...

Страница 2: ...he Tabs 8 Audio Settings 40 Equalizer 41 Factory EQ 41 Crossover 42 Time Correction 43 Toslink 44 Gain Volume 44 WELCOME TO YOUR NEW Enjoy the ride THE BASICS THE SOURCES GENERAL SETTINGS TECH SPECS A...

Страница 3: ...te Home Button Access the Home Menu Tune Track Up Button Media control Next Forward Seek Press hold function for select sources Tune Track Down Button Media control Previous Back Seek Press hold funct...

Страница 4: ...tom of the screen Tabs give direct access to sources settings and can be customized as shown on Page 8 The active Tab will be highlighted and sources that are not available will be dimmed out Once the...

Страница 5: ...equipped with Automatic Climate Controls you can view and adjust the climate control settings from the touchscreen display as well as operate the heated seats and heated steering wheel if equipped Th...

Страница 6: ...e Intake Manifold Fuel Pressure Absolute Load Ignition Timing Engine Run Time BACK Return to the previous screen Vehicle Info Menu Provides access to various vehicle display modes The current mode wil...

Страница 7: ...vehicle s GPS position altitude and compass heading Vehicle Info Drivetrain Selecting Drivetrain from the Vehicle Info Menu will display a visual status for the transfer case axles sway bar and tire a...

Страница 8: ...tes when pressing the camera button 1 2 3 Vehicle Settings HOME BUTTON Settings Vehicle Settings The Vehicle Settings are all the factory vehicle settings retained from the factory radio Since these a...

Страница 9: ...ges and information FIG A Selecting the Camera Settings button will open up the Camera Settings menu FIG B The bottom menu bar displays avaiable cameras Touch any available camera to switch camera vie...

Страница 10: ...incoming call End Decline Press to end an active call or decline an incoming call ST Indicator Indicates when the current radio station is in Stereo Tune Seek Up Press and release to Tune Up Press and...

Страница 11: ...tings Once a device is paired and connected settings can be set on the BT Device Settings page Devices Access list of all devices in memory Connect Add Delete devices Auto Connect ON OFF Set to ON if...

Страница 12: ...ber and it will be added to your Favorites list The Favorites list can be accessed from the Phone main menu To Search your contact list select the keyboard icon on the Information Bar Call Log The Cal...

Страница 13: ...the activation process the SiriusXM satellites will send an activation message to your tuner When your radio detects that the tuner has received the activation message your radio will display Subscrip...

Страница 14: ...up to 1 hour of live SiriusXM Satellite Radio Pressing Pause or Rewind while listening to a live broadcast will enable Replay mode The Replay Time Bar will appear when Replay is active Touch for Previ...

Страница 15: ...e Lock Code Select Set Lock Code enter the old code and then enter the new code Reset Lock Code To reset the Lock Code to default code 1234 go to System Settings Load De faults The reset process takes...

Страница 16: ...ay visit https support apple com en us HT205634 Ask Siri for what you need Press the Voice Control button or the Home Dashboard button in Apple CarPlay until Siri appears on the display then say what...

Страница 17: ...elect iPod as the source HDMI INPUT Press the HOME BUTTON HDMI to switch to the HDMI input The HDMI input can be used for an external DVD player streaming sticks media players and smartphone mirroring...

Страница 18: ...H10 can support up to four additional cameras To access any installed camera press the HOME BUTTON Cameras When a camera is first activated there will be menu bars at the top and bottom of the display...

Страница 19: ...color Illumination Color AMBER RED AQUA GREEN BLUE WHITE Set button illumination color Custom Illumination OFF ON When Custom Illumination is set to ON it allows custom illumination color based on RG...

Страница 20: ...e s lights are turned on AV OFF USB AV Determines which source is routed to the AV outputs Settings Tabs The Tabs are customizable and can be configured to include favorite sources or settings To Prog...

Страница 21: ...in volume settings Toslink and microphone settings See page 34 Loudness ON OFF When ON boosts low and high frequencies when listening at lower volume Subwoofer ON OFF Turns subwoofer output ON OFF Pha...

Страница 22: ...the sound arrives at the listen ing position at the same time giving the listener a more accurate life like stereo image To set Time Correction select a listening position for example the driver s sea...

Страница 23: ...rom the Advanced Audio Settings will allow gain volume adjustments for individual sources For example if AM FM is much louder than BT Music lower AM FM and or raise BT Music to even out the volume lev...

Страница 24: ...ad unit Turn up BT Volume Gain see page 44 Phone Volume is low Turn up volume on device Turn up volume on head unit Turn up BT Volume Gain see page 44 Turn up Mic Gain see Page 21 Phone Microphone not...

Страница 25: ...12dB 18dB Gain 14dB to 7dB 1dB step Phase 0 or 180 Speaker level 9dB 1dB step Time correction 0 to 133 step inch ms USB USB 2 0 Max current supply 1 5A USB Class MSC Mass Storage Class MTP Media Tran...

Страница 26: ...ecifically to iPod iPhone or iPad respectively and has been certified by the developer to meet Apple performance standards Apple is not responsible for the operation of this device or its compliance w...

Отзывы: