Stern ELITE SD 1.6 E Скачать руководство пользователя страница 11

8

9

BATTERY REPLACEMENT

SETTINgS ADJUSTMENT wITH A REMOTE CONTROL

If desired, use the remote control to adjust the soap dispenser settings.
Hold the remote control straight in front of the sensor in a distance of about 4-6” 
(10-15cm). 
Attention: Holding the soap dispenser remote control out of the recommended range 

(too close or too far) may interfere with the remote activation.
Choose the function you want to adjust by pressing on the function button as 

following:

  1-SOAP QUANTITY

The 1-4 drop keys allow the user to choose the desired soap quantity. 

4

2.1 to 2.3 *

3

1.6 to 1.9 

2

1.2 to 1.6

1

0.7 to 0.9

Indication: continues blink of the red light in the sensor eye.
* The exact soap dosage depends on the soap viscosity.

2

3

1

4

  2-ADJ

This function allows getting back to the soap 

quantity factory settings.  

Indication: 2 blinks of the red light in the sensor 

eye.


3-TEMPORARY OFF FUNCTION

This  function is ideal to perform any kind of 

activity in front of the sensor without operating 

the system (for example, cleaning).  The soap 

dispenser will remain shut for one minute when 

this button is pressed once.  

To cancel this function and to return to normal 

operation press the On/Off button again or wait 

one minute.
Indication: OFF – 2 fast blinks, ON – 4 fast blinks


4-FILL THE SOAP TANK

Once the soap tank has been filled \ re-filed, 

press the FILL button. The pump would work for 

one minute in order for the soap to start coming 

out of the soap dispenser spout. 
To stop this activity press the FILL button again. If 

the soap has not started coming out of the spout, 

press the Fill button again.

Battery models only 

When the battery weakens, the red indicator light will blink at a constant rate when 

the user’s hands are within the sensor range. The battery must be replaced within two 

weeks. 
To replace the battery in battery models: 
1. Carefully open the battery box, use a 2.5 mm Allen key
2. Remove the old batteries
3. Replace the used batteries with new D batteries 
4. Close the box.

NOTE:

 Do not mix used batteries with new ones.

Important:

 Spent batteries should not be disposed of with 

normal household waste. Contact your local authority for 

information on waste disposal and recycling. 

Содержание ELITE SD 1.6 E

Страница 1: ...1 TOUCH FREE DECK MOUNTED SOAP DISPENSERS I n sta l l at I o n a n d m a I n t e n a n c e g u I d e EXTREME ELITE TRENDY...

Страница 2: ...assumes no responsibility for errors or omissions in the information presented in this document In no event shall Stern Engineering Ltd be liable for any special incidental indirect or consequential...

Страница 3: ...e 1 4cc customizable by optional remote control Sensor range 30 100 mm 10 mm 1 18 3 94 customizable by optional remote control TRENDY SD 1 6 E 239916 EXTREME SD 1 6 E 237916 ELITE SD 1 6 E 236216 TREN...

Страница 4: ...ed viscosity and pH levels are the main factors for smooth operation of your dispenser If needed use a viscometer to verify the viscosity of your soap to ensure maximum benefit The recommended range f...

Страница 5: ...liarize yourself with the part names and confirm that the parts are included 1 X BODY AND FIXINg ACCESSORIES 1 X SOAP TANK wITH BOTTLE SUPPORT AND PUMP ASSEMBLY 1 X BATTERY BOX FOR 6XD ALKALINE BATTER...

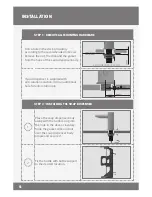
Страница 6: ...dy RECOMMENDED HOLE SIzE If your dispenser is supplied with anti rotation solution drill an additional hole for anti rotation pin STEP 2 INSTALLINg THE SOAP DISPENSER 1 Place the soap dispenser body a...

Страница 7: ...CE 1 Remove the protective sticker covering the sensor Keep away from the sensor range 2 Connect the motor connector to its matching connector coming from the electronic unit Please note that since th...

Страница 8: ...tall the battery box on the wall underneath the sink and connect the battery connector Caution make sure to connect the connectors according to the indication on the battery box sticker FROM THE SOAP...

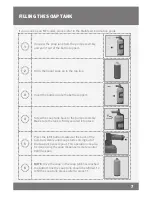
Страница 9: ...is firmly secured into place 5 Press the refill button located at the back of the pump assembly until soap starts coming out of the soap dispenser spout This operation can also be done using the soap...

Страница 10: ...he soap viscosity 2 3 1 4 2 ADJ This function allows getting back to the soap quantity factory settings Indication 2 blinks of the red light in the sensor eye 3 TEMPORARY OFF FUNCTION This function is...

Страница 11: ...in two weeks To replace the battery in battery models 1 Carefully open the battery box use a 2 5 mm Allen key 2 Remove the old batteries 3 Replace the used batteries with new D batteries 4 Close the b...

Страница 12: ...mage the surface of the soap dispenser For surface cleaning use ONLY soap and water then wipe dry with a clean cloth or towel When cleaning bathroom tiles the soap dispenser should be protected from a...

Страница 13: ...m contact your Stern Distributor Dealer or Plumbing Contractor Please be sure to provide all pertinent information regarding your claim including a complete description of the problem the product mode...

Страница 14: ...viscosity or debris in pipes Soap discharging from pump housing Fill with soap with correct viscosity 100 3800 cPs and prime pipes using the fill button on remote control Soap tank is empty Pump is m...

Страница 15: ...with soap of correct viscosity NOTE Using the soap dispenser with high viscosity soap may cause permanent damage to the pump and shorten the lifecycle Debris or dried soap in the tank or tubing Refill...

Страница 16: ...8768 Toll Free 1 800 4364410 info sternfaucets com tech sternfaucets com 777 Passaic Avenue Clifton NJ 07012 USA Tel 1 973 773 8011 Fax 1 973 779 8768 Toll Free 1 800 4364410 info sternfaucets com te...

Отзывы: