background image

1. Remove the Existing Toilet

Turn off the water supply.

Flush the toilet, then sponge out all remaining water from the
tank.

Disconnect the supply shut-off valve (if present), and remove the
old tank and bowl.

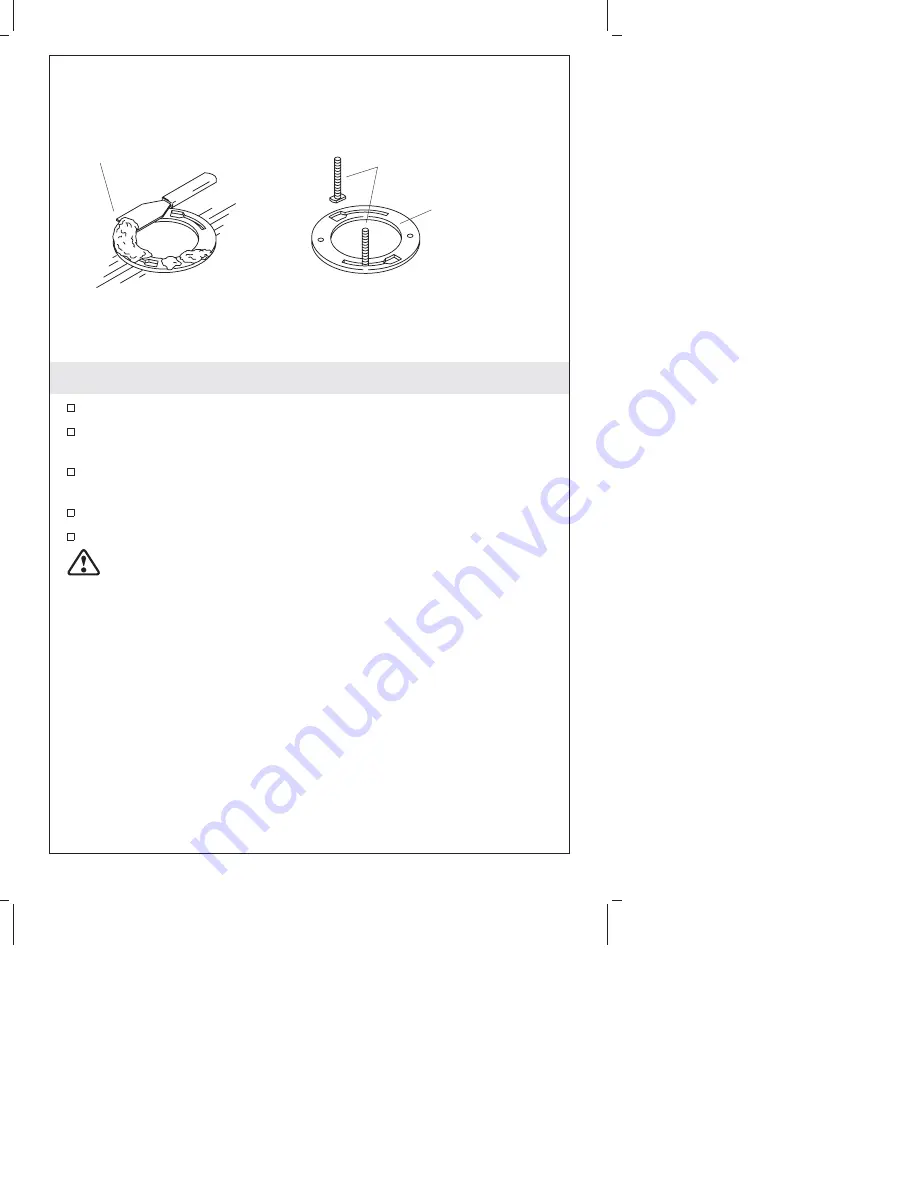
Remove the old wax seal from the floor with a putty knife.

Replace the old T-bolts with the new 5/16

diameter T-bolts.

CAUTION: Risk of hazardous gases.

If the new toilet is not

installed immediately, temporarily stuff a rag in the closet flange.

T-Bolts

Closet Flange

Scrape off the 
old wax seal

Sterling

3

1035429-2-D

Содержание 402028

Страница 1: ...Installation Guide Dual Flush Close Coupled Toilet Fran ais page Fran ais 1 Espa ol p gina Espa ol 1 402024 402025 402027 402028 1035429 2 D...

Страница 2: ...ry or product damage Handle with care Vitreous china can break or chip if the product is handled carelessly Observe all local plumbing and building codes Carefully inspect the new toilet for damage Il...

Страница 3: ...if present and remove the old tank and bowl Remove the old wax seal from the floor with a putty knife Replace the old T bolts with the new 5 16 diameter T bolts CAUTION Risk of hazardous gases If the...

Страница 4: ...body weight around the toilet to set the seal Place the bolt cap bases over the T bolts in the up position as marked Place the washers and nuts on the bolt cap bases and T bolts IMPORTANT Risk of prod...

Страница 5: ...Risk of product damage Overtightening may cause breakage or chipping of the vitreous china Install the bolt gaskets onto the tank bolts and slide the tank bolts down through the holes in the tank and...

Страница 6: ...er and check all connections for leaks Verify proper operation Periodically check for leaks for several days following the installation Adjustments Adjust the water level in the tank to the marked wat...

Страница 7: ...small push button Then pull out and remove the large push button Press the large push button onto the larger diameter rod and the small push button onto the smaller rod Insert the rods into the side...

Страница 8: ...u produit Manipuler avec pr caution La porcelaine vitrifi e peut se briser ou se fendre si le produit est manipul avec n gligence Respecter tous les codes de plomberie et de b timent locaux Inspecter...

Страница 9: ...servoir et sa cuvette Retirer du sol l anneau en cire existant avec un couteau mastic Remplacer les vieux boulons en T avec des nouveaux de 5 16 ATTENTION Risque d manation de gaz nocifs Si l installa...

Страница 10: ...une pression de tout le poids du corps autour du W C pour fixer le joint Placer les bases de cache boulons sur les boulons en T dans la position Haut tel que marqu Placer les rondelles et crous sur le...

Страница 11: ...ler la cuvette cont Mesurer la longueur des boulons en T du dessus des crous Si les boulons s tendent de 1 4 6 mm ou plus d couper l exc s Installer les bouchons des boulons Sterling Fran ais 4 103542...

Страница 12: ...magement du produit Le serrage excessif peut casser ou fendre la porcelaine vitrifi e Installer les deux joints des boulons du r servoir et glisser ces derniers travers les orifices du r servoir et de...

Страница 13: ...r le bon fonctionnement V rifier le bon fonctionnement V rifier p riodiquement s il y a des fuites ceci plusieurs jours apr s l installation R glages Ajuster le niveau d eau du r servoir au niveau de...

Страница 14: ...it Puis retirer le bouton poussoir le plus large Presser le large bouton sur la tige au diam tre le plus large et le bouton le plus petit sur la tige la plus petite Ins rer les tiges par les trous sur...

Страница 15: ...al producto Maneje el producto con cuidado La porcelana vitrificada puede romperse o despostillarse si no se maneja con cuidado Cumpla con todos los c digos locales de plomer a y construcci n Revise a...

Страница 16: ...nte la taza y el tanque existentes Utilice una esp tula paral raspar el sello de cera viejo del piso Reemplace los pernos en T viejos con los nuevos pernos en T de 5 16 de di metro PRECAUCI N Riesgo d...

Страница 17: ...un sello de cera nuevo Aplique todo el peso de su cuerpo sobre el inodoro para fijar el sello Coloque las bases de los tapapernos sobre los pernos en T y en posici n marcada hacia arriba up Monte las...

Страница 18: ...ale la taza cont Mida la longitud de los pernos en T desde la parte superior de las tuercas Si los pernos se extienden 1 4 6 mm o m s corte el exceso Instale los tapapernos 1035429 2 D Espa ol 4 Sterl...

Страница 19: ...producto Si se aprieta demasiado la porcelana vitrificada puede romperse o despostillarse Instale los empaques para los pernos en los pernos del tanque y deslice los pernos del tanque hacia abajo a tr...

Страница 20: ...ones Verifique que funcione correctamente Verifique peri dicamente que no haya fugas durante los d as siguientes a la instalaci n Ajustes Ajuste el nivel de agua en el tanque a la l nea de agua marcad...

Страница 21: ...ire el bot n grande Presione el bot n grande en la varilla de mayor di metro y el bot n peque o en la varilla m s peque a Introduzca las varillas en los orificios laterales del alojamiento del bot n s...

Страница 22: ...1035429 2 D...

Страница 23: ...1035429 2 D...

Страница 24: ...Phone 1 888 STERLING 1 888 783 7546 Mexico 001 877 680 1310 SterlingPlumbing com 2006 by Kohler Co 1035429 2 D...

Отзывы: