background image

CONFIGURE MOTION DETECTION

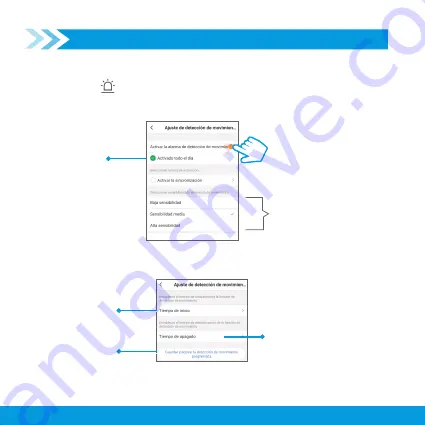
When you activate this function, you will receive alerts every time the camera detects 

movement, and a photo will be saved.

1. Press the icon

2. Enable the button 

Activar la alarma de detección de movimiento

. You will see the 

following screen:

If you enable the option 

Activar la sincronización

 You will see the following screen:

22

If you activate this option, 

the camera will send a 

notification to your 

smartphone, detecting 

movement at any time of 

the day

Choose the level of sensitivity you want 

the camera to have before any 

movement

Set a start time for motion 

detection

Press to save the 

parameters

Set an end time for motion 

detection

Содержание Smart Home CCTV-218

Страница 1: ...CÁMARA Wi Fi Manual de instrucciones V0 1 0719A CCTV 218 ...

Страница 2: ...No intentes abrir el equipo puede ocasionar un mal funcionamiento y se anulará la garantía No instales la cámara en lugares con altas temperaturas exceso de humedad bajo luz solar directa o cerca de equipos que generen calor No coloques objetos pesados sobre la cámara No utilices productos químicos o corrosivos para limpiarla No expongas la cámara a condiciones de agua o humedad No la instales a l...

Страница 3: ...PARTES Y CONTENIDO CÁMARA 2 LED infrarrojos LED indicador Lente Micrófono Ranura para memoria microSD Botón de reinicio Bocina Puerto micro USB ...

Страница 4: ...ELIMINADOR USB CABLE USB A MICRO USB BASE PARA INSTALAR CÁMARA 3 TAQUETES 3 HERRAMIENTA DE PUNTA PARA REINICIO 3 TORNILLOS ...

Страница 5: ...eren Home Las instrucciones y el funcionamiento pueden variar si existen actualizaciones en la aplicación 1Abre la aplicación y selecciona Crear cuenta nueva 2 Para registrar tu cuenta selecciona el país e introduce tu número telefónico o tu correo electrónico Al finalizar toca en la opción Obtenga el código de verificación ...

Страница 6: ... código y crea una contraseña Presiona Finalizado para concluir el proceso info steren com mx 1Después de crear tu cuenta selecciona Crear hogar Asigna un nombre al hogar y selecciona o crea sus áreas Al terminar presiona Finalizado ...

Страница 7: ...l lado derecho superior para agregar un equipo Después la clasificación Sensor de protección y por último la opción Cámara de seguridad 3 Conecta la cámara a un contacto eléctrico con el eliminador USB y el cable USB a micro USB ...

Страница 8: ...a red en la que se conectará el equipo y presiona Confirmar 6 Prepara la cámara para ponerla de frente hacia la pantalla de tu smartphone como se muestra en el ejemplo En la app presiona Continuar 7 Haz que la cámara vea el código QR que aparece y cuando escuches un tono presiona Oír el tono de aviso El LED indicador cambiará a color azul ...

Страница 9: ...eos y fotos guardados en smartphone Mover la cámara Pantalla completa Intensidad de señal Wi Fi Botón de menú Hablar desde el smartphone Activar Desactivar alarma por detección de movimiento 8 Espera hasta que se realice la conexión y después asigna un nombre y un área para la cámara Presiona en Finalizado para concluir el proceso Galería de videos y fotografías guardados en la microSD ...

Страница 10: ...ntalla Si habilitas la opción Activar la sincronización verás la siguiente pantalla 9 Si activas esta opción la cámara enviará una notificación a tu smartphone al detectar movimiento en cualquier momento del día Elige el nivel de sensibilidad que deseas que tenga la cámara ante cualquier movimiento Establece una hora de inicio para la detección de movimiento Presiona para guardar los parámetros Es...

Страница 11: ...de este dispositivo con otra persona previamente debe tener instalada la aplicación así como haber creado una cuenta 1 Selecciona el ícono del lado derecho superior para acceder a las configuraciones 2 Presiona en Compartir equipo y después en Añadir lo compartido 10 ...

Страница 12: ...na con quien compartirás el dispositivo presiona Finalizado En la pantalla principal de tu contacto se agregará automáticamente el dispositivo y podrá empezar a controlarlo Para revisar cuáles son los contactos con quienes compartes el dispositivo regresa a la pantalla anterior 11 info steren com mx ...

Страница 13: ...alizar las marcas de perforación 4 Inserta los tornillos para fijar firmemente la base 5 Coloca la cámara sobre la base y haz coincidir las muescas Gírala para que quede bien sostenida 2 Realiza las perforaciones 3 Inserta los taquetes en las perforaciones 12 ...

Страница 14: ...ar donde puede adquirir partes componentes consumibles y accesorios así como hacer válida esta garantía es en cualquiera de las direcciones mencionadas posteriormente ESTA PÓLIZA NO SE HARÁ EFECTIVA EN LOS SIGUIENTES CASOS 1 Cuando el producto ha sido utilizado en condiciones distintas a las normales 2 Cuando el producto no ha sido operado de acuerdo con el instructivo de uso 3 Cuando el producto ...

Страница 15: ...www steren com mx ...

Страница 16: ...Wi Fi CAMERA Instruction Manual V0 1 0719A CCTV 218 CCTV 218 ...

Страница 17: ... the equipment may cause a malfunction and the warranty will be voided Do not install the camera in places with high temperatures excess humidity under sunlight direct or close to equipment that generates heat Do not place heavy objects on the camera Do not use chemical or corrosive products to clean it Do not expose the camera to water or humidity conditions Do not install it in the open To make ...

Страница 18: ...PARTS AND CONTENT CAMERA 15 Infrared LED Indicator LED Lens Microphone Slot for microSD memory Reset button Speaker Micro USB port ...

Страница 19: ...USB POWER CONVERTER USB CABLE TO MICRO USB BASE TO INSTALL CAMERA 3 ANCHORS 16 TOOL OF TIP FOR RESTART 3 SCREWS ...

Страница 20: ...l the Steren Home app The instructions and operation may vary if there are updates in the application 1Open the application and select Crear cuenta nueva 2 To register your account select the country and enter your phone number or your email address When finished tap on the option Obtenga el código de verificación ...

Страница 21: ...the code and create a password Press Finalizado to complete the process info steren com mx 1After creating your account select Crear hogar Assign a name to the home and select or create your areas When finished press Finalizado ...

Страница 22: ...n the upper right to add a device After the classification Sensor de protección and finally the option Cámara de seguridad 3 Connect the camera to an electrical contact with the USB eliminator and the USB to micro USB cable ...

Страница 23: ... the network on which the device will be connected and press Confirmar 6 Prepare the camera to face the screen of your smartphone as shown in the example In the app press Continuar 7 Have the camera see the QR code that appears and when you hear a tone press Oír el tono de aviso The indicator LED will change to blue ...

Страница 24: ...llery of videos and photos saved in smartphone Move the camera Fullscreen Wi Fi signal strength Menu button Talk from the smartphone Gallery of videos and photographs saved in the microSD Activate Deactivate detection alarm of movement 8 Wait until the connection is made and then assign a name and area for the camera Press on Finalizado to conclude the process ...

Страница 25: ... You will see the following screen If you enable the option Activar la sincronización You will see the following screen 22 If you activate this option the camera will send a notification to your smartphone detecting movement at any time of the day Choose the level of sensitivity you want the camera to have before any movement Set a start time for motion detection Press to save the parameters Set a...

Страница 26: ...this device with another person you must first have the application installed as well as having created an account 1 Select the icon on the upper right side to access the settings 2 Press on Compartir equipo and next in Añadir lo compartido 23 CCTV218 ...

Страница 27: ...person with whom you will share the device press Finalizado In the main screen of your contact the device will be added automatically and you can start controlling it To check which contacts you share the device with go back to the previous screen 24 info steren com mx ...

Страница 28: ...ded base to make the drilling marks 4 Insert the screws to securely fix the base 5 Place the camera on the base and match the notches Turn it so that it stays well supported 2 Perform the perforations 3 Insert the anchors into the holes 25 ...

Страница 29: ...ponents consumables and accessories as well as valid this guarantee is in any of the addresses mentioned later THIS POLICY WILL NOT BE EFFECTIVE IN THE FOLLOWING CASES 1 When the product has been used in conditions other than normal 2 When the product has not been operated in accordance with the instructions for use 3 When the product has been altered or repaired by personnel not authorized by Ele...

Страница 30: ...www steren com mx ...

Отзывы: