background image

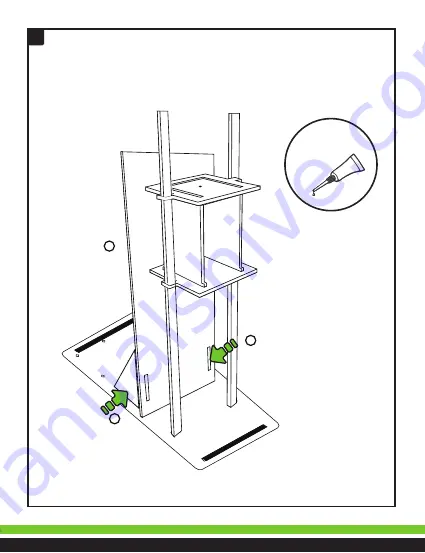
Place

glue

6

B

J

J

Place part B behind the cab. Use the J pieces as support

Содержание K-920

Страница 1: ...KIT ELEVADOR ELECTRÓNICO 0618A K 920 V0 0 MANUAL DE INSTRUCCIONES ...

Страница 2: ...evitar dañar o romper las piezas Tenga cuidado al ensamblar las piezas NO las fuerce Use pegamento para madera para fijar las uniones del armado Evite colocar pegamento en las partes móviles Este aparato no se destina para utilizarse por personas incluyendo niños cuyas capacidades físicas sensoriales o mentales sean diferentes o estén reducidas o carezcan de experiencia o conocimiento Los niños de...

Страница 3: ...t D 2 pzas Cant B 1 pza Cant C 2 pzas Cant G 2 pzas Cant E 2 pzas Cant F 1 pza Cant H 2 pzas Cant I 1 pza Cant J 2 pzas Cant K 2 pzas Cant L 2 pzas Cant M 1 pza Cant N 2 pzas Cant Ñ 1 pza Cant O 1 pza Cant Guias 4 2 cm de diametro 4 7 cm de diametro 1 7 cm diametro 1 5 cm diametro 1 2 cm diametro ...

Страница 4: ...D1 D4 4 pzas Cant 4 pzas Cant D5 D6 2 pzas Cant Transistor 2N 2222 Cable dupont Tuerca de seguridad Tornillo grande Tornillo chico Hilo de nylon Broche pila Botón tipo push Placa Resistencia 3K9 naranja blanco rojo Diodo 1N4148 LED rojo R1 R4 D1 D3 J 2 Q4 R6 Q1 Q3 D4 B 1 B 2 B 3 B 4 D2 Q2 MOTOR R5 D 5 S 1 V gnd S1 S2 S 2 D 2 J 1 Resistencia 560 verde azul café Arme y suelde los componentes de la p...

Страница 5: ...ezas G por debajo de la pieza A con cuidado ENSAMBLAJE Coloque pegamento Coloque pegamento Comience a ensamblar desde la base Asegúrese de colocar las piezas correctas antes de aplicar pegamento 2 3 1 A A C G G C ...

Страница 6: ...4 Coloque pegamento Arme la cabina del elevador D D E F E ...

Страница 7: ...5 G G Tenga cuidado de no dañar las piezas G ...

Страница 8: ...Coloque pegamento 6 B J J Coloque la pieza B atrás de la cabina Utilice las piezas J como soporte ...

Страница 9: ...G G B Coloque la pieza M para asegurar la pieza B y las piezas G 7 ...

Страница 10: ...Coloque pegamento 8 P P Utilice pinzas y desarmador Coloque las piezas sobre M y G Utilice tornillos U para asegurarlos junto con tuercas S para apretar tornillos y tuercas ...

Страница 11: ...n medio la pieza I En ambas orillas coloque piezas K asegure todas las piezas con un tornillo T y tuerca S Utilice pinzas y desarmador para apretar tornillos y tuercas No apriete mucho la tuerca porque la polea debe girar para que baje y suba la cabina del elevador 9 ...

Страница 12: ...ome la pieza O pase el hilo V y haga un nudo asegurando la pieza O en seguida pase el hilo por el orificio de la cabina y páselo por arriba de la polea hasta llegar a la pieza Ñ y amarrelo al agujero 10 ...

Страница 13: ...s N N N Ñ 11B Inserte las piezas H por debajo del chasis péguelas y coloque el motor asegúrelo con tornillos T y una tuerca Q abajo y otra S arriba 11A Tome el cable dupont R corte un extremo y pele el cable suelde en las terminales del motor cada una en un extremo Ponga atención a la polaridad de los cables 11 ...

Страница 14: ...vador 2 Mantenga presionado el botón de la derecha para bajar la cabina del elevador Botones 12C Suelde los cables del broche de pila o pieza J1 como se muestra en la imagen 12D Coloque una batería de 9 V en el orificio y conéctela al broche Ponga atencion a la polaridad de los cables D1 D3 J 2 Q4 R6 Q1 Q3 D4 B 1 B 2 B 3 B 4 D2 Q2 MOTOR R5 D 5 S 1 V gnd S1 S2 S 2 D 2 J 1 D1 D3 J 2 Q4 R6 Q1 Q3 D4 B...

Страница 15: ......

Страница 16: ...ELECTRONIC ELEVATOR KIT 0618A K 920 V0 0 INSTRUCTION MANUAL ...

Страница 17: ...to avoid damaging or breaking the parts Be careful when assembling parts DO NOT force them Use wood glue to fix the joints of the assembly Avoid placing glue on the moving parts This device is not intended for use by persons including children whose cphysical sensory or mental abilities are different or reduced or lack experience or knowledge Children should be supervised to ensure they do not use...

Страница 18: ...2 pzas Cant B 1 pza Cant C 2 pzas Cant G 2 pzas Cant E 2 pzas Cant F 1 pza Cant H 2 pzas Cant I 1 pza Cant J 2 pzas Cant K 2 pzas Cant L 2 pzas Cant M 1 pza Cant N 2 pzas Cant Ñ 1 pza Cant O 1 pza Cant Guides 4 2 cm in diameter 4 7 cm in diameter 1 7 cm diameter 1 5 cm diameter 1 2 cm diameter ...

Страница 19: ...pzas Cant D1 D4 4 pzas Cant 4 pzas Cant D5 D6 2 pzas Cant Transistor 2N 2222 Dupont cable Safety nut Large screw Small screw Nylon thread Stack brooch Push type button Plate Resistance 3K9 orange white red Diode 1N4148 Red LED R1 R4 D1 D3 J 2 Q4 R6 Q1 Q3 D4 B 1 B 2 B 3 B 4 D2 Q2 MOTOR R5 D 5 S 1 V gnd S1 S2 S 2 D 2 J 1 Resistance 560 green blue coffee Assemble and weld the components of the plate ...

Страница 20: ...Pass the pieces G under piece carefully ASSEMBLY Place glue Place glue Start assembling from the base Be sure to place the correct parts before applying glue 2 3 1 A A C G G C ...

Страница 21: ...4 Place glue Assemble the elevator cabin D D E F E ...

Страница 22: ...5 G G Be careful not to damage the G pieces ...

Страница 23: ...Place glue 6 B J J Place part B behind the cab Use the J pieces as support ...

Страница 24: ...G G B Place part M to secure part B and parts G 7 ...

Страница 25: ...Place glue 8 P P Use pliers and screwdriver Place part M to secure part B and parts G to tighten screws and nuts ...

Страница 26: ... piece I in the middle On both sides place pieces K secure all the pieces with a screw T and nut S Use pliers and screwdriver to tighten screws and nuts Do not tighten the nut too much because the pulley must turn to lower and raise the cabin of the elevator 9 ...

Страница 27: ...Take piece O pass thread V and tie a knot securing piece O then pass the thread through the bore of the booth and pass it up from the pulley until you reach the Ñ part and tie it to the hole 10 ...

Страница 28: ...he pieces N N N Ñ 11B Insert the parts H under the chassis stick them and place the motor secure it with screws T and a nut Q down and another S up 11A Take the dupont cable R cut one end and Strip the cable weld on the motor terminals each one on one end Pay attention to the polarity of the cables 11 ...

Страница 29: ...r car 2 Press and hold the button on the right to lower the elevator cab Buttons 12C Solder the cables of the battery clip or piece J1 as shows in the image 12D Place one 9 V battery in the hole and connect it to brooch Pay attention to the polarity of the cables D1 D3 J 2 Q4 R6 Q1 Q3 D4 B 1 B 2 B 3 B 4 D2 Q2 MOTOR R5 D 5 S 1 V gnd S1 S2 S 2 D 2 J 1 D1 D3 J 2 Q4 R6 Q1 Q3 D4 B 1 B 2 B 3 B 4 D2 Q2 M...

Страница 30: ......

Отзывы: