background image

80

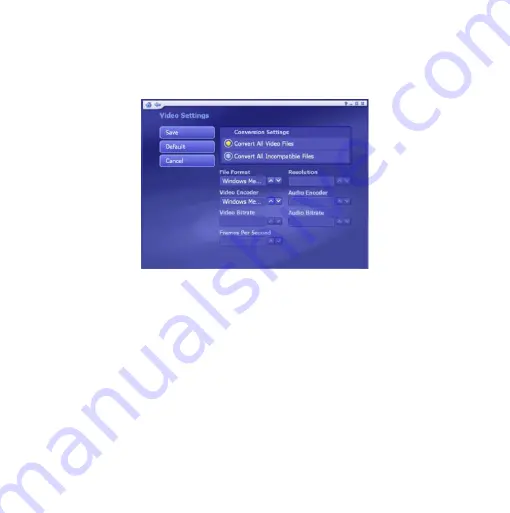
Video Settings

Click the “Video” button in the Settings screen to modify the Video 

configuration.

• From the “Conversion Settings” section, select “Convert All Video Files” or 

select “Convert All Incompatible Files” for transfer to mobile devices.

• Set the file format, resolution, video encoder, audio encoder, video bitrate, 

audio bitrate and frame rate by selecting from the pull-down list.

Note: Many of these settings are related. So it is quite possible that when 

you select a certain option, the other options will change or become 

unavailable to prevent you from creating an unusable file.

When you’re ready, click “Save.” Or click “Cancel” at any time to exit 

without saving. If you wantto switch back to original default settings, click 

“Default.”

Содержание COM-254

Страница 1: ......

Страница 2: ...RACTERÍSTICAS Soporta señales de vídeo de alta definición HDTV 1920X1080 También capta señales de vídeo estándar NTSC en TV abierta Grabe sus programas favoritos en formato MPEG 2 Captura de imagenes fijas Snapshot en formatos JPG BMP TIF y PNG Control remoto Pantalla panorámica 16 9 o estandar 4 3 Fabricado en plástico negro Capta todas las señales de televisión digital disponibles Antes de utili...

Страница 3: ...3 CONTENIDO Un Sintonizador Un adaptador Un Control Una antena Un manual de instrucciones Un CD de instalación ...

Страница 4: ...4 CONTROLES Sintonizador 1 Conector USB 2 Conector para antena 1 2 ...

Страница 5: ...Úselo para seleccionar un canal directamente 4 Snapshot Al presionarlo obtendrá una imagen fija de la señal de TV 5 ESC Presiónelo para regresar a la pantalla anterior del sofware 6 Teclas de dirección Para navegar por los menús 7 OK Para seleccionar una opción del menú 8 REC Presione para iniciar la grabación de un programa 1 3 4 6 8 10 12 2 5 7 9 11 13 ...

Страница 6: ...otón por segunda vez la graba ción continuará en el lugar donde la detuvo 11 CH CH Use estos dos botones para cambiar de canal 12 Stop Presione para detener completamente la grabación Si presiona des pués REC la grabación comenzará en un archivo nuevo 13 Vol Vol Con estos botones podrá controlar el volumen de la TV ...

Страница 7: ...Operativo Windows XP Vista 32 64 bits INSTALACIÓN DE DRIVERS EN XP Asegúrese de instalar los drivers antes de realizar las conexiones correspondientes 1 Inserte el disco de instalación aparecerá la pantalla de bienvenida 2 Seleccione Setup driver 3 Seleccione un lenguaje y presione Next para continuar con la instalación Antes de utilizar su nuevo Kit C ...

Страница 8: ...8 4 En la siguiente ventana presione el botón Next para continuar 5 Seleccione Complete en el tipo de instalación posteriormente presione el botón Next para continuar ...

Страница 9: ...9 6 Para terminar con la instalación presione Finish 7 Reinicie el equipo ...

Страница 10: ... los drivers instale el software de aplicación 1 Inserte de nuevo el disco de instalación para que aparezca la pantalla de bienvenida Ejecute la aplicación ADTVtwins 2 Seleccione Utility Setup 3 Seleccione el idioma y presione Aceptar para continuar con la instalación ...

Страница 11: ...ntrato de licencia 6 Introduzca el nombre de usuario El nombre de la organización y La clave del programa La clave se encuentra en el archivo 35sn txt dentro de la carpeta utility del CD Después presione el botón Siguiente para continuar con la instalación ...

Страница 12: ...12 7 Seleccione la carpeta Donde se instalará los archivos del programa Seleccione Siguiente para continuar ...

Страница 13: ...as siguientes conexiones 1 Conecte la antena incluída o el cable coaxial de una antena externa usando el adaptador incluído Recomendamos una antena para TV de alta definición en la entrada coaxial del sintonizador 2 Inserte el cable USB en el conector USB del sintonizador y el extremo contrario conéctelo a un puerto USB disponible de la computadora ...

Страница 14: ...nto y haga clic en Siguiente El CD de instalación debe estar dentro de la computadora 4 Posteriormente seleccione Instalar automáticamente el software 5 Para terminar haga clic en Finalizar Posiblemente realice 2 veces los pasos del 3 al 5 Antes de utilizar su nuevo Kit C Antes de utilizar su nuevo Kit C ...

Страница 15: ...icación Total media 3 5 2 Aparecerá la siguiente pantalla con las opciones TV DVD Imagen Música Radió Vídeo Portátil y Configuración TV 3 Seleccione TV 4 Aparecerá el asistente para configurar la señal de TV haga clic en Siguiente ...

Страница 16: ... para continuar 6 En la siguiente pantalla aparecen 2 opciones Auvitek Dongle Analog Capture y Auvitek Dongle Digital Tuner seleccione la primera opción si desea ver TV analógica o seleccione la segunda opción si desea ver TV digital de alta definición ...

Страница 17: ...17 Si selecciona la opción Auvitek Dongle Analog Capture En pantalla aparecerá lo siguiente Seleccione un dispositivo de audio ...

Страница 18: ...para empezar con la búsqueda de los canales disponibles Cuando termine con la búsqueda aparecerá una ventana indicando el número de canales encontrados acepte el mensaje Posteriormente haga clic en siguiente para continuar con la configuración En caso de que en algún momento desee detener la búsqueda haga clic en Parar ...

Страница 19: ...gurar un tipo de señal aparecerá una ventana indicando si desea configurar un segundo tipo de señal 10 Si no desea configurar un segundo tipo de señal seleccione NO y en la siguiente pantalla seleccione Acabar para terminar con la configuración del modo TV Si selecciona Si repita los pasos 7 y 8 ...

Страница 20: ...20 Para comenzar a usar el modo TV haga clic en el siguiente icono de la pantalla Posteriormente seleccione TV Aparecerá la siguiente pantalla ...

Страница 21: ...ra regresar al modo de pantalla anterior presione la tecla ESC del teclado o haga doble clic sobre la pantalla EPG En esta opción podrá ver la guía de los canales disponibles Para entrar a cualquier canal simplemente seleccione el canal y haga doble clic sobre el canal ...

Страница 22: ...canal seleccionado aparecerá una estrella Presione el botón Aceptar para guardar la configuración CAMBIAR ENTRE TV ANALÓGICA DIGITAL Para cambiar entre TV analógica y digita utilice el siguiente botón de la barra inferior GRABACION DE TV En esta opción puede reproducir un archivo de vídeo guardado o grabar el archivo en un Disco compacto Si su computadora tiene un grabador de discos compactos Debe...

Страница 23: ...23 Para grabar un programa de TV seleccione un canal Presione el botón de grabar Para detener la grabación presione el siguiente icono Presione el botón Grabación de TV y obtendrá la siguiente pantalla ...

Страница 24: ... en formato mpg seleccione el archivo y a su lado aparecerán 3 iconos que son Permite editar vídeo Permite renombrar un vídeo Borra un vídeo Para editar un vídeo Si presione el botón de edición de vídeo y tendrá la siguiente pantalla ...

Страница 25: ...n un punto inicial Haga clic en el siguiente icono Una marca aparecerá en el inicio Seleccione un punto final y haga clic Presione el siguiente botón Finalmente aparecerá la siguiente pantalla con el segmento cortado ...

Страница 26: ...clic en Guardar para salvar el vídeo Las demás funciones de esta pantalla de Grabación de TV son Deshace una selección Rehace una selección Selecciona el punto incial de un segmento creado Selecciona el punto final de un segmento creado Reinicia la edición de vídeo al presionar este botón aparecerá el mensaje Está seguro de que quiere reiniciar ...

Страница 27: ...ón Durante una reproducción regresa o adelanta respectivamente Para renombrar un archivo de vídeo seleccione el archivo y haga clic en el siguiente icono Posteriormente aparecerá la siguiente pantalla Simplemente cambie el nombre del archivo y haga clic en aceptar ...

Страница 28: ...la Grabación de TV haga clic en Grabar a un Disco en pantalla aperecerá lo siguiente En caso de no reconocer la unidad de grabación Presione el icono Luego seleccione Configuración General Creación de discos y en la opción Grabar a Seleccione la unidad de grabación y reinicie el programa Antes de utilizar su nuevo Kit C Antes de utilizar su nuevo Kit C ...

Страница 29: ... tamaño a utilizar Posteriormente presione el botón Grabar comenzará el proceso de grabación Cuando termine el proceso aparecerá el siguiente mensaje Seleccione la primera opción si desea realizar otra copia de disco o presione el botón Hecho para finalizar el proceso ...

Страница 30: ...r la creación de discos En sistema de TV seleccione uno de los dos tipos de sistema PAL o NTSC En Grabar a Seleccione la unidad de grabación puede ser D E F etc Formato de disco Seleccione el formato VCD o DVD Formato de audio Aqui puede seleccionar un formato de audio Para que la configuración tenga éxito presione Guardar ...

Страница 31: ...31 HORARIO En esta opción podrá programar la grabación de forma automática Presione el botón Agregar y aparecerá la siguiente pantalla Haga clic en el siguiente icono para nombrar el programa a grabar ...

Страница 32: ...fuente del Televisor En la sección Empezar grabación en la primera opción aparecerá la fecha en caso de haber seleccionado Una sola vez y Diariamente Puede aparecer el día de la semana si seleccionó la opción Semanalmente Posteriormente seleccione la hora de inicio y la hora final de grabación Si desea que el programa se cierre cuando termine de grabar habilite la casilla Cierre el equipo una vez ...

Страница 33: ...figurar el modo TV Al oprimir este botón aparecerá el siguiente mensaje Haga clic en Si para continuar Reiniciar la señal de TV En esta opción usted podrá reconfigurar la señal de TV Vea los pasos del 5 al 10 de la páginas 14 17 de este manual ...

Страница 34: ...ntrados Para seleccionar un canal haga clic en la casilla izquierda de cada canal Si desea seleccionar todos los canales de una sola vez haga clic en el botón Seleccionar todos El botón Borrar todos elimina la selección de todos los canales Si desea renombrar los canales primero seleccione el canal posteriormente haga clic en el icono Aparecerá la siguiente pantalla ...

Страница 35: ...l canal haga clic en Hecho para guardar el cambio regresará a la pantalla de editar canales Si desea borrar un canal primero selecciónelo y luego haga clic en el siguiente icono Por último haga clic en Guardar para salvar los cambios ...

Страница 36: ...pciones seleccione una aplicación en caso de tener un dispositivo de audio y vídeo adicional Haga clic en Aplicar para guardar los cambios Importar lista de canales y Exportar lista de canales En estas opciones permite importar o exportar una lista de canales previamente creados seleccione el archivo y presione el botón Importar o Exportar dependiendo de la acción deseada ...

Страница 37: ...deo en toda la ventana del programa Menú del DVD Abre la pantalla de menú de DVD Marco de captura Toma una captura de pantalla de la pantalla de vídeo actual Expulsar Expulsa el disco Configuración Ver y editar las configuraciones para la reproducción de DVDs y la captura de vídeo AJUSTES SETTINGS Modifique la configuración para la reproducción de DVDs y la captura de vídeo ...

Страница 38: ...de audio principal y los menús de DVD Control Parental Establecer contraseñas que deben ser introducidas antes de que las películas en clasificaciones específicas PG PG 13 R etc se puedan reproducir Estructura de almacenamiento Aquí se puede establecer la ubicación de almacenamiento y tipo de archivo para los cuadros capturados Auto CV Usted puede elegir para reanudar la reproducción de un DVD des...

Страница 39: ...erior Las fotos de la carpeta actual se muestran como miniaturas en la pantalla Haga clic en una miniatura para mostrarla en modo de pantalla completa En la sección Visualización usted podrá elegir entre el Detalle o Miniaturas Ambos formas de visualización muestran miniaturas de las fotos y carpetas disponibles la vista Detalle incluye los nombres y fechas de los archivos y carpetas En la sección...

Страница 40: ...o para entrar a este modo Los controles en la barra de herramientas son Reproducir Ver las fotos empezando por la actual como una presentación de diapositivas Ajuste los valores de presentación antes de empezar la reproducción Anterior Ir a la foto anterior Siguiente Ir a la siguiente foto Edición Editar la foto Salir Salga de la vista de pantalla completa ...

Страница 41: ...do por la que se ha seleccionado Antes de reproducir una presentación de diapositivas ajuste los valores de la presentación Para terminar la reproducción de diapositivas haga doble clic con el botón izquierdo del mouse o presione la tecla Esc Valores En esta sección podrá establecer los efectos de transición el calendario y música de fondo para su presentación ...

Страница 42: ... de diapositivas se reinicie de forma automática Pulse la tecla Esc para salir de este modo de reproducción En el Music Soundtrack sección seleccione On para reproducir una o más canciones durante la presentación de diapositivas Haga clic en el botón Agregar para agregar una canción También puede eliminar una pista de música haciendo clic en Eliminar bote de basura El tiempo total de los archivos ...

Страница 43: ...e la música que desea agregar En la sección Ordenar elija para organizar las canciones según Nom bre Fecha Género Artista y Álbum Seleccione las canciones que desee añadir haciendo clic cada una o seleccione todas las canciones utilizando el botón Seleccionar todos Haga clic en Deseleccionar todos para deshacer la selección las marcas de verificación indican las canciones seleccionadas Cuando haya...

Страница 44: ... incluye nombres y fechas de los archivos y carpetas 3 En la sección Orden escoja organizar las fotos según el nombre fecha o tamaño 4 Para ver la foto con más detalle mueva el ratón sobre cada miniatura para mostrar una vista más grande 5 Seleccione las fotos que desee imprimir haciendo clic en cada foto o use la opción Seleccionar todos Haga clic en el botón Deseleccionar para deshacer la selecc...

Страница 45: ...papel según lo que vaya a utilizar A la derecha aparecerá una vista previa de la impresión 8 Introduzca el número de copias que desea de cada página impresa 9 Haga clic en Imprimir Editar Hay varias opciones que le permitirán editar las fotografías según sus necesidades ...

Страница 46: ...oom In Out Pan Utilice esta herramienta para acercar y alejar de la foto Cuando la imagen está ampliada puede moverse por ella usando la herramienta Pan Mejora automática Al seleccionar esta opción se mostrarán de forma automática tres versiones mejoradas de la foto más el original Simplemente escoja el que más le guste ...

Страница 47: ...rregirlas manualmente mediante los pasos siguientes 1 Mueva la cruz sobre la superficie de los ojos rojos 2 Presione Enter luego haga clic en Arreglar para eliminar la parte roja haga clic en Restaurar para empezar de nuevo 3 Cuando haya terminado haga clic en Hecho Corte Usted puede recortar la foto a un tamaño preestablecido que le permita una mejor impresión ...

Страница 48: ...o del cuadro de recorte a su gusto 3 Seleccione Mover y coloque el cuadro de recorte sobre el área de la foto que desea conservar 4 Para ejecutar el comando de corte elija la opción Recortar 5 Seleccione Hecho para cancelar Anterior Siguiente Foto Estos botones le permiten navegar a la foto anterior siguiente en la ubicación actual ...

Страница 49: ...49 Borrar Elija esta opción para eliminar la foto actual Salir Volver a la pantalla anterior Grabar en disco Aquí puede crear un DVD VCD con las presentaciones de diapositivas de sus fotos ...

Страница 50: ...sponibles La vista Detalles incluye nombres y fechas de los archivos y carpetas 3 En la sección Orden usted podrá organizar las fotos según el nombre fecha o tamaño 4 Haga clic en una imagen para verla ampliada 5 Selecciona las fotos que desea grabar haciendo clic en cada una o use el botón de Seleccionar todo Haga clic en el botón Deseleccionar todo para deshacer la selección las marcas de verifi...

Страница 51: ... originales de las fotos crea una presentación de diapositivas de DVD y copia los archivos origina les en un directorio en el disco Archivar de las fotos originales en el disco hace un disco de copia de seguridad de los archivos seleccionados 8 Si se crea un disco DVD o VCD depende de los ajustes de Creación de discos Nota Algunas versiones de la aplicación no ofrecen ambas opciones Cuando esté li...

Страница 52: ... para ir a la carpeta anterior en el directorio Seleccione cualquier archivo de música para reproducir y usar los botones de reproducción estándar en la barra de herramientas flotante Hay una ventana de vista previa en la esquina inferior izquierda de la pantalla Puede hacer clic en el botón junto a ella para verla en el modo de pantalla completa Presione Esc para salir del modo de pantalla comple...

Страница 53: ...cción de audio Las listas son compatibles con Windows Media Player 9 y se almacenan en el directorio Mis documentos Mi música Mis listas Si modifica una lista de reproducción con Media Player los cambios se reflejarán en TotalMedia la próxima vez que inicie el programa presionando el botón Actualizar también actualizará la lista de reproducción ...

Страница 54: ...sea agregar a su lista Haga clic en Subir un nivel para subir un nivel de carpeta en el directorio 2 Filtre temas por género musical como todos Hip Hop Pop R B y otros 3 Ordene archivos por nombre fecha género artista o álbum 4 Compruebe cada archivo que desee agregar Los archivos seleccionados se enumeran a continuación y se mostrará la información como tamaño total número de elementos y tiempo t...

Страница 55: ...añadir más archivos de música haga clic en Agregar música para volver a la pantalla anterior Una vez que se encuentra en su lista de reproducción haga clic en Guar dar o en Cancelar para salir sin guardar Actualizar Refresca las listas de actualizaciones si han sido modificados con Windows Media Player Cancelar Regresa a la página principal de Música ...

Страница 56: ...oducir y use los botones de reproducción estándar en la barra de herramientas flotante para controlar la reproducción Las opciones adicionales incluyen Editar lista de reproducción Le permite añadir eliminar y reordenar los archivos de música dentro de una lista de reproducción ya creada ...

Страница 57: ...57 1 Para mover un archivo de arriba o abajo en la lista de temas seleccione el archivo y use el botón de botón a la derecha del archivo o pulse el botones arriba abajo del control remoto ...

Страница 58: ... vaya a la carpeta que contiene las canciones que desea añadir selecciónelas y haga clic en Siguiente 4 Una vez que su lista de reproducción se ha creado haga clic en Guardar Grabar en disco Le permite crear un CD usando su colección de música Copiar música desde CD Utilice esta opción para transformar CDs de audio en archivos que puede reproducir en la computadora ...

Страница 59: ...os archi vos convertidos WMA MP3 el ajuste de calidad y el directorio utilizado para guardar los archivos a copiar La opción Obtener información de CD desde Internet buscará automática mente en Internet la información título artista nombre del álbum etc para las canciones contenidas en su CD Si la información correspondiente se encuentra se integrará a las canciones al momento de convertirlas Para...

Страница 60: ...ta característica le permite crear un CD de música que puede reproducir en su equipo de audio También puede crear CDs WMA MP3 1 Elija entre crear un CD de música estándar como los que compra en una tienda o un disco WMA MP3 ...

Страница 61: ...pistas que desea grabar en el CD Cada vez que selec cione una pista ésta se agrega a la lista en la parte inferior de la página Nota Puede agregar archivos de música de distintas carpetas a la lista 6 Cuando haya seleccionado todos los archivos que desee haga clic en Siguiente 7 Para eliminar una pista haga clic en su correspondiente botón de Bo rrar papelera 8 Para reorganizar la lista utilice lo...

Страница 62: ...os canales o estaciones que han sido programados On Off Activar o desactivar la radio Grabación Grabación del programa de radio actual como archivo de audio Agregar Agregar un canal manualmente Volumen Aumenta o disminuye el nivel de sonido CH Utilice los botones para saltar hacia adelante o hacia atrás para el canal siguiente o anterior disponible Usted también puede usar los boto nes numéricos p...

Страница 63: ... y hacia atrás Las opciones incluyen Escanear Canales Analizar en busca de canales disponibles Todos los canales aparecen en la lista cuando la búsqueda termina Radio Grabada Compruebe los archivos de audio grabados Valores Ver y editar las configuraciones para el módulo de radio Nota La función de radio podría no estar disponible en todas las versiones del programa ...

Страница 64: ...desea utilizar Elegir la exploración paso entre 0 10MHZ y 0 20MHZ Establezca la ubicación de almacenamiento para los archivos de radio grabados Cuando esté listo haga clic en Guardar o haga clic en Cancelar para salir sin guardar ...

Страница 65: ... en este botón y en pantalla aparecerá lo siguiente En esta opción podrá capturar vídeo de una vídeo casetera por cable coaxial en sustitución del cable de antena Presione el botón Capturar y tendrá la siguiente pantalla ...

Страница 66: ...eo capturado habilite la casilla Crear un disco automáticamente Terminando el proceso presione el icono regresar para retornar a la página anterior Para la opción Guardar a un Disco consulte la página 26 de este manual En la opción Valores podrá habilitar los subtítulos si lo desea además podrá entrar a configurar los dispositivos de vídeo y audio en la opción Configuración de captura ...

Страница 67: ...67 ...

Страница 68: ...no de la lista Después de haber seleccionado el dispositivo el siguiente paso es configurarlo Una vez que todos los dispositivos están configurados seleccione uno para entrar a la pantalla principal del módulo Las opciones incluyen Sincronizar automáticamente Sincroniza tu dispositivo carpeta y la carpeta PC de forma automática Sincronizar manualmente Seleccionar los archivos manualmente para sinc...

Страница 69: ...i zación de carpetas etc Seleccionar dispositivo Seleccione otro dispositivo Sincronizar automáticamente Esta sección le ayudará a sincronizar sus archivos automáticamente La primera vez que se abra esta pantalla la aplicación le guiará para configurar los ajustes Después de terminada la configuración puede comenzar a sincronizar automáticamente los archivos ...

Страница 70: ...o Sincronizar manualmente Aquí podrá seleccionar manualmente los archivos que desee sincronizar entre la computadora y el dispositivo portátil Hay tres secciones en la pantalla Mi PC Mi dispositivo y un área de vista previa Puede hacer clic y arrastrar la línea en el medio para cambiar el tamaño de las secciones Puede seleccionar una carpeta en Mi PC o Mi dispositivo en la lista desple gable Se mo...

Страница 71: ...hivos que se van a sincronizar Crear una carpeta nueva o borrar un archivo carpeta seleccionada haciendo clic en el icono correspondiente Haga clic en el icono de la música para abrir la lista de reproducción Revise la ventana de Vista previa para reproducir el archivo selecciona do Utilice los botones de la barra de herramientas flotante para controlar la reproducción El espacio de disco necesari...

Страница 72: ... de ellas indica el progreso del archivo actual y la otra muestra el progreso global Cuando la sincronización se ha completado el programa le preguntará si quiere ver el registro de sincronización Para cancelar la sincronización haga clic en el botón Detener en cualquier momento ...

Страница 73: ...ra avanzar hasta el comienzo exacto de la sección desea recortar Haga clic en el Inicio de corte botón al lado izquierdo del icono de tijera Use los controles de vista previa es decir reproducir pausa ffwd para avanzar a la final exacto de la sección desea recortar Haga clic en Fin de corte para definir el área a recortar de su vídeo Nota Puede eliminar varias secciones de un vídeo repitiendo los ...

Страница 74: ...dición anterior siguiente en la barra de tiempo Para los archivos de video más de 10 minutos aparecerá otra barra de bajo de la barra de tiempo para indicar su posición actual en relación con el archivo de vídeo completo Programar sincronización Esta sección le permite establecer un calendario para sincronizar entre el PC y el dispositivo móvil El programa permitirá controlar el calendario y sincr...

Страница 75: ... PM Elija con qué frecuencia desea que tenga lugar la sincronización con el ajuste de frecuencia Cuando esté listo haga clic en Aceptar O haga clic en Cancelar en cualquier momento para salir sin guardar Programación Esta área le permite configurar las opciones del módulo Portátil Nota El botón de la carpeta del dispositivo sólo está disponible cuando se utiliza un dispositivo Windows Mobile ...

Страница 76: ...alla de Ajustes para editar el nombre del dispositivo Escriba un nombre de dispositivo en el campo de texto Cuando esté listo haga clic en Guardar o haga clic en Cancelar en cualquier momento para salir sin guardar Si desea volver a la configuración predeterminada haga clic en Predeterminado ...

Страница 77: ...ón con el dispositivo seleccione la opción Eliminar archivos en el dispositivo que han sido borrados en el ordenador Sincronización desde dispositivo Los archivos recién añadidos o actualizados se sincronizan desde el dispositivo a la PC basándose en la configuración de sincronización Sincronización bidireccional entre el ordenador y el dispositivo Los archivos se sincronizarán basándose en la con...

Страница 78: ...uede seleccionar Convertir todos los archivos de fotos o seleccione Convertir todos los archivos incompatibles para un dispositivo en particular Seleccione un formato de archivo la resolución y la calidad Cuando esté listo haga clic en Guardar O haga clic en Cancelar en cualquier momento para salir sin guardar Si desea volver a la configura ción original haga clic en Predeterminado ...

Страница 79: ... particular Ajuste el formato de archivo bitrates muestra de tasas de bits Nota Algunas combinaciones de estas opciones no están disponibles en un formato determinado Es posible que las opciones de cambien automá ticamente al pasar a una opción diferente Esto evita la creación accidental de un archivo inutilizable Cuando esté listo haga clic en Guardar O haga clic en Cancelar en cualquier momento ...

Страница 80: ...e vídeo codificador de audio bitrate de vídeo bitrate de audio y velocidad de fotogramas Nota Muchos de estos valores están relacionados Por lo tanto es muy posible que al seleccionar cierta opción las otras no esten disponibles para evitar la creación de un archivo inutilizable Cuando esté listo haga clic en Guardar O haga clic en Cancelar en cualquier momento para salir sin guardar Si desea para...

Страница 81: ...cronizar automáticamente y Lista de sincroni zación se establecen aquí Seleccione los tipos de archivos que desea sincronizar usando las casillas de verificación y haga clic en el icono de carpeta para localizar los archivos en la ubicación deseada Nota la opción foto no estará disponible para el iPod Cuando esté listo haga clic en Guardar O haga clic en Cancelar en cualquier momento para salir si...

Страница 82: ...spositivos detectados o soportados figuran en esta lista Los dispositivos que no se ven aquí no son detectados por el programa Haga clic en un dispositivo para iniciar la sincronización de archivos con su PC Para retirar un dispositivo selecciónelo y haga clic en Eliminar papelera ...

Страница 83: ...83 CONFIGURACIÓN Esta área le permite configurar los ajustes básicos para cada módulo del programa General Creación de discos Cambie la configuración de la creación de discos ...

Страница 84: ...eño del menú para sus películas Título Escriba su propio título utilice el título del primer vídeo la fecha actual o sin título Fondo Seleccione el fondo del menú Elija la categoría que desee y a continuación el diseño específico Reproducir todos Al marcar el botón Añadir una opción Play All al menú principal usted tendrá la opción de reproducir todos los video clips en el disco una tras otra sin ...

Страница 85: ...n su equipo para guardar los programas de televisión grabados También puede establecer la calidad HQ Alta Calidad SP Reproducción Estándar LP Reproducción Larga EP Reproducción Extendida Configuración de pantalla Aquí podrá modificar la configuración de la forma en que programa se muestra en diferentes tipos de hardware Esta pantalla le permite modificar la configuración de cómo la aplicación apar...

Страница 86: ...n como pantalla ajuste Desentrelazado en Apagado Cuando se utiliza un monitor póngalo en Encendido Elija entre 3D y 2D para el efecto de la interfaz cuando cambia entre módulos 2D significa que sólo se mostrará una transición de fundido al cambiar entre las pantallas 3D significa que habrá un zoom y transición de fundido Utilizar el efecto 2D puede mejorar el rendimiento en sistemas que se tengan ...

Страница 87: ...pción Shuffle para reproducir las canciones en orden aleatorio Compruebe la opción Repetir para que la canción se repita cuando una vez que haya terminado Seleccione Configuración de la conversión de CD para cambiar el for mato de archivo para las pistas copiadas WMA o MP3 ...

Страница 88: ...e CD para Internet busca automáticamente en Internet la información del CD título artista nombre del álbum etc para las canciones que se van a convertir Si se encuentra la información correspondiente se integrará en canciones extraídas del CD Para utilizar esta función asegúrese de que su sistema esté conectado a Internet ...

Страница 89: ...89 ESPECIFICACIONES Alimentación 5V 2 3W x Control remoto Alimentación 3V 2xAAA El diseño del producto y las especificaciones pueden cambiar sin previo aviso ESPAÑOL ...

Страница 90: ...e efectiva la garantía 4 El lugar donde puede adquirir partes componentes consumibles y accesorios así como hacer válida esta garantía es en cualquiera de las direcciones mencionadas posteriormente ESTA PÓLIZA NO SE HARA EFECTIVA EN LOS SIGUIENTES CASOS 1 Cuando el producto ha sido utilizado en condiciones distintas a las normales 2 Cuando el producto no ha sido operado de acuerdo con el instructi...

Страница 91: ...C9610259N4 ELECTRONICA STEREN DE GUADALAJARA S A López Cotilla No 51 Centro 44100 Guadalajara Jal RFC ESG810511HT6 ELECTRONICA STEREN DE MONTERREY S A Colón 130 Pte Centro 64000 Monterrey N L RFC ESM830202MF8 ELECTRONICA STEREN DE TIJUANA S A de C V Calle 2a Juárez 7636 Centro 22000 Tijuana B C N RFC EST980909NU5 En caso de que su producto presente alguna falla acuda al centro de distribución más ...

Страница 92: ......

Страница 93: ...e equipment near wet places May cause malfunction or shock hazard Clean only with a soft dry cloth FEATURES Supports HDTV quality 1920 x 1080 Receive Standard video signals NTSC Record your favourite TV shows in MPEG 2 Snapshot function in JPG BMP TIF and PNG formats Remote control 16 9 and 4 3 display It is manufactured in black plastic Tunes all available digital TV signals ...

Страница 94: ...3 CONTENT Tuner Adaptor Remote Control Antenna Installation CD User s manual ...

Страница 95: ...4 CONTROLS Tuner 1 USB connector 2 Antenna connector 1 2 ...

Страница 96: ...3 Numeric keys Use it to select a channel directly 4 Snapshot When you press it you will get a snapshot of TV signal 5 ESC Press it to exit full screen mode 6 Direction keys Use them to navigate on sofware menues 7 OK Select a menu item 8 REC Press to to record TV 1 3 4 6 8 10 12 2 5 7 9 11 13 ...

Страница 97: ...button a second time the recording will start at the same point where it was stoped 11 CH CH Use this buttons to change channel 12 STOP This button stops completely recording If you press REC button again the recording will start in a new file 13 Vol Vol Use this buttons to increase decrease volume ...

Страница 98: ...RAM OS XP Vista 32 64 bits HOW TO INSTALL THE DRIVERS XP Make sure to install drivers before connect the device to the computer 1 Place the CD installation into CD ROM drive Welcome screen will show 2 Select Setup Driver 3 Select a language and click Next to continue Antes de utilizar su nuevo Kit C ...

Страница 99: ...8 4 Click Next 5 Select Complete then click Next to continue ...

Страница 100: ...9 6 Click Finish 7 Restart the computer ...

Страница 101: ...TION XP After installing drivers please install the Software Application 1 Place the installation CD into the CD ROM driver Welcome screen will show 2 Select Setup Utility 3 Select the language and click Accept to continue ...

Страница 102: ... Next to continue 5 Click Accept after reading the License Agreement 6 Type an User name Company name and serial number The serial number is in a file called 35sn txt in utility folder Then click Next to continue ...

Страница 103: ...12 7 Select the folder where you want to install the files ...

Страница 104: ...ONS After installing software application install the device 1 Plug the included antenna or coaxial cable from a external antenna using the included adaptor We recommend to use a HD antenna 2 Plug the USB cable into the USB connector in the tuner and the laptop ...

Страница 105: ...play click Not now then click Next Installation CD must be placed into the CD ROM drive 4 Then click Install automatically 5 Click Finish It is possible that you need to repeat steps 3 to 5 twice Antes de utilizar su nuevo Kit C Antes de utilizar su nuevo Kit C ...

Страница 106: ...O USE 1 Run Total Media 3 5 2 Next window will display in the screen you will have three options TV DVD Picture Video Music Radio To Go Setup TV 3 Select TV 4 In this window you can set the TV signal click Next ...

Страница 107: ...k Next to continue 6 In the next window you will have two options Auvitek Dongle Analog Capture and Auvitek Dongle Digital Tuner please select first option if you want to watch Standard TV or second one if you want to watch HD TV ...

Страница 108: ...17 If you select Auvitek Dongle Analog Capture next window will display Select an audio device ...

Страница 109: ...le TV or Antenna TV according your service 8 Click Start to search available TV signals At the end a window will display with found channels Click OK Click Next to continue Click Stop if you want to stop the channel searching ...

Страница 110: ...ard and digital After your first searching the software will request if you want to search for a different TV signal 10 If you don t want to search other kind of TV signal click NO then click Finish to store all changes If you select Yes repeat steps 7 and 8 ...

Страница 111: ...20 To start using the tuner in TV mode click this icon Then select TV Next window will display ...

Страница 112: ...EN Click to change to full screen press ESC to back to previous size or click twice over the screen EPG Use this option to see the available channel guide To watch a channel select the desired one click on it twice ...

Страница 113: ...annel name Click OK to store the changes SELECT ANALOG OR DIGITAL SIGNAL To change between analog and digital TV use this button in the lower bar RECORDED TV With this option you can play a stored video file or record the file into a CD or DVD only if your laptop has a CD DVD burner A TV program must be recorded previously before using this feature ...

Страница 114: ...23 To record a TV program select the channel Click Record To stop the recording click on the next icon Click Recorded TV next window will display ...

Страница 115: ...he recorded file will be stored in mpg format select the file and you will see three icons next to the file Edit a video Rename a video Delete a video To edit a video Click the icon next window will display ...

Страница 116: ...ck to mark the Starting point Click the next icon A mark will be displayed in the start Select and Ending point and click on it Click next button After these steps a window will display with the edited video ...

Страница 117: ...ll not be displayed Repeat the steps to cut as many segments as you want Click Save to store the file TV recording functions Undo Redo Selects the Starting point of a segment Selects the Ending point of a segment Restarts video edition when you click the icon next message will display Are you sure you want to reset ...

Страница 118: ...27 Play Pause Stops a play Click to backward or forward a video To rename a video file select the file click the next icon A window will display Select a new name click OK ...

Страница 119: ... DVD In Recording TV mode click Burn to Disc next window will display In case the software can t find the recording drive click Then select Setuo General Disc creation in Burn option select the driver and restart the software Antes de utilizar su nuevo Kit C Antes de utilizar s nuevo Kit C ...

Страница 120: ...ord at down of the screen you can see the required space Then click Record to start the process When the process finish next message will display If you want to make a second copy of the video select first option Otherwise click Done to finish ...

Страница 121: ... helps you to configure the way a CD DVD is recorded In TV system select one of the TV systems PAL or NTSC In Burn To select the recording drive unit it can be D E F or other Disc format select between VCD or DVD Audio format select an audio format To store changes click Save ...

Страница 122: ...31 SCHEDULE With this option you can program the time of recording automatically Click Add next window will display Click To name the program you want to record ...

Страница 123: ...na or ATSC cable In the Start recording section the date will display as a first option if you select Once or Daily the day of the week may appears if you select Weekly Select the Starting and Ending recording time Check Shut down the computer if you want to close the software automatically after recording finish Click Save to finish ...

Страница 124: ...GS Select this option to set TV mode When you click this button next message will display Click Yes to continue Reset TV signal With this option you can restart TV signals refers to pages 14 to 17 steps 5 to 10 ...

Страница 125: ...hannels will be displayed in the screen To select a channel click in the left box of each channel If you want to select all the channels at once click Select All Delete All will uncheck the selection If you want to rename the channels first select one of them and then click on the icon Next window will display ...

Страница 126: ...35 Click Done after renamed If you want to delete a channel select the desired channel and click next icon Finally click Save to store changes ...

Страница 127: ...he options please select an application just in the case you have an additional AV device Click Apply to save changes Importing Exporting channel list With this options you can import or export channel lists just select the file and click Export To import a file click Import and select the file you want to import ...

Страница 128: ...en Displays the video over the entire program displaying area DVD Menu Takes you to the DVD menu screen Frame Capture Takes a screen capture of the current video screen Eject Ejects the disc Settings View and edit the settings for playing DVDs and capturing video Settings Modify the settings for playing DVDs and capturing video ...

Страница 129: ...subtitles the main audio track and the DVD menus Parental Control Set passwords that must be entered before movies at specific ratings PG PG 13 R etc can be played Frame Storage Here you can set the save location and file type for captured screenshots Auto Resume You can choose to resume playback of a DVD from the last stopped point or from the very beginning ...

Страница 130: ... one directory level The photos in the current folder will show as thumbnails on the screen Click a thumbnail to display it in full screen mode From the View section you can choose either Detail or Thumbnail view Both views show you thumbnails of the available photos and folders Detail view includes file folder names and dates From the Sort section choose to arrange the photos according to name da...

Страница 131: ...There are several controls on the toolbar to help you Play Play the photo and the following photos as a slide show please set the slide show settings before playing Previous Go to the previous photo Next Go to the following photo Edit Edit the photo with a number of editing options Exit Quit the full screen view ...

Страница 132: ...f the photos in the current location starting with the one you selected Before playing a slide show please set the Slide Show Settings Stop the slide show by double clicking the mouse or pressing Esc on the keyboard SETTINGS Set the transition effects timing and background music for your slide show ...

Страница 133: ... box to have your slide show automatically restart once it completes Press the Esc key to exit a looping slide show In the Music Soundtrack section choose On to play one or more songs during the slide show Click the Add button to set background music The added music files will be listed You can also remove a music track by selecting it and clicking the Delete trash can button The total time of the...

Страница 134: ... the category of the music you want to add Options include All Hip Hop Pop R B and Other From the Sort section choose to arrange the songs according to Name Date Genre Artist and Album Select the songs you want to add by clicking on the songs one by one or using the Select All option Click Deselect All button to undo the selec tion Checkmarks indicate selected songs When ready click the Add button...

Страница 135: ...ws show you thumbnails of the available photos and folders Detail view includes file folder names and dates 3 From the Sort section choose to arrange the photos according to name date or size 4 To see the photo in greater detail move the mouse to each file to show a larger view 5 Select the photos you want to print by clicking on the photos one by one or using the Select All button Click the Desel...

Страница 136: ...aper Size you re using A preview of your choice will appear to the right 8 Enter the number of Copies you want of each printed page 9 Click Print Edit A multitude of editing options are available each one being extremely easy to use Options include ...

Страница 137: ...om In Out Pan Use this tool to zoom in and out on your photo When zoomed in you can move to hidden areas of the photo by switching to the pan tool Auto Enhance Selecting this option presents you with three automatically enhanced versions of your photo plus your original Simply choose the one you like best ...

Страница 138: ...ble to fix it manually using the following steps 1 In Move mode position the crosshairs over the red eye area 2 Press enter then click Fix It to get rid of the red Click Restore to start over 3 When you re finished click Done Crop You can crop your photo to any one of a variety of set proportions that are ideal for perfect printing ...

Страница 139: ...ttons resize the crop box to your liking 3 Choose Move and then position the crop box over the area of the photo you want to keep 4 To execute the crop command choose Crop It 5 Choose Done to cancel Previous Next Photo These buttons let you navigate to the previous next photo in the current location ...

Страница 140: ...49 Delete Choose this option to delete the current photo Exit Go back to the previous screen Burn to disc Here you can create DVD VCD slide shows and archive your photos to disc ...

Страница 141: ...ow you thumbnails of the available photos and folders Detail view includes file folder names and dates 3 From the Sort section choose to arrange the photos according to name date or size 4 Click on a photo to see a larger view of it 5 Select the photos you want to burn by clicking on the photos one by one or using the Select All option Or click the Deselect All button to undo the selection Checkma...

Страница 142: ...Disc With Archive Of Original Photos creates a DVD slide show and copies the original files to a directory on the disc Archive Original Photos To Disc makes a backup disc of the selected files 8 Whether you create a DVD or VCD disc depends on your Disc Creation settings Note Some versions of the application do not provide both options When you re ready choose Start or Cancel to go back ...

Страница 143: ... to go up one folder level in the directory Select any music file to play it and use the standard playback buttons on the floating toolbar to control playing files There is a preview window in the bottom left corner of the screen You can click the button next to it to display it in full screen mode Press Esc to exit full screen Filter tracks by music genre such as All Hip Hop Pop R B and Other Sor...

Страница 144: ...ew audio playlists Playlists are compatible with Windows Media Player 9 and stored in the My Documents My Music My Playlists directory If you modify a playlist using Media Player the changes will be reflected in TotalMedia the next time you start the program pressing Refresh will also update the playlists ...

Страница 145: ...your new playlist Click the Up One Level button to go up one folder level in the directory 2 Filter tracks by music genre such as All Hip Hop Pop R B and Other 3 Sort files by name date genre artist or album 4 Check each file that you want to add The selected files are listed below and the information such as total size number of items and total time will be shown 5 When you re ready click Next ...

Страница 146: ...ighlighting it and clicking the Delete trash can button 8 To add more music files click the Add Music button to go back to the previous screen Once your playlist is set click Save or click Cancel to exit without saving Refresh Updates playlists if they ve been modified with Windows Media Player Cancel Takes you back to the main Music page ...

Страница 147: ...dow in the bottom left corner of the screen You can click the button next to it to play it in full screen mode Press Esc to exit full screen Additional options include Edit Playlist Allows you to add remove and rearrange music files within a playlist alreadycreated This screen allows you to update the current playlist by adding removing and rearranging music files ...

Страница 148: ...57 1 To move a file up or down in the playlist select the file then go to the Move Up Down button to the right of the file or press the up down buttons on your remote ...

Страница 149: ...dd Music navigate to the folder containing the songs you want to add select the songs then click Next 4 Once your playlist is set click Save Burn To Disc Allows you to create a music CD from the music playlist Rip Music CD It s easy to rip convert your audio CDs into audio files you can play back on your computer ...

Страница 150: ...mat for ripped files WMA or MP3 if available the quality setting and the directory used for saving the ripped files The Get CD Information from the Internet option will automatically search the Internet for CDDB information title artist album name etc for the songs contained on your CD If corresponding information is found it will be embedded into your ripped music To use this feature make sure yo...

Страница 151: ...eature enables you to create music CDs that you can play in your home stereo or car audio system You can also create WMA MP3 CDs 1 Choose to create either a standard music CD like those you buy at the store or a WMA MP3 disc ...

Страница 152: ... or album 5 Select the tracks you want to burn to the CD Each time you select a track it is added to the list at the bottom of the page Note You can add music files from different folders to the list 6 When you have selected all the files you want click Next 7 To remove a track click its corresponding Delete icon trash can 8 To rearrange your list use the Up Down arrow buttons to the right of each...

Страница 153: ...ers on the console indicate various channels stations that are preset On Off Turn on or off the radio Record Record the current radio program as an audio file Add Add a channel manually Volume Increase or decrease the sound level CH Use the buttons to skip forward backward to the next previous available channel You can also press the number buttons to the desired channel ...

Страница 154: ...ext available station Options include Scan Channels Scan for available channels All the channels will be listed below Recorded Radio Check the recorded audio files Settings View and edit the settings for the Radio module Note The Radio feature may not be available in all versions of the program Settings View and edit Radio settings ...

Страница 155: ...64 Choose the device you want to use Choose the scan step between 0 10MHZ and 0 20MHZ Set the save location for recorded radio files When you re ready click Save or click Cancel to exit without saving ...

Страница 156: ...65 VIDEO Click to see next window With this option you can capture video from a VCR through coaxial cable Click Capture you will see next Window ...

Страница 157: ...k Capture finally click Play in the VCR If you want to record into a CD DVD check Save in disc automatically Click Back icon to return previous page For Save into CD option refers to page 26 In Settings you can activate or deactivate the subtitles also you can set AV devices with Capture Setting option ...

Страница 158: ...67 ...

Страница 159: ...m will prompt you to select one from the list After you have selected a device then the next thing to do is to configure it It s important to do this Once all devices are configured select a device to enter the screen above Options include Automatically Sync Synchronize your device folder and PC folder automatically Manually Sync Manually select files to synchronize between your PC and device ...

Страница 160: ...t synchronization folder etc Select Device Select another device Automatically sync This section help you synchronizes your files automatically The first time this screen is opened the application will lead you through configuring the settings After that is completed you can start automatically synchronizing files ...

Страница 161: ... between your PC and device There are three sections on the screen My computer My device and a Preview area You can click and drag the line in the middle to change the size of the My computer and My device sections You can select a folder under My computer or My Device in the pull down list The files in the selected folder will be listed showing the name size status duration type and date time Thi...

Страница 162: ...rrow button in the middle to add it to the list of files to synchronize Create a New folder or delete a selected file folder by clicking the corresponding icon Click the music icon to open your playlist Check the Preview box to play a selected file Use the buttons on the floating toolbar to control playback The required disc space and the available space will be shown at the bottom of the screen I...

Страница 163: ... bottom right of the screen One is for the current file conversion and the other is for the overall progress When the sync has completed the program will prompt you to view the sync log To cancel the sync click the Stop button at any time ...

Страница 164: ...dvance to the exact start of the section you d like to trim Click the Mark In button next to the scissor icon Use the preview controls ie play pause ffwd to advance to the exact end of the section you d like to trim Click the Mark Out button to define the area to be trimmed out of your video Note You can remove multiple sections of a video by repeating steps 1 4 over other areas of the video track...

Страница 165: ...n be used to jump to the previous next edits on the time bar For video files longer than 10 minutes a seek bar appears beneath the time bar to indicate your current position relative to the entire video file Schedule sync This section lets you set a schedule to synchronize between your PC and mobile device The program will monitor the schedule and synchronize files automatically on the schedule yo...

Страница 166: ...o select AM or PM Choose how often you want synchronization to take place using the Frequency setting When you re ready click OK Or click Cancel at any time to exit without saving Settings This area lets you configure the settings for To Go module Note The Device Folder button is only available when you are using a Windows Mobile Device ...

Страница 167: ...evice Name button in the Settings screen to edit device name Type in a device name into the text field When you re ready click Save or click Cancel any time to exit without saving If you want to switch back to default settings click Default ...

Страница 168: ...e deleted files on the computer while syncing to device check the Delete files on device which have been deleted on PC option Sync from device Newly added or updated files will be synchronized from device to PC based on the sync folders settings Bidirectional sync between computer and device Files will be synchronized based on the sync folders settings on both PC and device When you re ready click...

Страница 169: ...n Settings section you can select Convert All Photo Files or select Convert All Incompatible Files for a particular device Select a file format resolution and quality from the list When you re ready click Save Or click Cancel at any time to exit without saving If you want to switch back to original default settings click Default ...

Страница 170: ...the file format bitrates sample bitrates channels by selecting from the pull down list Note Some combinations of these options are not available in a particular format You may see some options change automatically as you change a different option This prevents you from accidentally creating an unusable file When you re ready click Save Or click Cancel at any time to exit without saving If you want...

Страница 171: ...lution video encoder audio encoder video bitrate audio bitrate and frame rate by selecting from the pull down list Note Many of these settings are related So it is quite possible that when you select a certain option the other options will change or become unavailable to prevent you from creating an unusable file When you re ready click Save Or click Cancel at any time to exit without saving If yo...

Страница 172: ...ders for Automatically sync and Schedule sync are set here Select the types of files you want synced using the checkboxes and click the folder icon to browse for the desired location to synchronize files Note The photo option will not be available for iPod When you re ready click Save Or click Cancel at any time to exit without saving ...

Страница 173: ...r device All devices detected or supported are listed here The devices not seen here are either not connected or unavailable Click on a device to start synchronizing files with your PC Remove a device by selecting it then click Delete trash can ...

Страница 174: ...83 SETUP This area lets you configure the basic settings for each module of the program Options include Disc Creation Change disc creation settings This section lets you change ...

Страница 175: ...esign for your movies Title Enter your own title use the title of the first video use the present date or include no title at all Background Select the menu background Choose the category you want and then the specific design Play All By checking the Add a Play All Option to the main menu box you will have the option of playing all the video clips on the disc one after the other without needing to...

Страница 176: ...ion on your computer to save your recorded TV programs You can also set the quality HQ High Quality SP Standard Play LP Long Play EP Extended Play Display Settings Modify the settings for how the program displays on different types of hardware This screen enables you to modify the settings for how the application appears on different kinds of monitors or televisions ...

Страница 177: ...etween 3D and 2D for the interface Display Effect 2D means that there will only be a fade transition when switching between screens 3D means there will be a zoom and fade transition Using the 2D Display Effect can improve performance on systems that are near the minimums listed in the system requirements About TotalMedia Get information about ArcSoft TotalMedia and access tools for registering you...

Страница 178: ... music settings Check the Shuffle option to have the songs play in random order Check the Repeat option to have the music start over again when it s done Choose Rip CD Settings to change the file format for ripped tracks WMA or MP3 ...

Страница 179: ...88 ENGLISH SPECIFICATIONS Input 5V 2 3W x USB Remote control Input 3V 2xAAA Product details and specifications are subject to change without previous notice Antes de utilizar su nuevo Kit C ...

Страница 180: ... exceed 30 natural days from the day the claim was received 4 Steren sell parts components consumables and accessories to customer as well as warranty service at any of the addresses mentioned later THIS WARRANTY IS VOID IN THE NEXT CASES If the product has been damaged by an accident acts of God mishandling leaky batteries failure to follow enclosed instructions improper repair by unauthorized pe...

Отзывы: