background image

Appendix

UR-RT4 / UR-RT2 Operation Manual

37

Signal Flows

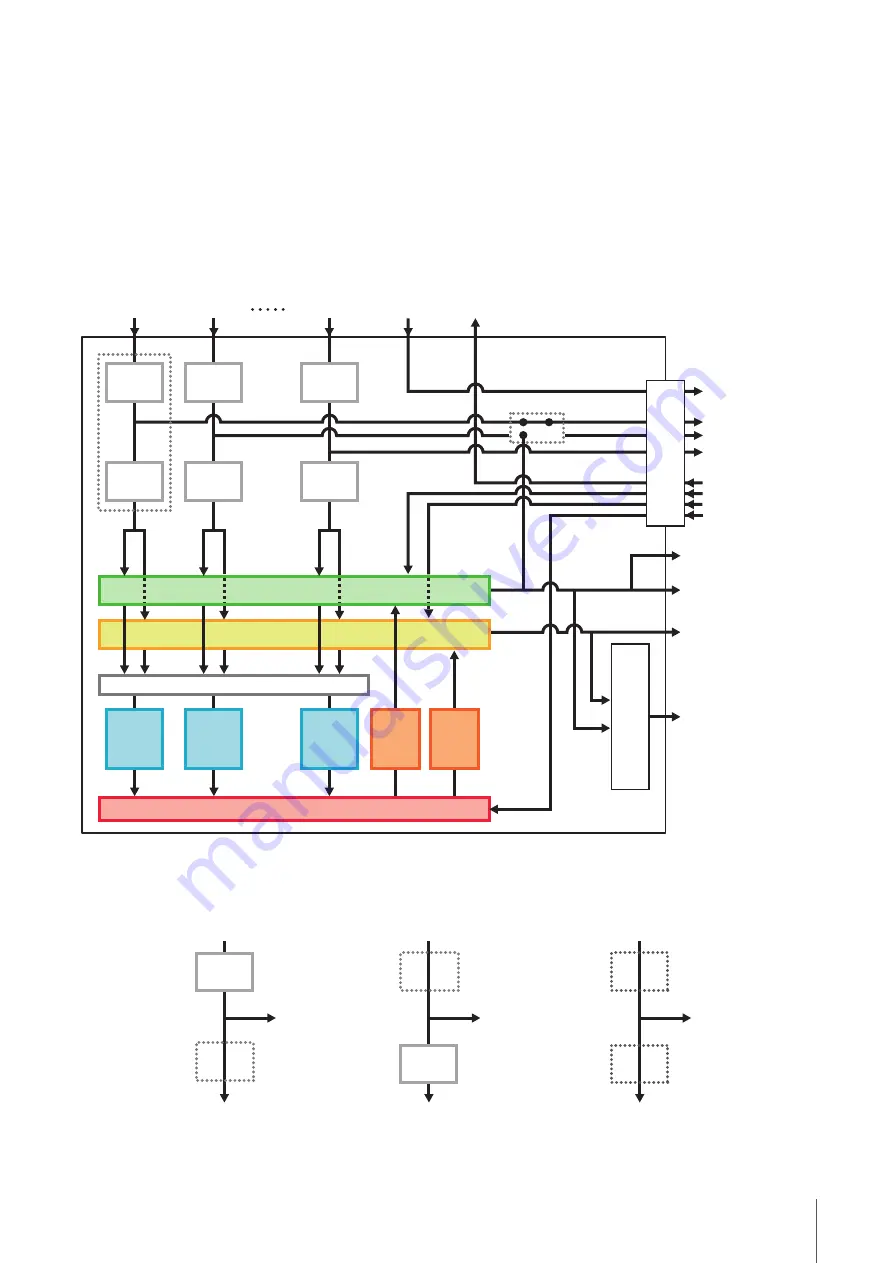
The following chart indicates the signal flow in the device.

NOTE

The controllers on the device, such as the [GAIN] knob, [OUTPUT] knob are not included in this chart.

To configure each parameter, use the “dspMixFx UR-RT” (

page 11

) or “Dedicated Windows for Cubase Series” (

page 16

).

Please note that you cannot use the built-in Channel Strip (Ch. Strip) and Guitar Amp Classics when the sample rate is set to 176.4 kHz or 
192 kHz.

UR-RT4

*1 The following chart indicates an effect insertion location.

*2 You can turn this on for either MIX 1 or MIX 2.

*1

MIX 2

MIX 1

- X

LOOPBACK OFF/ON

To 

[MIDI OUT]

Ch. Strip

Ch. Strip

From 

[MIC/HI-Z 1]

REV-X

Send 

Level

From 

[MIC/HI-Z 2]

Ch. Strip

Ch. Strip

REV-X

Send 

Level

Ch. Strip

Ch. Strip

REV-X

Send 

Level

REV-X select *2

REV-X

Return 

Level

REV-X

Return 

Level

From 

[MIDI IN]

To DAW input

From 
DAW output

To [MAIN OUTPUT]
To [LINE OUTPUT 1/2]

To [LINE OUTPUT 3/4]

To [PHONES 2]

To [PHONES 1]

REV-X

From 

[LINE INPUT 6]

OUTPUT SELECT

USB

Lower (MON.FX)

To DAW
input

Ch. Strip

From input on the device

To output on the device

To DAW
input

From input on the device

To output on the device

Upper (INS.FX)

From input on the device

To output on the device

To DAW
input

Ch. Strip

Not applied (OFF)

Содержание UR-RT2

Страница 1: ...USB AUDIO INTERFACE UR RT4 UR RT2 Operation Manual Operation Manual EN...

Страница 2: ...X 21 Guitar Amp Classics 23 Using with a Computer 26 Connection Example UR RT4 26 Connection Example UR RT2 27 Configuring Audio Driver Settings on the DAW Software 28 Recording Playback 28 Using with...

Страница 3: ...n the 48V switch phantom power is turned on 6 TRANSFORMER switch Switches the transformer circuit of the MIC HI Z 1 2 jack and MIC LINE 3 4 jack on and off NOTE The unit features one transformer of an...

Страница 4: ...e MIX 1 or MIX 2 signals To select the output signal of the PHONES 2 refer to Headphone Area page 14 in the section dspMixFx UR RT or the Headphones Window page 17 in the section Dedicated Windows for...

Страница 5: ...nnecting devices not requiring phantom power to the MIC HI Z 1 2 and MIC LINE 3 4 jacks make sure to set the phantom power switch to OFF NOTE When the phantom power switch is turned on and off all inp...

Страница 6: ...nal is 3 dB below the clipping level 5 48V indicator Lights up when the 48V switch phantom power is turned on 6 TRANSFORMER switch Switches the transformer circuit of the MIC LINE 1 2 jack on and off...

Страница 7: ...GAIN 1 2 knob Adjusts the input signal level of the MIC LINE 1 2 jack 8 PHONES knob Adjusts the output signal level of the PHONES jack 9 PHONES jack For connection to a set of stereo headphones OUTPU...

Страница 8: ...minimum before turning the phantom power switch to ON or OFF When connecting devices not requiring phantom power to the MIC HI Z 1 2 jacks make sure to set the phantom power switch to OFF NOTE When th...

Страница 9: ...s window is for selecting the sample rate 1 Sample Rate Lets you select the sample rate of the device Options 44 1 kHz 48 kHz 88 2 kHz 96 kHz 176 4 kHz 192 kHz NOTE The available sample rates may diff...

Страница 10: ...ect the sample rate from the Format menu How to Select the Buffer Size Mac You can select the buffer size in the settings window for each application DAW software etc 1 From the Cubase series menu sel...

Страница 11: ...e the scene name by clicking on it Clicking the button on the right opens the window for calling up other scenes Call up the desired scene by clicking it To cancel calling up the scene click outside o...

Страница 12: ...unlit 7 Effect Edit Opens lit and closes unlit the selected effect setup window 8 Effect Type Select the effect type Options ChStrp Clean Crnch Lead Drive NOTE The maximum number of Channel Strip and...

Страница 13: ...the signal level 2 REV X Send On Indicates that REV X Send is on This is normally set to on 3 REV X Edit Opens lit and closes unlit the REV X page 21 setup window 4 REV X Type Selects the REV X type...

Страница 14: ...be selected UR RT4 only PHONES 1 is fixed to MIX 1 and cannot be changed Setup Window This window is for configuring the common settings of the device 1 CONTROL PANEL For Windows this opens the Yamah...

Страница 15: ...the loopback function turn off the monitor functions on your DAW software Options Description Circular Drag in a circular motion to increase and decrease the parameter Drag on a dial clockwise to inc...

Страница 16: ...antom power on off status 2 Phase Turns on lit and off unlit the phase inversion of the signal 3 High Pass Filter Turns on lit and off unlit the high pass filter not available on LINE INPUT 5 6 LINE I...

Страница 17: ...his window is for configuring the general settings of the device Click the upper tabs to select the window Only the settings on the Reverb Routing window are saved to the Cubase project file Headphone...

Страница 18: ...Level Knob Adjusts the return level of the selected highlighted signal Range dB 6 00 dB Settings Windows This window is for configuring the device settings 1 INPUT 5 6 LEVEL INPUT 3 4 LEVEL Selects t...

Страница 19: ...the default settings Note that you cannot use the built in Channel Strip when the sample rate is set to 176 4 kHz or 192 kHz Screenshot How to Open the Window From Dedicated Windows for Cubase Series...

Страница 20: ...izer 1 Equalizer Curve This graph indicates the characteristics of the 3 band equalizer The vertical axis indicates the gain and the horizontal axis indicates the frequency You can adjust LOW MID and...

Страница 21: ...from DAW software to REV X For example to send the recorded audio data to REV X you can check the sound with REV X which is used for monitoring during the recording Screenshot How to Open the Window...

Страница 22: ...w Freq Adjusts the frequency of the Low Ratio Range 22 0 Hz 18 0 kHz OPEN CLOSE Opens and closes the window for adjusting the reverb settings Graph Indicates the characteristics of reverberation The v...

Страница 23: ...ics from the Effect Type then click Effect Edit in the section Input Settings Window page 16 From dspMixFx UR RT Select the Guitar Amp Classics from the Effect Type then click Effect Edit in the secti...

Страница 24: ...turally Types 3 and 4 have more pronounced overtones resulting in a fat soft tone Types 5 and 6 deliver wilder aggressive distortion with a tight attack The even numbered amp types have greater presen...

Страница 25: ...to the preamp stage affecting the amount of distortion produced MASTER adjusts the output level from the preamp stage that is then fed to power amp stage The GAIN and MASTER control settings have a la...

Страница 26: ...yboard Monitor speakers Outboard Headphone amp Microphone Guitar Keyboard Headphones Rear panel Front panel Mixer When using the condenser microphone turn the switch on after connecting it Turn the sw...

Страница 27: ...imum before connecting or disconnecting the external device Check Computer Synthesizer MIDI keyboard Monitor speakers Headphones Rear panel Front panel Microphone Guitar Keyboard Mixer When using the...

Страница 28: ...e connection examples pages 26 27 Turn the 48V switch on when using a phantom powered condenser microphone Cubase Series Programs 1 Launch the Cubase series DAW The steinberg hub window appears 2 Sele...

Страница 29: ...eries menu Programs Other Than Cubase Series 1 Launch your DAW software 2 Open dspMixFx UR RT For instructions on how to open dspMixFx UR RT refer to the section How to Open the Window page 11 3 Adjus...

Страница 30: ...es refer to the Steinberg Website below http www steinberg net Set all volume levels to minimum before connecting or disconnecting the external device Check When using the condenser microphone turn th...

Страница 31: ...s refer to the Steinberg Website below http www steinberg net Set all volume levels to minimum before connecting or disconnecting the external device Check Synthesizer MIDI keyboard Monitor speakers H...

Страница 32: ...t 4 Enter a project name and tap OK in the New project window 5 Tap AUDIO to add an AUDIO track 6 Tap on the far left of your screen to show the track menu with Audio input at the top 7 Tap to show th...

Страница 33: ...n also tap to return the beginning of the recording 14 Tap to playback the recorded sound dspMixFx for iOS devices From your iOS devices you can conveniently control built in DSP mixer functions and D...

Страница 34: ...de instructions to complete the TOOLS for UR RT installation Confirm whether or not a proper USB cable is used If the USB cable is broken or damaged replace the USB cable with a new one Make sure to u...

Страница 35: ...ise interruption or distortion Does your computer satisfy the system requirements Confirm the system requirements For the latest information see the Steinberg website below http www steinberg net Are...

Страница 36: ...p and Guitar Amp Classics iterations which can be used simultaneously are limited to the following For example Channel Strip can be used for two mono channels while Guitar Amp Classics can be used for...

Страница 37: ...ct insertion location 2 You can turn this on for either MIX 1 or MIX 2 1 MIX 2 MIX 1 X LOOPBACK OFF ON To MIDI OUT Ch Strip Ch Strip From MIC HI Z 1 REV X Send Level From MIC HI Z 2 Ch Strip Ch Strip...

Страница 38: ...REV X Send Level REV X Send Level REV X Return Level To MIDI OUT From MIC LINE 1 From MIC LINE 2 From MIDI IN From LINE INPUT 4 From DAW output To MAIN OUTPUT 1 2 To PHONES 1 USB Lower MON FX To DAW i...

Страница 39: ...Appendix UR RT4 UR RT2 Operation Manual 39 Block Diagrams UR RT4 44 1 48 88 2 96 kHz TRANSFORMER TRANSFORMER...

Страница 40: ...Appendix UR RT4 UR RT2 Operation Manual 40 UR RT4 176 4 192 kHz TRANSFORMER TRANSFORMER...

Страница 41: ...Appendix UR RT4 UR RT2 Operation Manual 41 UR RT4 44 1 48 88 2 96 kHz iOS device TRANSFORMER TRANSFORMER...

Страница 42: ...Appendix UR RT4 UR RT2 Operation Manual 42 UR RT4 176 4 192 kHz iOS device TRANSFORMER TRANSFORMER...

Страница 43: ...Appendix UR RT4 UR RT2 Operation Manual 43 UR RT2 44 1 48 88 2 96 kHz TRANSFORMER TRANSFORMER...

Страница 44: ...Appendix UR RT4 UR RT2 Operation Manual 44 UR RT2 176 4 192 kHz TRANSFORMER TRANSFORMER...

Страница 45: ...Appendix UR RT4 UR RT2 Operation Manual 45 UR RT2 44 1 48 88 2 96 kHz iOS device TRANSFORMER TRANSFORMER...

Страница 46: ...Appendix UR RT4 UR RT2 Operation Manual 46 UR RT2 176 4 192 kHz iOS device TRANSFORMER TRANSFORMER...

Страница 47: ...ee air Temperature Range 0 40 C Included Accessories AC adaptor PA 150B or equivalent TOOLS for UR RT4 CD ROM Startup Guide brochure CUBASE AI DOWNLOAD INFORMATION printed ESSENTIAL PRODUCT LICENCE IN...

Страница 48: ...102 dB A Weighted THD N 0 0025 1 kHz 3 dBFS 22 Hz 22 kHz BPF Maximum Input Level 22 dBu 4 dBu input 2 1 dBV 10 dBV input Input Impedance 30 k 4 dBu input 20 k 10 dBV input Gain Selection 4 dBu or 10...

Страница 49: ...UT 3 4 balanced unbalanced Frequency Response 0 1 0 1 dB 20 Hz to 22 kHz Dynamic Range 102 dB A Weighted THD N 0 0025 1 kHz 3 dBFS 22 Hz 22 kHz BPF Maximum Input Level 22 dBu 4 dBu input 2 1 dBV 10 dB...

Страница 50: ...s click Continue or Yes 6 Follow the on screen instructions to remove the software Repeat steps 4 through 6 to uninstall the remaining software you have not selected Uninstalling TOOLS for UR RT is no...

Страница 51: ...Steinberg Website http www steinberg net Manual Development Group 2018 Yamaha Corporation Published 02 2018 MW A0...

Отзывы: