background image

4

LAYOUT PLAN A 

A

13mm

MINIMUM AND MAXIMUM TABLE

Wall out of plumb will not allow the full minimum / maximum range.

WALL


CHANNEL

WALL 

CHANNEL

X

X

X

X

SHOWER TYPE

FRONT PANEL (A) MIN/MAX

RETURN PANEL (B) MIN/MAX

900 x 900 Square (2 Sided)

870mm to 890mm

870mm to 890mm

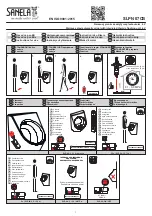
IMPORTANT! Before you start read through to get the concept.

1. Mark out the wall channels 13mm off acrylic tray edge.
2. If the tray is not level or walls are out of plumb protruding or curving inwards more than 4mm 

recalculation of this position as required. Use the Min to Max Table below.

3. Plumb and mark the boundary lines of wall channels and predrill a 2mm lead hole in the liner.
4. Apply a continuous 7mm bead of silicone on the back of channel, fasten to wall ensuring these 

remain plumb.

Содержание VIDA

Страница 1: ...0 IMPORTANT 1 When you receive your Vida Square Shower package please check for any freight damage 2 If damage has occurred advise your supplier within 8 hours 3 Do not install any faulty product as this will invalidate later claims ...

Страница 2: ...en drilling walls to avoid hidden pipes or electrical cables IMPORTANT PREPARATION STEPS 1 Solid fixing must be provided in the walls behind the wall channels 20mm centre off outside of the Acrylic tray 2 Plumbing fittings in the wall need suitable solid fixings 3 All plumbing must be completed by a registered plumber and be in place prior to being lined 4 The wall lining must be a Wet Area grade ...

Страница 3: ...hannel 1830 2 Pc 3 Wall Channel Screws ST3 5x35 8 Pc 4 Screw Cap 9 Pc 5 Frame to Wall Channel Screws ST4x10 9 Pc 6 Door Panel 1725x780x6 1 Pc 7 Handle 1 Pc 8 Return Panel 1830x822x5 1 Pc 9 Door Bottom Seal 780 1 Pc 10 Back Door Seal 1760 1 Pc 11 Pivots Top and Bottom 2 Pc 12 Pivot Screw Cap 2 Pc PARTS LIST ...

Страница 4: ...re you start read through to get the concept 1 Mark out the wall channels 13mm off acrylic tray edge 2 If the tray is not level or walls are out of plumb protruding or curving inwards more than 4mm recalculation of this position as required Use the Min to Max Table below 3 Plumb and mark the boundary lines of wall channels and predrill a 2mm lead hole in the liner 4 Apply a continuous 7mm bead of ...

Страница 5: ... channels Fasten outside corner square up door in frame Align shower screen to tray and wall channels Complete fastenings Join the two panels at corner 5 6 7 5 1 5 2 6 1 6 2 7 1 7 2 7 3 5 3 5 4 7 4 7 5 7 6 7 7 7 8 7 9 2 6 8 8 5 5 5 6 2 INSTALLATION ...

Страница 6: ...6 8 9 8 1 8 2 8 3 8 4 9 1 9 9 9 9 6 6 6 6 6 9 INSTALLATION Fit back door seal and make final adjustments to door Fit door parts ...

Страница 7: ...er screen because water can build up over time within the wall channel and leak out of the shower area The screen is designed to allow the water to return into the shower area if any is present SCREENS THAT ARE SEALED ON THE INSIDE WILL VOID WARRANTY ALLOW 24 HOURS FOR SILICONE TO FULLY DRY BEFORE USE S ilicone Si licone Seal the join between wall profile and frame 150mm up from base on both sides...

Отзывы: