background image

39

749.082 | Z02 | 2015-02-03

EN

5 Installation

Notice

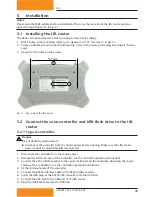
Please note the MAC address before installation. This is on the rear side of the IFA router and is re-

quired for registration (

 in Fig. 7). 

5.1  Installing the IFA router

The device can be fastened to a flat mounting surface (wall, ceiling):
1.  Drill 2 holes in the mounting surface, at a clearance of 131 mm (see 

 in Fig. 7).

2.  Screw a suitable screw into each hole, leaving 5 mm of the screw protruding (use dowels if neces-

sary).

3.  Hang the IFA router on the screws.

131 mm

1

2

Fig. 7:   Rear side of the IFA router

5.2  Connect the solar controller and USB flash drive to the IFA 

router

5.2.1 Type A controller

 Danger

Risk of death by electrocution!


Disconnect the controller from the mains power before opening. Make sure that the mains 

power cannot be unintentionally reconnected.

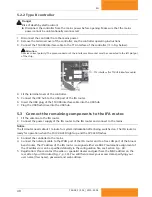
1.  Disconnect the controller from the mains power. 
2.  Remove the terminal cover of the controller; see the controller operating instructions.
3.  Connect the S232 interface cable to the correct terminals on the controller, observing the colour 

coding of the conductors; see the controller operating instructions.

4.  Fit the terminal cover of the controller.
5.  Connect the RS232 interface cable to the RS232 USB converter.
6.  Insert the USB plug of the RS232 USB converter into the USB hub.
7.  Connect the USB hub to the USB port of the IFA router.
8.  Plug the USB flash drive into the USB hub.

Содержание TK-RW2

Страница 1: ...749 082 Z02 2015 02 03 Änderungen aufgrund technischer Verbesserungen vorbehalten DE EN IFA Router Montage und Bedienungsanleitung Installation and operating instructions ...

Страница 2: ......

Страница 3: ...ellungen 18 9 1 Konfigurationsdatei editieren 18 9 2 Inhalt der Konfigurationsdatei 19 9 3 Wiederherstellen der Konfigurationsdatei 25 10 Kundenspezifisches Logo 25 10 1 Anforderungen an die Vorlage 25 10 2 Kundenspezifisches Logos einbinden 25 11 Eigene Bilder in Diashow hinzufügen 26 11 1 Anforderungen an eigene Bilder 26 11 2 Vorgehensweise beim Einfügen eigener Bilder 26 12 Fehlersuche 27 12 1...

Страница 4: ...r Kinder Personen mit physischen sensorischen oder mentalen Beeinträchtigungen Personen die nicht über ausreichende Erfahrungen und Kenntnisse verfügen Es sei denn sie wurden durch eine Person die für ihre Sicherheit verantwortlich ist in die Benutzung des Ge räts unterwiesen und anfänglich beaufsichtigt 2 Zu dieser Anleitung 2 1 Gültigkeit Diese Anleitung beschreibt Installation Inbetriebnahme un...

Страница 5: ... A Typ B 4 Aufbau und Funktion 4 1 System 4 2 Systemkomponenten Die Fernanzeige besteht aus folgenden Komponenten siehe auch Abb 1 geeigneter solarthermischer Regler 1 z B Typ A oder Typ B IFA Router TP LINK TL MR3420 mit spezieller Firmware für Fernanzeige USB Stick mit Firmware für Fernanzeige Breitband Router mit Modem 1 2 mit ständiger Internet Verbindung und einem freien LAN Port PC 1 oder La...

Страница 6: ...FA Router ist mit einer speziellen Firmware für Betriebssystem und Applikations Software ausge stattet Dadurch verliert die ursprüngliche Bedienungsanleitung des TL MR3220 ihre Gültigkeit Die technischen Daten sowie die Zulassungen des IFA Routers gelten weiterhin Server Der Server archiviert die Daten und erzeugt Grafiken die am Browser eines PC mit Internet Anschluss angezeigt werden können Der ...

Страница 7: ...nwert des Wärmemengenzählers 3 Berechnung anhand Summenwert des Wärmemengenzählers und folgenden Publikationen Europa Erneuerbare Energien in Zahlen nationale und internationale Entwicklung Deutsches Bundesministeri um für Umwelt Naturschutz und Reaktorsicherheit für Europa CO2 Einsparfaktor 232 g CO2 kWhtherm Nordamerika Kanada Hawaiian Electric Co Inc HECO Residential Rebate Program Solar water ...

Страница 8: ... Verbindung zum Mediaplayer 3 4 wird nicht verwendet WAN Port Anschluss für Verbindung zum LAN Port des Breitband Routers WPS RESET kurz drücken 3 s WLAN ein aus lange drücken 3 bis 8 s Abfrage Versionsnummer bei lokaler Anzeige sehr lange drücken 10 s Reset auf Auslieferungszustand Antenne WIFI wird nicht verwendet USB Port Anschluss für USB Hub 7 8 Abb 5 Anschlüsse an der linken Seite ...

Страница 9: ...ossen Ⓕ USB ein Das USB 3G 4G Modem ist verbunden es werden keine Daten übertragen blinkt Daten werden über das USB 3G 4G Modem übertragen aus Das USB 3G 4G Modem ist nicht verbunden Ⓖ WPS ein Ein drahtloses Gerät wurde mit der WPS Funktion erfolgreich mit dem Netz verbunden blinkt 2 Ein drahtloses Gerät wird mit der WPS Funktion mit dem Netz verbunden Dies kann 2 Minuten dauern blinkt 3 Ein draht...

Страница 10: ...outers 5 2 Solarregler und USB Stick am IFA Router anschließen 5 2 1 Regler Typ A Gefahr Lebensgefahr durch Stromschlag Den Regler vor dem Öffnen vom Stromnetz trennen Sicherstellen dass das Stromnetz nicht unbeabsichtigt wieder angeschlossen werden kann 1 Regler vom Stromnetz trennen 2 Klemmenabdeckung des Reglers entfernen siehe Bedienungsanleitung des Reglers 3 RS232 Schnittstellenkabel am Regl...

Страница 11: ...B Hub einstecken 5 3 Restliche Komponenten am IFA Router anschließen 1 Antenne am IFA Router montieren 2 Netzteil des IFA Routers an den IFA Router und an das Stromnetz anschließen Hinweis Der IFA Router benötigt nach dem Einschalten der Netzspannung ca 1 min für die System Initialisie rung Der IFA Router ist betriebsbereit wenn die POWER LED leuchtet und die SYS LED blinkt 3 Den Regler an das Str...

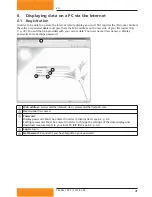
Страница 12: ... Ihre Zugangsdaten mitteilen Ihren Benutzernamen Username sowie ein Anzeige Passwort und ein Einstellungen Pass wort 1 2 3 5 4 Web Adresse www solarthermalweb de oder www solarthermalweb com Benutzername Username Passwort Anzeige Passwort Muss eingegeben werden um Daten anzuzeigen siehe dazu 6 2 S 11 Einstellungen Passwort Muss eingegeben werden um die Einstellungen der Datenanzeige zu ändern und ...

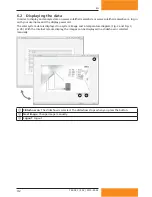
Страница 13: ...den Die Daten der Solaranlage werden in einem Systembild und in einem Temperaturdiagramm dargestellt Abb 2 und Abb 3 S 5 Bei der Internet Fernanzeige können die Bilder wahlweise in einer Dia show abgespielt oder manuell gewechselt werden 1 2 3 Slideshow on Die Diashow ist ausgewählt Beim Drücken der Schaltfläche wird die Diashow angehalten Next image Bilder manuell wechseln Logout Abmelden ...

Страница 14: ...nn ein eigenes kundenspezifisches Logo im Systembild erscheinen Dazu muss im Auswahlfenster Logo markiert werden Logo hochladen analog zu Ist das Verwenden eines kundenspezifischen Logos nicht erlaubt wird in der Zusatz locked angezeigt Hinweis Es können nur Logos im JPEG Format verwendet werden Endung der Logodatei ist jpg Pictures Anzeige der auf den Server geladenen Systembilder und eigenen Bil...

Страница 15: ...ld rechts neben Kontrollkästchen Name des Temperaturfühlers der in der Legende des Temperaturdiagramms angezeigt wird Es wird ein Name bis 12 Zeichen Länge eingegeben und mit save gespeichert Picture display duration Anzeigedauer eines Bildes während der Diashow Der Wert wird in Sekunden eingegeben und mit save gespeichert TS Analyzer Files Lädt die Messwerte eines wählbaren Monats als ZIP Datei h...

Страница 16: ...er angeschlossen haben Monitor TV Beamer und die Bedien oberfläche insbesondere das Hauptmenü des Mediaplayers am Anzeigegerät zu sehen ist mit der Fernbedienung des Mediaplayers vertraut sind den Mediaplayer per LAN oder WLAN mit dem IFA Router verbunden haben Hinweise dazu LAN Netzwerk LAN Einrichtung DHCP IP Auto WLAN Netzwerk WLAN Einrichtung Connectionx Infrastruktur AP Autom TK RW Net Grunde...

Страница 17: ...nutzer ID eingeben OK und mit Enter OK abschlie ßen 9 2x drücken dann 2x drücken in Spe zielle Dateiserver IP ist 0 markiert Netz kennwort leer lassen 10 drücken um 250 einzustellen In Spezielle Dateiserver IP muss nun 192 168 250 1 stehen 11 2x drücken um die Schaltfläche OK zu markieren OK an der Fernbedienung drücken 12 OK drücken Fernbedienung ...

Страница 18: ...inmal eingerichtet wurde starten Sie die Diashow nach dem Einschalten des Mediaplayers wie folgt 1 Im Hauptmenü Foto wählen Tasten an der Fernbedienung Dann OK drücken 2 Ordner mit markieren und OK drücken 3 Netzwerk mit markieren und OK drücken 4 OK drücken My_Shortcuts ist markiert 5 192 168 250 1 Netzbenutzer ID mit markieren und OK drücken 6 OK drücken Solar Share ist markiert 7 OK drücken Bil...

Страница 19: ...s an das kabellose Netzwerk TK RW2 Net wird bestätigt Der digitale Bilderrahmen fordert nun die Installation der EasyShare Software auf dem IFA Router Mit Jetzt suchen zur Installation auffordern 6 Geräte gefunden Die gefundenen Geräte werden aufgelistet SolarShare auswählen und die Installation mit FER TIG abschließen 7 Setup erfolgreich Die erfolgreiche Installation wird nochmals bestätigt Die B...

Страница 20: ... nur mit Microsoft WordPad geöffnet werden Bei Änderungen der WLAN Einstellungen müssen die Netzwerkeinstellungen des Bilderrahmens neu angepasst werden Ein Semikolon am Zeilenanfang kennzeichnet eine Zeile als Kommentar Parameterzeilen dürfen deshalb nicht mit einem Semikolon beginnen Beispiel für richtige Anwendung 1 4 Ueberschreibe CO2 Faktor factor_CO2 0 232 Beispiel für falsche Anwendung 1 4 ...

Страница 21: ... T5 T4 T3 T2 T1 exp 0 0 1 1 1 1 diagram_bitmask_override 1 4 Ueberschreibe CO2 Faktor Override CO2 factor factor_CO2 0 232 1 5 Diagrammtitel diagram title 50 Zeichen 50 chars diagram_title 1 6 Texte fuer Diagrammlegende diagram legend texts 12 Zeichen 12 chars diagram_t1_text T1 diagram_t2_text T2 diagram_t3_text T3 diagram_t4_text T4 diagram_t5_text T5 diagram_t6_text T6 1 7 Einheiten im Systembi...

Страница 22: ...col wan_protocol dhcp 3 2 Verwendung nur wenn 3 1 static Angabe der IP Adresse Only if 3 1 static Declaration of IP address wan_ip_addr 3 3 Verwendung nur wenn 3 1 static Angabe der Subnetmaske Only if 3 1 static Declaration of subnet mask wan_netmask 3 4 Verwendung nur wenn 3 1 static Angabe der Gateway Adresse Only if 3 1 static Declaration of gateway address wan_gateway 3 5 Verwendung nur wenn ...

Страница 23: ...Werte 0 oder 1 annehmen wobei 0 Fühler nicht ausgewählt und 1 Fühler ausgewählt bedeutet In dem Beispiel 0 0 1 1 1 1 wären die Fühler T1 bis T4 ausgewählt T5 und T6 wären deaktiviert Sollten wieder die Standardeinstellungen verwendet werden muss wieder ein Strichpunkt vor den Ausdruck diagram_bitmask_override geschrieben werden 9 2 4 CO2 Faktor 1 4 Ueberschreibe CO2 Faktor factor_CO2 0 232 Sollte ...

Страница 24: ...ie nachstehend beschriebenen Einstellungen sind Kenntnisse der Netzwerktechnik erforder lich 9 2 8 WLAN nach Einschalten des IFA Routers 2 1 WLAN nach Einschalten des IFA Routers ausgeschaltet ja 1 nein 0 wlan_disabled 0 Werkseitig ist wlan_disabled auf 0 gesetzt d h nach jedem Neustart des IFA Routers ist das WLAN automatisch aktiv Wird wlan_disabled auf 1 gesetzt ist das WLAN des IFA Routers nac...

Страница 25: ... Netzwerk verschlüsselt werden muss Folgendes gesetzt werden encryption WEP für WEP Verschlüsselung encryption WPA für WPA Verschlüsselung encryption WPA2 für WPA2 Verschlüsselung 9 2 12 WLAN Passwort 2 5 WLAN Passwort OPEN WEP 5 oder 13 Zeichen WPA WPA2 8 bis 63 Zeichen passphrase Werkseitig ist der Wert für passphrase auf gesetzt da das Netzwerk werkseitig unverschlüsselt ist Wenn als Verschlüss...

Страница 26: ...nführungsstrichen definiert werden z B wan_netmask 255 255 255 0 9 2 16 Gateway 3 4 Verwendung nur wenn 3 1 static Angabe der Gateway Adresse wan_gateway Wenn das Protokoll für die IP Vergabe wie in 8 3 13 beschrieben auf static gesetzt wurde muss das Gateway innerhalb der Anführungsstriche definiert werden z B wan_gateway 92 168 1 1 9 2 17 DNS 3 5 Verwendung nur wenn 3 1 static Angabe des DNS Ser...

Страница 27: ...eträgt maximal 200 x 40 Pixel L x B Größere Logos werden so verkleinert dass sie in den Bildbereich passen Dies ist mit einem Qualitäts verlust verbunden Verwenden Sie daher die angegebene Bildgröße Das Seitenverhältnis wird dabei beibehalten Das Suffix aller verwendeten Bilder muss jpg lauten Der Name der Logodatei lautet logo jpg 10 2 Kundenspezifisches Logos einbinden 1 IFA Router und digitalen...

Страница 28: ... Ladezeiten kommen kann Die Namen 1_system jpg und 2_diagram jpg werden von der Fernanzeige verwendet und können nicht für eigene Bilder verwendet werden da sie sonst überschrieben werden 11 2 Vorgehensweise beim Einfügen eigener Bilder IFA Router und digitaler Bilderrahmen müssen spannungsfrei geschaltet werden USB Stick vom IFA Router abziehen und in den USB Port eines PCs stecken In den Ordner ...

Страница 29: ...lt No or wrong USB flash drive inserted Es darf nur der mitgelieferte USB Stick verwendet werden Nach Einstecken des richtigen Sticks im laufenden Betrieb muss u U ein Reset durchgeführt werden Meldung Fault No USB RS232 adapter found Überprüfen ob das TTL USB Schnittstellenkabel am IFA Router angeschlossen ist Nach Installation des Schnittstellenkabels muss u U ein Reset durchgeführt werden Meldu...

Страница 30: ... wird angezeigt obwohl die Fernanzeige in Betrieb genommen wurde Internet Verbindung überprüfen Sicherstellen dass der Port 5206 für ausgehende Verbin dungen freigeschaltet ist wenn der IFA Router hinter einer Firewall betrieben wird Der Betrieb über einen Proxy Server ist derzeit nicht möglich Überprüfen ob die serielle Verbindung zwischen Regler und Router funktioniert Die Internet Seite www sol...

Страница 31: ...ährend der Gewährleistungszeit zeigen und die Funktionsfähigkeit des Produktes beeinträchtigen beseitigen Natürliche Abnutzung stellt keinen Fehler dar Eine Gewährleistung erfolgt nicht wenn der Fehler von Dritten oder durch nicht fachgerechte Montage oder Inbetriebnahme fehlerhafte oder nachlässige Behandlung unsachgemäßen Transport übermäßige Beanspruchung ungeeignete Betriebsmittel mangelhafte ...

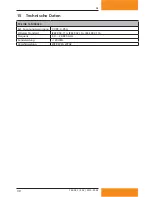
Страница 32: ...015 02 03 DE 15 Technische Daten TP LINK TL MR3420 Ext Spannungsversorgung 9 VDC 0 85 A Wireless Standard IEEE 802 11n IEEE 802 11g IEEE 802 11b Frequenz 2 4 2 4835 GHz Sendeleistung 20 dBm Verschlüsselung WEP WPA WPA2 ...

Страница 33: ... 43 7 Displaying data locally using the media player 45 8 Locally displaying data on the digital picture frame 48 9 Changing the WLAN settings 49 9 1 Editing the configuration file 49 9 2 Contents of the configuration file 50 9 3 Restoring the configuration file 56 10 Customised logo 56 10 1 Requirements to the logo template 56 10 2 Integrating a customised logo 56 11 Adding your own images to a s...

Страница 34: ...ctory labels and markings must never be altered removed or rendered unreadable This device is not intended for Children Persons with physical sensory or mental impairment Persons without sufficient experience or knowledge unless they are instructed in the use of the device and initially supervised by a person responsible for their safety 2 About this manual 2 1 Applicability This manual covers ins...

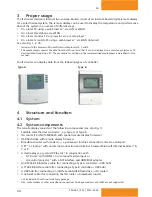
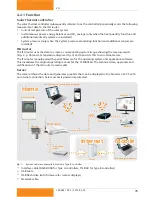
Страница 35: ...e A Type B 4 Structure and function 4 1 System 4 2 System components The remote display consists of the following components see also Fig 1 Suitable solar thermal controller 1 e g Type A or Type B IFA router TP LINK TL MR3420 with special remote display firmware USB flash drive with remote display firmware Broadband router with modem 1 2 a permanent Internet connection and a free LAN port A PC 1 o...

Страница 36: ...server The IFA router is equipped with special firmware for the operating system and application software This invalidates the original operating manual for the TL MR3220 The technical data approvals and certifications of the IFA router remain valid Server The server archives the data and generates graphics that can be displayed in the browser of a PC with an Internet connection Server access is p...

Страница 37: ...of the heat meter 3 Calculation based on the total cumulative value of the calorimetry system and the following publi cations Europe Renewable energy sources in figures national and international development German Federal Ministry for the Environment European Nature Conservation and Nuclear Safety CO2 savings factor 232 g CO2 kWhtherm North America Canada Hawaiian Electric Co Inc HECO Residential...

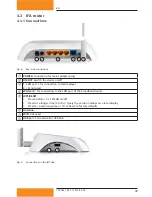
Страница 38: ...port 1 for connection to media player 3 4 not used WAN port For connecting to the LAN port of the broadband router WPS RESET Press briefly 3 s WLAN on off Press for a longer time 3 to 8 s Query the version number on a local display Press for a very long time 10 s Reset to factory defaults Antenna WIFI not used USB port Connection for USB hub 7 8 Fig 5 Connections on the left side ...

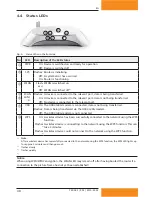
Страница 39: ...he USB 3G 4G modem is connected data is not being transferred Flashes Data is being transferred via the USB 3G 4G modem Off The USB 3G 4G modem is not connected Ⓖ WPS On A wireless device has been successfully connected to the network using the WPS function Flashes 2 A wireless device is connecting to the network using the WPS function This can take 2 minutes Flashes 3 A wireless device could not ...

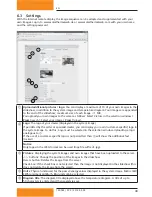
Страница 40: ...drive to the IFA router 5 2 1 Type A controller Danger Risk of death by electrocution Disconnect the controller from the mains power before opening Make sure that the mains power cannot be unintentionally reconnected 1 Disconnect the controller from the mains power 2 Remove the terminal cover of the controller see the controller operating instructions 3 Connect the S232 interface cable to the corr...

Страница 41: ...to the USB hub 7 Plug the USB flash drive into the USB hub 5 3 Connect the remaining components to the IFA router 1 Fit the antenna to the IFA router 2 Connect the power supply of the IFA router to the IFA router and connect to the mains Notice The IFA router needs about 1 minute for system initialisation after being switched on The IFA router is ready for operation when the POWER LED lights up an...

Страница 42: ...You will then be provided with your access data Your user name Username a Display password and a Settings password 1 2 3 5 4 Web address www solarthermalweb de or www solarthermalweb com User name Username Password Display password Must be entered in order to display data see 6 2 p 42 Settings password Must be entered in order to change the settings of the data display and download measurements to...

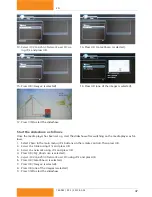
Страница 43: ...rname and the display password The solar system data is displayed in a system image and a temperature diagram Fig 2 and Fig 3 p 36 With the Internet remote display the images can be displayed in a slideshow or selected manually 1 2 3 Slideshow on The slideshow is selected The slideshow stops when you press the button Next image Change image manually Logout Logout ...

Страница 44: ...aler you can display your own customer specific logo in the system image To do this Logo must be selected in the selection window Uploading a logo analogous to If the use of a customer specific logo is not permitted then will show the additional text locked Notice Only logos in the JPEG format can be used logo file suffix of jpg Pictures Displaying the system images and own images that have been u...

Страница 45: ...eld to the right of the check box Name of the temperature sensor that is to be dis played in the temperature diagram legend A name of up to 12 characters is entered and then saved via save Picture display duration The display duration of each image in the slideshow The value in seconds is entered and then saved via save TS Analyzer Files Downloads the measurements for any selected month as a ZIP f...

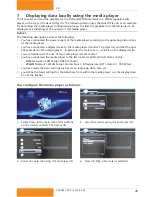
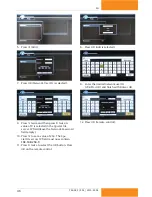
Страница 46: ... device to the media player monitor TV projector and that the oper ating interface of the media player in particular the main menu is visible on the display device you are familiar with the use of the media player remote control you have connected the media player to the IFA router via LAN or WLAN Notes on this LAN Network LAN Setup DHCP IP Auto WLAN Network WLAN Setup Connectionx Infrastructure A...

Страница 47: ...d finish with Enter OK 9 Press twice and then press twice A value of 0 is selected in the Special file server IP field leave the Network Password field empty 10 Press to set a value of 250 The Spe cial file server IP field must now contain 192 168 250 1 11 Press twice to select the OK button Press OK on the remote control 12 Press OK remote control ...

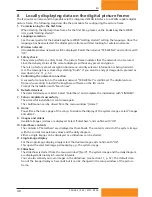
Страница 48: ... player has been set up start the slideshow after switching on the media player as fol lows 1 Select Photo in the main menu buttons on the remote control Then press OK 2 Select the folder using and press OK 3 Select the network using and press OK 4 Press OK My_Shortcuts is selected 5 Select 192 168 250 1 Network user ID using and press OK 6 Press OK Solar Share is selected 7 Press OK Images is sel...

Страница 49: ...essful connection to the wireless network TK RW2 Net is confirmed The digital picture frame is now asking to install the EasyShare software on the IFA router Prompt the installation with Search now 6 Detected devices The detected devices are listed Select SolarShare and complete the installation with FINISHED 7 Setup completed successfully The successful installation is confirmed again The confirm...

Страница 50: ...d using Microsoft WordPad The network settings of the picture frame need to be re adjusted if changes are made to the WLAN settings A semicolon at the start of a line designates the line as a comment Parameter lines must there fore not begin with a semicolon Example of correct use 1 4 Override CO2 factor factor_CO2 0 232 Example of incorrect use 1 4 Override CO2 factor factor_CO2 0 232 1 Disconnec...

Страница 51: ...T6 T5 T4 T3 T2 T1 exp 0 0 1 1 1 1 diagram_bitmask_override 1 4 Ueberschreibe CO2 Faktor Override CO2 factor factor_CO2 0 232 1 5 Diagrammtitel diagram title 50 Zeichen 50 chars diagram_title 1 6 Texte fuer Diagrammlegende diagram legend texts 12 Zeichen 12 chars diagram_t1_text T1 diagram_t2_text T2 diagram_t3_text T3 diagram_t4_text T4 diagram_t5_text T5 diagram_t6_text T6 1 7 Einheiten im System...

Страница 52: ...rotocol wan_protocol dhcp 3 2 Verwendung nur wenn 3 1 static Angabe der IP Adresse Only if 3 1 static Declaration of IP address wan_ip_addr 3 3 Verwendung nur wenn 3 1 static Angabe der Subnetmaske Only if 3 1 static Declaration of subnet mask wan_netmask 3 4 Verwendung nur wenn 3 1 static Angabe der Gateway Adresse Only if 3 1 static Declaration of gateway address wan_gateway 3 5 Verwendung nur w...

Страница 53: ...may only have the value 0 or 1 0 means sensor not selected and 1 means sensor selected In the example 0 0 1 1 1 1 the sensors T1 to T4 would be selected while T5 and T6 would be deactivated If you wish to return to the standard settings you must re write a semicolon in front of the phrase diagram_bitmask_override 9 2 4 CO2 factor 1 4 Override CO2 factor factor_CO2 0 232 If you wish to use another ...

Страница 54: ...et to 0 so the wireless LAN is automatically enabled after restarting the IFA router If wlan_disabled is set to 1 the wireless LAN of the IFA router is inactive after restarting 9 2 9 WLAN name 2 2 WLAN name ssid TK RW Net The ssid is preset at the factory to TK RW Net so the wireless network of the IFA router appears on the picture frame under the name TK RW Net A change of name requires a new as...

Страница 55: ...12 WLAN password 2 5 WLAN password OPEN WEP 5 or 13 characters WPA WPA2 8 to 63 characters passphrase The factory preset value for passphrase is because the network is unencrypted by default If you chose WEP encryption the password must be entered as a 5 digit or 13 digit password e g passphrase 12345 If you chose WPA or WPA2 encryption the password must be entered as an 8 to 63 digit password e g...

Страница 56: ...ithin the quotation marks e g wan_netmask 255 255 255 0 9 2 16 Gateway 3 4 Use only when 3 1 static Specify the gateway address wan_gateway If the protocol for the IP assignment as described in 8 3 13 has been set to static the gateway must be defined within the quotation marks e g wan_gateway 92 168 1 1 9 2 17 DNS 3 5 Use only when 3 1 static Specify the DNS server wan_dns If the protocol for the...

Страница 57: ...stomised logo is 200 x 40 pixels l x w Larger logos are scaled to fit into this image size This results in a corresponding loss of quality There fore please use the specified image size The width to height ratio is maintained The suffix for each of the images must be jpg The name of the logo file is logo jpg 10 2 Integrating a customised logo 1 Disconnect the IFA router and digital picture frame f...

Страница 58: ...s The names 1_system jpg and 2_diagram jpg are in use by the remote display and cannot be chosen for your own images otherwise they will be overwritten 11 2 Procedure for inserting your own images The IFA router and digital picture frame must be disconnected from the mains Remove the USB flash drive from the IFA router and plug it into the USB port of a PC Copy your own images into the share image...

Страница 59: ...ng USB flash drive inserted You may only use the supplied USB flash drive After inserting the correct USB flash drive while the device is still switched on you may have to do a Reset Message Fault No USB RS232 adapter found Check that the TTL USB interface cable is correctly connected to the IFA router After installing the interface cable you may need to do a Reset Message Fault Wrong software ver...

Страница 60: ...sfully activated is shown even though the remote display has been put into operation Check the Internet connection If the IFA router is connected to the network behind a firewall check that the firewall allows outgoing connec tions on port 5206 Operation via a proxy server is not currently possible Check whether the serial connection between the controller and the router is functional The web site...

Страница 61: ...duct during the guarantee period and affect the correct functioning of the product Natural wear and tear does not constitute a malfunction No legal guarantee can be offered if the fault can be attributed to third par ties unprofessional installation or commissioning incorrect or negligent handling improper transport excessive loading use of improper equipment faulty construction work unsuitable co...

Страница 62: ...N 15 Technical data TP LINK TL MR3420 Ext power supply 9 VDC 0 85 A Supported wireless standards IEEE 802 11n IEEE 802 11g IEEE 802 11b Frequency 2 4 2 4835 GHz Transmission power 20 dBm Supported encryption methods WEP WPA WPA2 ...

Страница 63: ......

Страница 64: ...749082 ...

Отзывы: