05/11
Pub. No. 200-G
- 2 -
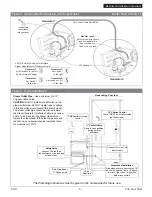
Optional Auto Drain
shown installed
Power Supply
Modular Jacks
Knockouts for
Control Cables
PC Board
Knockouts for
Control Cables
Knockouts for
electrical
supply line
208/240 Volt
incoming power
connections
Ground
Optional Auto
Drain Connection
Water Inlet
⅜
" Compression
Fitting
¾" Steam
Outlet
Safety
Relief
Valve
Water
Level
Probe
DIP Switches
for Ganging
Generators
Electrical Installation Instructions
Figure 2 - Internal Electrical Connections
The Steam Generator is installed in an upright position.
The proper sized 90°C copper wire and circuit breaker
have been used.
The circuit breaker is NOT a GFI (Ground Fault
Interrupter) type.
The Steam Generator is properly grounded.
The circuit breaker or disconnect switch is on.
Water supply is open to the Steam Generator.
Checklist
Before starting, insure that the conditions of the following checklist have been met:
The proper size Steam Generator has been selected by
using the sizing page in the “Full Line Brochure,” “Pricing
Guide,” or “The Generator Sizing Guide” in the Residen-
tial Systems/Steambath Product Information section of
the Steamist website - www.steamist.com.
CAUTION:
An improperly sized Steam Generator will
NOT produce the amount of steam necessary to reach
selected temperature.
The proper voltage Steam Generator has been selected
(i.e., 208V or 240V). A 208V Generator operating on
240V will damage the heating element, and a 240V
Generator operating on 208V will result in a 25%
loss of power.
5.
Ganging Mulltiple Steam Generators
IMPORTANT:
When ganging 2 to 4 steam generators
together an additional 3199 steam head and 5158 control
cable must be purchased for each additional generator.
a) Locate the Control Cable knockout at top of steam
generator. Mount proper strain relief into knockout hole.
b) Route 5158 control cable from any one of the 4 Modular
Jacks located on the circuit board to the steam genera-
tor to be ganged (see Figure 3).
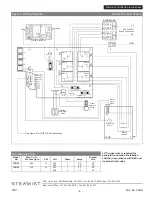
c) Set DIP Switches on each additional Steam Generator's
main PCB as shown in the Gangable Generators chart
(see Figure 3).
Model: TSG-12 & TSG-15


