-4-
4. Part Names and Functions
①
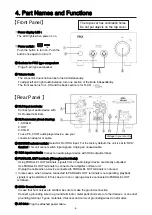
Power display LED :
The LED lights when power is on.
OFF
ON
【
Front Panel
】
【
Rear Panel
】
④
①
③
The top cover has ventilation holes.
Do not put objects on the top cover.
⑦
⑧ ⑨ ⑩
⑤
⑪
⑥
Voltage in your country
④
Volume knob:
The concentric dual knob can be turned simultaneously.
To adjust left and right audio balance, turn one section of the knob independently.
The front section is for L-CH and the back section is for R-CH.
③
Sockets for PRO type earspeaker:
Plug a 5-pin type earspeaker.
⑤
XLR input terminals:
Connect your audio device with
XLR output terminals.
⑥
XLR connector pinout drawing:
1: SHIELD
2: HOT
3: COLD
To use Pin-3 HOT audio player device, use your
conversion adaptor or cable.
⑪
AC inlet: Plug the attached power cable.
⑦
SOURCE selector switch: Select XLR or RCA input. For the factory default, the unit is set to “RCA”.
Caution! This unit cannot switch input signals. Unplug an unused cable.
⑧
RCA input terminals: Connect an audio player device with RCA output terminal.
⑨
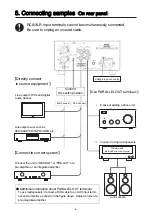
PARALLEL OUT terminals (Throughout terminals):
Using PARALLEL OUT terminals, signals from an audio player device are directly outputted.
Use PARALLEL OUT terminals to connect other amplifier or driver unit.
Unplug the cable when a device connected to PARALLEL OUT terminals is not used.
※
In rare cases, when a device connected to PARALLEL OUT terminals is not operating, playback
signals may be distorted. In this case, turn on or unplug a device connected to PARALLEL OUT
terminals.
⑩
GND: Ground terminal:
In case that hum noises are emitted, be sure to make the ground connection.
Connect a grounding wire to a ground terminal or metal parts (bolts etc.) of other devices, or an outlet
grounding terminal.
Types, materials, thickness and colors of grounding wires do not matter.
②
②
Power switch
:
Push the button to turn on. Push the
button once again to turn off.

