background image

EN

13

TABLE OF CONTENTS

14 Preface

14 

The Wings

16 

The Fuselage

19 

Control Throws

19 

Center of Gravity

21 

Declaration of comfirmity

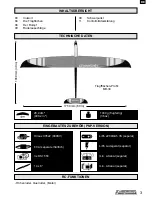
RC-FUNCTIONS

- Elevator, Ailerons, (Motor)

SPECIFICATIONS

INCLUDED  ACCESSORIES (PNP VERSION)

26,4 dm²

(409.2 in²)

1030 g (flying weight)

(36 oz)

1000 mm (39 in)

1750 mm (69 in)

Airfoil:

MH-30

Himax C3522 (900KV)

60 A (separately)

3x DS 1550

LiPo 2200mAh 3S (separately)

LiPo Charger (separately)

min. 4-Channel (separately)

min. 4-Channel (separely)

14 x 8“

Содержание CHEETAH R

Страница 1: ...BAUANLEITUNG INSTRUCTION MANUAL INSTRUCTIONS DE MONTAGE 0314077 0314077P...

Страница 2: ...Einschalten der Fernsteuerung dass die verwendete Frequenz frei ist Erst dann einschalten Sie alleine sind verantwortlich f r den sicheren Betrieb Ihres Modells und Motors Luftschrauben und generell a...

Страница 3: ...tserkl rung EINGEBAUTES ZUBEH R PNP VERSION Himax C3522 900KV 60 A separat erh ltlich 3x DS 1550 LiPo 2200mAh 3S separat LiPo Ladeger t separat min 4 Kanal separat min 4 Kanal separat 26 4 dm 409 2 i...

Страница 4: ...erstehen es gibt sicher hier und da andere M glichkeiten und Herangehensweisen Auf einige Alternativen wird deshalb w hrend der Baubeschreibung eingegangen diese jedoch nicht im Bild gezeigt Lesen Sie...

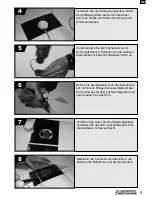
Страница 5: ...die sp teren Klebefl chen mit 80er Schleifpapier leicht an 5 Bohren sie das u erste Loch des Servohorns auf 1 8mm auf Bringen Sie anschlie end das Servo ber den Sender auf Neutralposition und verschr...

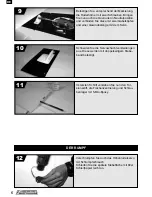
Страница 6: ...ndestange mit dem Servo 9 Schneiden Sie die Servoschachtverkleidungen aus Diese werden mit doppelseitigem Klebe band befestigt 10 Im letzten Schritt verkleben Sie nun den Tor sionsstift die Fl chenzen...

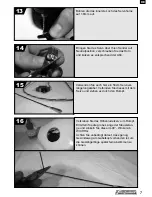
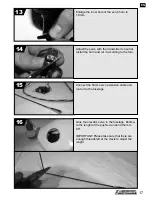
Страница 7: ...wenden Sie auch hier ein 50cm Servover l ngerungskabel Verbinden Sie dieses mit dem Servo und ziehen es durch den Rumpf 15 Verkleben Sie das H henruderservo im Rumpf Ermitteln Sie die grobe L nge der...

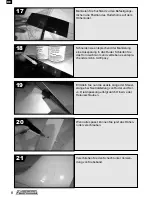
Страница 8: ...uder Schleifen Sie das Horn leicht anm und verkleben es entspre chend der Abb mit Epoxy 18 Ermitteln Sie nun die exakte L nge der Steuer stange bei Neutralstellung von Ruder und Ser vo Die Anpassung e...

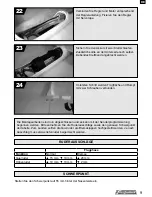
Страница 9: ...t werden RUDERAUSSCHL GE Flugphase Funktion Normal Bremse Querruder 15 mm 10 mm 20 mm H henruder 10 mm 10 mm 2 mm SCHWERPUNKT Stellen Sie den Schwerpunkt auf 55 mm hinter der Nasenleiste ein Verbinden...

Страница 10: ...den Angaben aus dieser Anleitung h lt das Modell keine b sen berraschungen parat Trotzdem ist eine gute Idee wenn beim ersten Start z B ein Clubkamerad das Modell wirft Freuen Sie sich auf viele sch n...

Страница 11: ...erwertung Ihres Altger ts zum Zeitpunkt der Entsorgung hilft Rohstoffe zu sparen und sicherzustellen dass bei seinem Receycling die mensch liche Gesundheit und die Umwelt gesch tzt werden Weiter Infor...

Страница 12: ...ontrol This interference can cause momentary loss of control so it is advisable to always keep a safe distance in all directions around your model as this margin will help avoid collisions or injury A...

Страница 13: ...mity RC FUNCTIONS Elevator Ailerons Motor SPECIFICATIONS INCLUDED ACCESSORIES PNP VERSION 26 4 dm 409 2 in 1030 g flying weight 36 oz 1000 mm 39 in 1750 mm 69 in Airfoil MH 30 Himax C3522 900KV 60 A s...

Страница 14: ...aches In some alternatives is therefore received during the building specifications but does not shown on the pictures PLEASE READ THIS INSTRUCTIONS CAREFULLY Use a hobby knife with 11 Blade to cut th...

Страница 15: ...he parts that will be glued lightly with 80 sandpaper 5 Enlarge the outermost hole to 1 8 mm Set the servo to neutral and fasten the servohorn 6 Connect the servo to the extension cable and glue the s...

Страница 16: ...ect the linkage 9 Trim the servocover with hobby scissors and glue them with double sided tape 10 For completing the assembly of the wing sec tion glue the torsion and center pin and the bolt retainer...

Страница 17: ...ll the horn and cut it according to the foto 14 Connect the 50cm servo extension cable und route it to the fuselage 15 Glue the elevator servo in the fuselage Estima te the lenght of the pushrod an be...

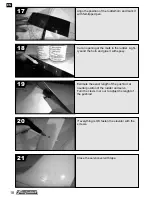
Страница 18: ...in the rudder Light ly sand the horn and glue it with epoxy 18 Estimate the exact length of the pushrod at neutral position of the rudder and servo Turn the clevis in or out to adjust the lenght of th...

Страница 19: ...w CONTROL THROWS Flight Mode Function Normal Brake Aileron 15 mm 10 mm 20 mm Elevator 10 mm 10 mm 2 mm CENTER OF GRAVITY 55 mm behind the leading edge against the fuselage Connect the ESC and motor ac...

Страница 20: ...EN 20 Now enjoy the first flight with your new CHEETAH Look forward to many hours with your new CHEETAH THE END...

Страница 21: ...human health and the environment For more information about where you can drop off your waste equipment for receycling please contact your local city office your household waste disposal service or w...

Страница 22: ...perte momentan e du contr le il faut donc toujours conserver une distance de s curit tout autour du mod le afin d viter tout risque de collision ou de blessure corporelle ge recommand 14 ans et plus C...

Страница 23: ...formit FONCTIONS DU PLANEUR Profondeur ailerons moteur CARACT RISTIQUES ACCESSOIRES VERSION PNP 26 4 dm 409 2 in 1030 g en ordre de vol 36 oz 1000 mm 39 in 1750 mm 69 in Profil MH 30 Himax C3522 900KV...

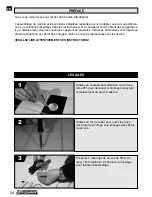
Страница 24: ...Certaines alternatives sont apparues durant la r daction du cahier des charges mais ne sont pas repr sent es sur les photos VEUILLEZ LIRE ATTENTIVEMENT CES INSTRUCTIONS Utilisez un couteau de mod lism...

Страница 25: ...surfaces qui seront encoll es l aide de papier abrasif grain 80 5 Portez le diam tre du trou ext rieur 1 8mm Mettez le servo au neutre et installez le palon nier 6 Connectez le servo la rallonge et c...

Страница 26: ...nages de servos l aide de ciseaux et collez les l aile en utilisant de l adh sif double face 10 Pour terminer l assemblage de l aile veuillez coller la cl d aile et le t ton antirotation une aile en...

Страница 27: ...mez le sur plus de mati re comme sur la photo 14 Connectez une rallonge de 50cm puis glissez la l int rieur du fuselage 15 Collez le servo de profondeur l int rieur du fuselage Contr lez la longueur d...

Страница 28: ...Poncez les surface de collage et collez le guignol en position l aide de colle poxy 18 Estimez la longueur exacte de la tringlerie quand le servo et la gouverne de profondeur sont au neutre Vissez ou...

Страница 29: ...it DEBATTEMENTS Mode de vol Fonction Normal Freins Ailerons 15 mm 10 mm 20 mm Profondeur 10 mm 10 mm 2 mm CENTRE DE GRAVITE 55 mm en arri re du bord d attaque au niveau de l emplanture de l aile Conne...

Страница 30: ...FR 30 Vous tes maintenant pr t effectuer les premiers vols de votre CHEETAH Nous vous souhaitons de tr s nombreuses heures de vol avec votre CHEETAH FIN...

Страница 31: ...nement Pour plus d informations quant aux lieux de d p t de vos quipements rebut s en vue du recyclage veuillez contacter votre mairie votre service de traitement des ordures m nag res ou le magasin d...

Страница 32: ...2016 Gustav Staufenbiel GmbH...

Отзывы: