background image

Instruction Manual

6

Initializing the Hard Drive

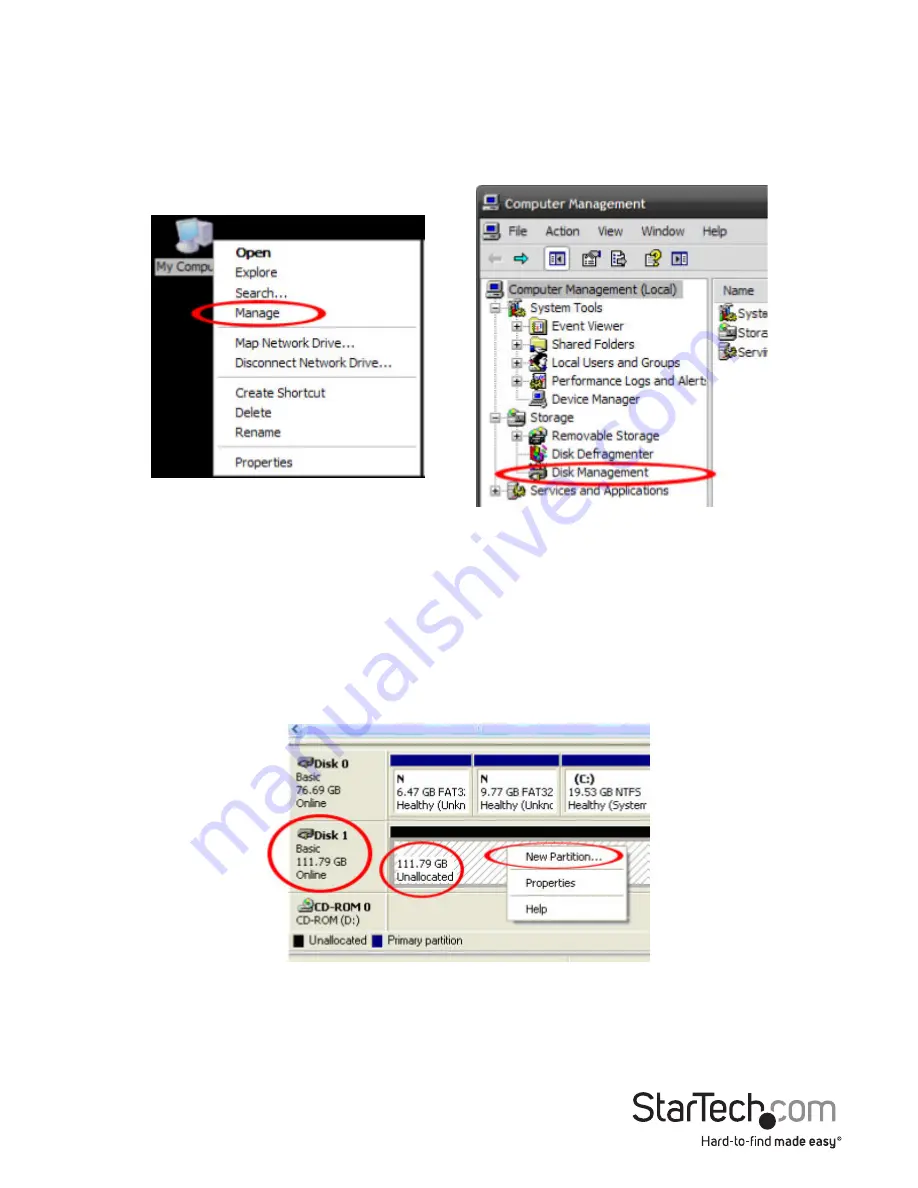
1.  If the SATA Hard Drive is blank it may need to be initialized and formatted before 

use. From the main Windows desktop, right-click on “My Computer” (“Computer” in 

Vista/ 7 / 8/ 8.1), then select Manage. In the new Computer Management window, 

select Disk Management from the left window panel.

2.   A dialog window should automatically appear, asking you to initialize the drive. 

Depending on the version of Windows, it will give you the option of either creating 

an “MBR” or “GPT” disk. GPT (GUID partition) is not compatible with some older 

operating systems, while MBR is supported by newer and older operating systems.

3.   Once initialized, locate the Disk that says it is “Unallocated” (check the listed hard 

drive capacity to confirm it’s the correct hard drive) and then right-click in the 

section that says “Unallocated” and select “New Partition”.

4.  Follow the on screen prompts to initialize the drive in the format of your choice.

Содержание S251SMU33EP

Страница 1: ...gsanleitung de startech com FR Guide de l utilisateur fr startech com ES Gu a del usuario es startech com IT Guida per l uso it startech com NL Gebruiksaanwijzing nl startech com PT Guia do usu rio pt...

Страница 2: ...eceiving antenna Increase the separation between the equipment and receiver Connect the equipment into an outlet on a circuit different from that to which the receiver is connected Consult the dealer...

Страница 3: ...m Requirements 1 Product Diagram 1 Rear View 1 Hardware Installation 2 How to Use 5 Connecting the Hard Drive 5 Powering the Drive Enclosure 5 LED Indicator 5 Disconnecting the Hard Drive 5 Initializi...

Страница 4: ...er 1x USB to DC power cable 1 x Instruction manual System Requirements Computer system with o available USB 3 0 2 0 port or eSATA eSATAp port o Microsoft Windows 2000 XP Server 2003 Vista Server 2008...

Страница 5: ...e your hard drive and storage device with caution Be sure that you are properly grounded by wearing an anti static strap when handling computer components or discharge yourself of any static electrici...

Страница 6: ...our 2 5 SATA HDD SSD to the drive tray by driving 2 of the hard drive installation screws larger included screws through the stabilizing holes on the bottom of the drive tray into the bottom mounting...

Страница 7: ...USB port on the hard drive enclosure to an available USB port on your computer system b If using eSATA i Connect the included eSATA cable from the eSATAp port on the hard drive enclosure to the eSATA...

Страница 8: ...LED will blink Do not remove the enclosure from the host computer while the LED is flashing as it could damage the drive or the enclosure resulting in data loss Disconnecting the Hard Drive Windows 1...

Страница 9: ...asking you to initialize the drive Depending on the version of Windows it will give you the option of either creating an MBR or GPT disk GPT GUID partition is not compatible with some older operating...

Страница 10: ...ors 1 x USB 3 0 Micro B 1 x eSATAp Internal Connectors 1 x 15 pin SATA Power female 1 x 7 pin SATA Data male Maximum Data Transfer Rate USB 3 0 5 Gbit s eSATA 6 Gbit s Compatible Operating Systems Win...

Страница 11: ...returned for repair or replacement with equivalent products at our discretion The warranty covers parts and labor costs only StarTech com does not warrant its products from defects or damages arising...

Страница 12: ...ts and we quickly deliver them wherever they need to go Just talk to one of our tech advisors or visit our website You ll be connected to the products you need in no time Visit www startech com for co...

Отзывы: