Quick-start guide
5
Confirm installation
Windows OS
1. On your computer, navigate to
Device Manager
.
2. Expand the
Ports (COM & LPT)
option.
3. Verify that the additional COM ports are listed.
4. Double-click a port and review the device properties.
Mac OS
1. On your computer, press and hold the
Option
key and click the
Apple
menu.
2. Click
System Information
or
System Profiler
.
3. Under
Hardware
, click
USB
.
The USB device tree lists all of the devices connected to each port.
Install the hub using the terminal block power input
Warning!
Make sure that the driver installation is complete before you plug in and
connect the USB serial hub.
1. Insert the provided driver CD into your host computer.
Note:
The CD should automatically open and display all of the folders contained on the
CD. If that doesn’t happen, navigate to the CD/DVD drive on your computer.
2. In the driver folder, double-click the appropriate
setup
file for the OS that you’re
currently running. The driver installation wizard will begin installing the driver and
automatically closes when the installation is complete.
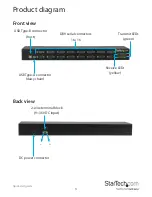
3. Connect the provided USB cable to the
USB Type-B host
port on the USB serial hub
and the USB port on your computer.
4. If the terminal block connector is already inserted in the USB serial hub, use a small
flat-head screwdriver to loosen the screws to the left and right of the terminal block
connector until you can remove it from the USB serial hub.
5. Use a small flat-head screwdriver to loosen the two screws located on the top of the
terminal block connector.
6. Connect the positive and negative wires from your DC power source to the proper
terminal block connectors.
Note:
Make sure that the polarity of the input power, positive (+) and negative (-), is
matched correctly with the terminal block pins.
7. Tighten the two screws located on the top of the terminal block connector.
8. Reinsert the terminal block connector into the USB serial hub and tighten the
screws to the left and right of the terminal block connector.


