StarTech.com 8STST12MHDLAN Скачать руководство пользователя страница 19

Instruction Manual

16

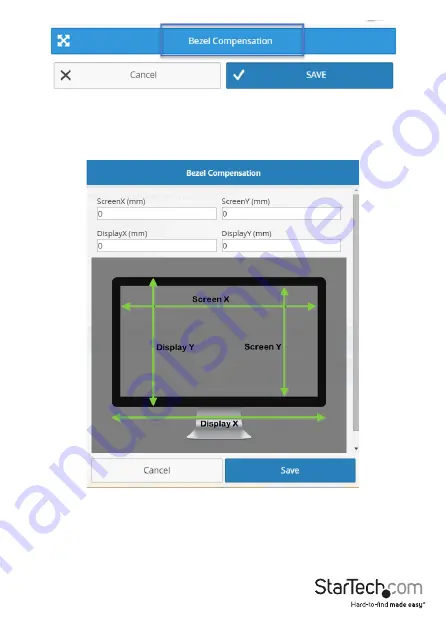
On the bezel compensation window, enter the following measurements in 

millimeters (mm): screen width of each display (ScreenX), screen height of each 

display (ScreenY), total width of each display (DisplayX) and total height of each 

display (DisplayY). Then click the Save button.

6.  The wizard is now complete and your created video wall configuration will appear 

on the Walls tab. 


You can select or switch your video source for each created video wall configuration 

clicking transmitters listed below each created video wall configuration.

Содержание 8STST12MHDLAN

Страница 1: ...w startech com ST12MHDLAN DE Bedienungsanleitung de startech com FR Guide de l utilisateur fr startech com ES Gu a del usuario es startech com IT Guida per l uso it startech com NL Gebruiksaanwijzing...

Страница 2: ...FCC Rules Operation is subject to the following two conditions 1 This device may not cause harmful interference and 2 this device must accept any interference received including interference that may...

Страница 3: ...Point to Point installation without Gigabit LAN network 5 Hardware Reset Procedure 6 Software Installation 7 Software operation 7 Connecting your transmitters and receivers to the software 7 Switching...

Страница 4: ...AC electrical outlet for the Transmitter and each Receiver HDMI cable for each display Gigabit Networking devices and cabling 2 x universal power adapter NA EU UK AU 2 x foot pad set 1 x instruction m...

Страница 5: ...cal outlet 1 Determine where the local video source i e computer Blu ray Player will be located and set up the device 2 Determine where the remote display will be located and place mount the display a...

Страница 6: ...ly repeat steps for each additional Receiver Note The Dip Rotary Switch on the transmitter and each receiver connected to the network must be set in the same position for the devices to communicate 3...

Страница 7: ...your network switch or router documentation to ensure IGMP snooping is supported and enabled 3 Optional When adding additional Receiver Units ST12MHDLANRX Sold separately a run of Cat 5e 6 cable will...

Страница 8: ...t on the Receiver Unit c Connect the provided Receiver Unit power supply Note The Dip Rotary Switch on the transmitter and Receiver connected must be set in the same position for the devices to commun...

Страница 9: ...on the display a hardware reset can be performed on the Transmitter Unit or individual Receiver Units 1 Press the reset button for more than 3 seconds on the device using a pin point tool such as a b...

Страница 10: ...ttp www StarTech com ST12MHDLAN 2 Under the overview tab select the link for the store that corresponds with your device 3 Select the download or install option Your software is now installed Software...

Страница 11: ...pen on the Devices tab and will automatically search for transmitters and receivers on your network and list them within the Devices tab Note you can re initiate the device search by selecting the ref...

Страница 12: ...address of 169 254 10 10 with a subnet mask of 255 255 0 0 You must ensure the tablet smartphone or computer you have the software installed on and each receiver has an IP address that starts with 169...

Страница 13: ...Instruction Manual 10 Or Select DHCP and your network automatically assign an IP address and mask to for the device in the range of the rest of your network devices...

Страница 14: ...beside them The transmitter that is currently selected for each receiver will be highlighted in yellow Note DHCP must be enabled on your network to automatically assign an IP address and mask in that...

Страница 15: ...Instruction Manual 12 Note if the receiver is part of a video wall it will be indicated with a button that lists the wall configuration and the location of the receiver...

Страница 16: ...be part of the video wall configuration Configuring your remote displays for a video wall application 1 Once the application is launched select the Walls tab 2 Select the icon to launch a wizard that...

Страница 17: ...of the video wall with the number of rows and columns you specified You will need to use this example to specify which receivers are represented within your video wall configuration Select the receiv...

Страница 18: ...he show device names on screen switch This can be deactivated once you have identified your displays 5 Optional If the displays in your video wall configuration have large bezels or empty space betwee...

Страница 19: ...ScreenY total width of each display DisplayX and total height of each display DisplayY Then click the Save button 6 The wizard is now complete and your created video wall configuration will appear on...

Страница 20: ...wall or switch You can adjust the settings defined for each video wall configuration or delete your video wall configuration by clicking the arrow next to each video wall Advanced operation and help...

Страница 21: ...arch automatically for devices over the network Target IP is an advanced setting that enables you to specify an IP address that the remote devices are set to in order for the software to identify them...

Страница 22: ...ng Cat 5e UTP or better Audio Yes Rack Mountable Yes Industry Standards HDMI HDCP Daisy Chain Yes Transmitter Connectors 1x HDMI 19 pin 1x RJ 45 Receiver Connectors 1x HDMI 19 pin 1x RJ 45 Power Adapt...

Страница 23: ...ned for repair or replacement with equivalent products at our discretion The warranty covers parts and labor costs only StarTech com does not warrant its products from defects or damages arising from...

Страница 24: ...ts and we quickly deliver them wherever they need to go Just talk to one of our tech advisors or visit our website You ll be connected to the products you need in no time Visit www startech com for co...

Отзывы: