background image

Handbook for the TRIUS SX-825      Issue 1 January 2015 


You will also need a PC computer with Windows XP, Vista or Windows 7 installed. This machine 
must have at least one USB 2.0 port available and at least 256 Mbytes of memory. If you intend to 
view the finished images on its screen, then you will also need a graphics card capable of displaying an 
image with a minimum of 1024 x 768 pixels and 24 bit colour. A medium specification Pentium with 
between 1GHz and 4GHz processor speed is ideal, but I recommend avoiding some of the lower 
specification ‘Netbook’ computers, as they can’t really handle the fast data stream from the camera. 
Please note that USB 2.0 operates at a very high speed and cannot operate over very long cables. Five 
metres of good quality cable is the maximum normally possible without boosters or extra powered 
hubs, although you can sometimes get good results at longer distances with very high quality cables.  


Installing the USB system: 

 
First, find a free USB socket on your PC and plug in the USB cable (do not connect the camera at this 
time). If you do not have a USB2 capable computer, it is normally possible to install a USB 2 card into 
an expansion slot.  
 
The next operation is to run the software installer from the CD ROM provided. Insert the CD into the 
computer and wait for Windows Explorer to open with the list of folders on the ROM. Now run the 
SETUP.EXE file that it contains – this will initiate the self-install software which will guide you 
through the process of installing the SX camera software onto your computer.  
 
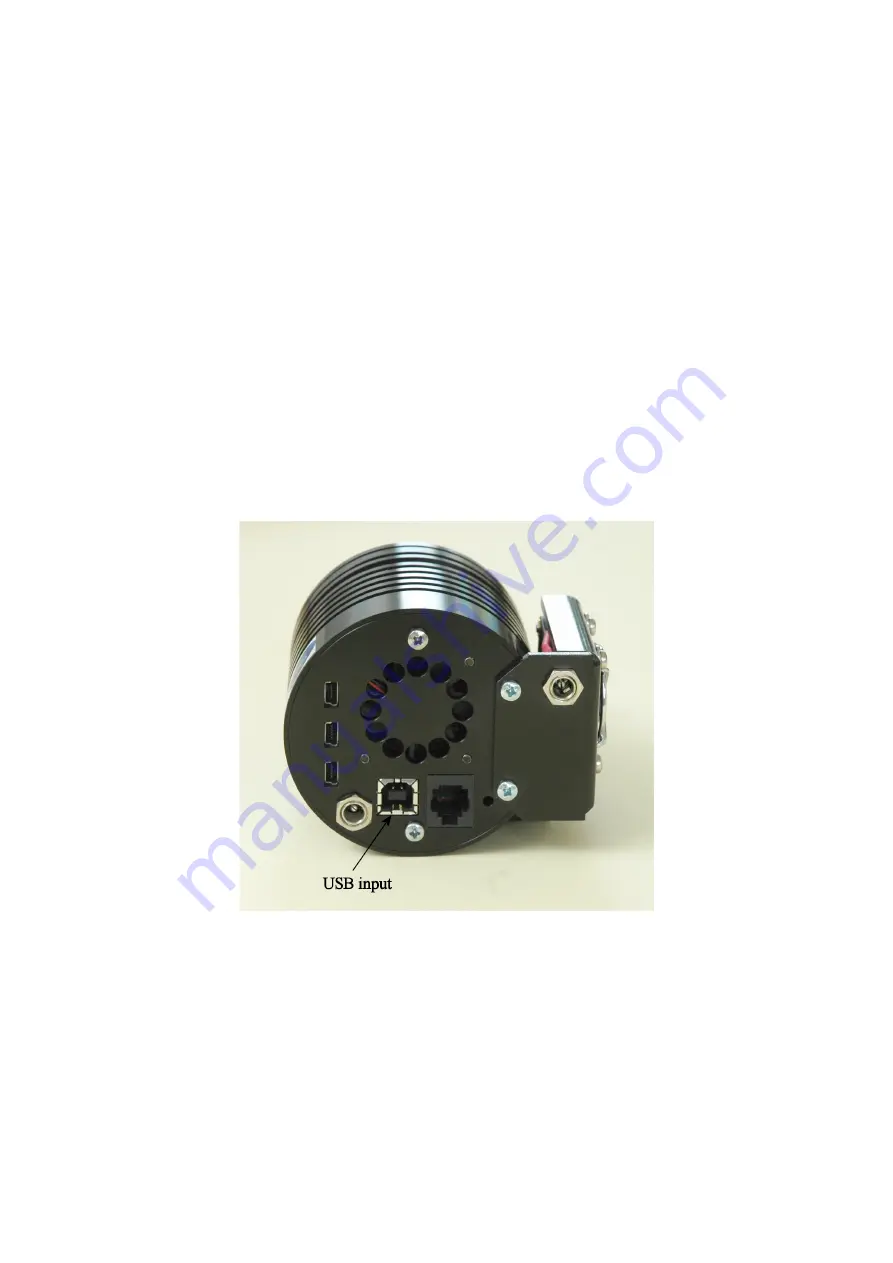
Now connect the USB cable to the socket on the camera rear panel.  


Windows will report ‘Found new hardware’ and will ask for the location of the drivers. Point the 
installer at the appropriate driver folder on your CD ROM (32 bit or 64 bit) - note that the ‘Windows 8 
signed drivers’ are OK for Windows 8, Windows 7 and Vista, but not for Windows XP. Use the older 
32 or 64 bit drivers for XP machines. Once you select the correct driver package, the driver installation 
should proceed smoothly. (Ignore any warnings about the older drivers having not been tested by 
Microsoft).  
 

Содержание TRIUS SX-825

Страница 1: ...lter wheel could use two of the USB ports and the third might connect to an electric focuser or similar peripheral The argon fill along with other improvements to the cooler stack has improved the del...

Страница 2: ...ase move on to the Quick Start section which follows A more detailed description of imaging techniques will be found in a later part of this manual Quick Starting your TRIUS SX 825 system Please note...

Страница 3: ...m First find a free USB socket on your PC and plug in the USB cable do not connect the camera at this time If you do not have a USB2 capable computer it is normally possible to install a USB 2 card in...

Страница 4: ...rties and then update driver Following the on screen instructions will allow you to re select the correct inf file from the CD SXVIO_SX9_119 inf and driver files SXVIO sys and generic sys which should...

Страница 5: ...ow click on the camera icon at the top of the screen If the USB connection is OK a message box will inform you of the Handle number for the SXVIO interface and various other version details etc Click...

Страница 6: ...u are imaging during the winter months Under indoor conditions the low airflow will limit the cooling capability and you should use a set point of no lower than 5C for stable cooling You can determine...

Страница 7: ...is introduces additional complications which are best avoided at this early stage There are two simple options one of which is available to everyone with a sheet of aluminium baking foil 1 Attach a st...

Страница 8: ...es the image to darken 3 If the USB did not initialise properly the camera start up screen will tell you that the connection is defective Try switching off the power supply and unplugging the USB cabl...

Страница 9: ...the CCD is from the camera barrel end When the par focal eyepiece is fitted into the telescope drawtube you can adjust the focus until the view is sharply defined and the object of interest is close t...

Страница 10: ...be rather small in your images Achieving a good focus Your starting point will depend on the focus aids if any which you are using With the par focal eyepiece you should slip the eyepiece into the dr...

Страница 11: ...e brands of CCD camera require a dark frame to be subtracted from your images to achieve the best results A dark frame is simply a picture which was taken with the same exposure as your light frame bu...

Страница 12: ...te for uneven illumination and sensitivity of the CCD and it is better to avoid the need for one by keeping the optics clean and unvignetted I will ignore flat fielding for current purposes and descri...

Страница 13: ...ce the background brightness and the image will begin to look rather more attractive although dark You can now try brightening the highlights with another Normal stretch in which you bring down the Wh...

Страница 14: ...h the mouse Once the reference is selected you can either add directly or average the images together Averaging is generally better as you are less likely to saturate the highlights of the picture The...

Страница 15: ...in your Autosave directory Dozens of images will be saved but only one or two will be satisfactory for further processing The Subframe mode of the SXV may be found useful for limiting the wasted area...

Страница 16: ...s then a reduction to R 3 P 3 will probably give a more natural look to the image as too large a radius and power tends to outline edges with dark or bright borders As a finishing touch the applicatio...

Страница 17: ...in Using the Binned modes Up to this point I have assumed that the full resolution imaging mode is being used This is fine for most purposes but it will often provide more resolution than the optical...

Страница 18: ...m loosely across the aperture of your telescope and point the instrument high in the sky to avoid any gradient in the light near the horizon Now take several images with exposure times adjusted to giv...

Страница 19: ...inder and unscrew the two top spacer pillars from the PCB Now gently lift the PCB off the 20 way connector NOTING THE ORIENTATION OF THE BOARD for correct replacement later Now remove the lower two sp...

Страница 20: ...he filling tube may then be extracted and the second port re sealed N B DO NOT leave the camera switched on for long periods between uses The cold CCD will collect ice by slow diffusion through any sm...

Страница 21: ...vice CCD type Sony ICX825AL EXview II interline imager CCD size Active area 8 8 mm x 6 63 mm CCD pixels 1392 x 1040 pixel array Each pixel is 6 54 x 6 54uM square Well depth Full res mode 23 000e Binn...

Страница 22: ...The equipment shall only be used for normal purposes described in the standard operating instructions and within the relevant safety standards of the country where the equipment is used 2 Repairs unde...

Отзывы: