background image

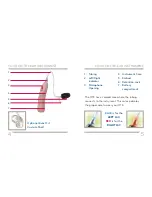
When washing the earbud in a sink, be sure the 
drain plug is closed, and that the earbud is 
completely dry before reattaching it to the tubing 
and the instrument .

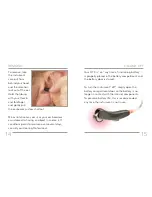
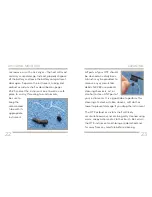
To perform more extensive 
cleaning, first remove the
tubing from the OTE
instrument by using your  
fingernail to pull the 
colored nose cone AWAY  
from the instrument .  
DO NOT PULL ON THE TUBING .

Replace the earbuds and tubing every 6 - 8 weeks 
or as advised by your hearing professional . 

Holding the tubing 
by the thicker area
where the retention
lock joins the tubing,
gently pull the earbud  
or custom shell
off the tube

A wax reamer may 
be provided to 
remove wax and
debris from inside
the tubing . To use
the reamer, insert
the line end into the
earbud opening .

25

24

cleaning

cleaning

Содержание Aspect

Страница 1: ...Aspect Aspect Xtra O p e r at i o n s M a n u a l On The Ear ...

Страница 2: ...nt 7 Batteries 8 Insertion and Removal 11 On and Off 15 Volume Levels 16 Feedback 17 Using The Telephone 18 OTE Care 20 Avoiding Moisture 21 Cleaning 23 Put it away 27 Service and Repair 28 Troubleshooting Guide 29 Tips for Better Communication 30 FDA Required Information 31 ...

Страница 3: ...u A positive attitude and willingness to relearn hearing and listening techniques will make your world a better sounding place The OTE consists of a discreet instrument containing the digital sound processor which is connected by the tubing to a specially sized earbud or custom earmold that fits comfortably in your ear Your OTE is programmed to match your particular hearing requirements These para...

Страница 4: ...oper side to wear your OTE 1 Tubing 2 Left Right indicator 3 Microphone Opening 4 Instrument Case 5 Earbud 6 Retention Lock 7 Battery compartment BLUE is for the LEFT EAR RED is for the RIGHT EAR Optional Exact Fit Custom Shell 1 2 3 4 5 6 7 5 4 your on the ear instrument your on the ear instrument ...

Страница 5: ... most of these tasks while seated at a table or desk above a soft surface such as a towel to reduce the risk of dropping the instrument or battery Each instrument can be identified by its serial number located on the inside spine The manufacturer and model name are also shown in this location 00 000000 Serial number Manufacturer s name and Model name 7 6 handling your instrument your on the ear in...

Страница 6: ...lose securely check that the battery is placed properly in the compartment Your OTE uses a size 10A battery This size is identified by the yellow color code on hearing instrument battery packaging Always be sure to use the correct size and type cell An indicator tone will sound when the battery s voltage is low You should replace the battery when you hear the tone To replace the battery open the b...

Страница 7: ...can vary in size and performance your Hearing Professional is your best source for lifespan estimates and verification that you are using the proper size and type WARNING HEARING INSTRUMENT BATTERIES ARE DANGEROUS IF SWALLOWED NATIONAL BUTTON BATTERY INGESTION HOTLINE 202 625 3333 Dispose of spent battery cells immediately in the proper waste or recycling receptacle Keep battery cells out of the r...

Страница 8: ...arefully place the instrument case behind your ear Move the flexible retention lock into place by first curling and lifting the lock tip into the bowl of your ear Use your finger to push the lock into a secure position Earbud Custom Shell 13 12 insertion insertion ...

Страница 9: ...erve battery life this is recommended any time the instrument is not in use To remove take the instrument case out from behind your head and the retention lock out of the ear Hold the tubing with your thumb and forefinger and gently pull the earbud or custom shell out Minor irritation may occur as your ear becomes accustomed to having an object in and on it If conditions persist or worsen over sev...

Страница 10: ...ertion removal and when using the telephone It should cease when you move your hand or telephone away from the instrument If feedback persists after the instrument has been inserted correctly contact your Hearing Professional Your OTE has been programmed to the most appropriate volume level by your Hearing Professional There is no volume control on the instrument If your OTE is consistently too lo...

Страница 11: ...ut removing the instrument or earbud Place the telephone handset directly over your ear Some practice and experimentation may be necessary to find the best phone position TV viewing can take a little longer to get used to than live speech because of music sound effects and overall pace Depending on the sophistication of your TV s audio system sit eight to ten feet in front of the screen with the T...

Страница 12: ... ensure trouble free performance of your OTEs This includes daily cleaning on your part as well as regular comprehensive examinations by your hearing professional Your OTEs may be so light and comfortable you may forget you have them on Develop the mental habit of checking your ears before swimming bathing or applying hairspray Do the same with clothing pockets before laundering Should it get wet ...

Страница 13: ...ll parts of your OTE should be cleaned on a daily basis A brush may be provided to remove any accumulated debris NEVER use solvents cleaning chemicals oil or alcohol to clean ANY part of your instruments It is a good idea to perform this cleaning at a desk or table above a soft cloth or towel to prevent damage if you drop the instrument The OTE earbud or custom shell will likely accumulate earwax ...

Страница 14: ...l to pull the colored nose cone AWAY from the instrument DO NOT PULL ON THE TUBING Replace the earbuds and tubing every 6 8 weeks or as advised by your hearing professional Holding the tubing by the thicker area where the retention lock joins the tubing gently pull the earbud or custom shell off the tube A wax reamer may be provided to remove wax and debris from inside the tubing To use the reamer...

Страница 15: ... recommended replacement of your OTE earbuds and tubing A container may be provided to carry and store your OTE when not in use It can also provide a convenient place to keep your instruments overnight If your OTE will not be used for an extended period of time remove the battery completely place the instrument in the container and store in a cool dry place away from direct sunlight or heat 27 26 ...

Страница 16: ...e or clinic If you re away from home most hearing professionals are willing to help If you are uncertain who can provide service write to the address shown on page 37 Symptom Possible Causes Solutions Not Working Depleted battery Replace battery Blocked earbud Clear blockage Defective instrument See your hearing professional Not Loud Enough Blocked earmold Clean the devices Low battery Replace bat...

Страница 17: ...eview the following simple communication tips 30 31 TIPS FOR BETTER COMMUNICATION TIPS FOR BETTER COMMUNICATION For You Move closer to and look at the speaker Sit face to face in a quiet room Try different locations to find the best place to listen Minimize distractions Background noises may be frustrating at first remember you have not heard them for a while Let others know what you need keep in ...

Страница 18: ...ore beginning to speak Look at you or sit face to face in a quiet room Speak clearly and at a normal rate and level shouting can actually make understanding more difficult Rephrase rather than repeat the same words different words may be easier to understand Minimize distractions while speaking 32 33 TIPS FOR BETTER COMMUNICATION NOTES ...

Страница 19: ...34 35 NOTES NOTES ...

Страница 20: ...gologists 37 FDA required information The purpose of the medical evaluation is to assure that all medically treatable conditions that may affect hearing are identified and treated before the hearing aid is purchased Following the medical evaluation the physician will give you a written statement that states that your hearing loss has been medically evaluated and that you may be considered a candid...

Страница 21: ...78314 000 7 07 All rights reserved BKLT8314 05 EE ST 0086 ...

Отзывы: