Original
Operating and maintenance
manual
Road Grader
Страница 1: ...Original Operating and maintenance manual Road Grader ...
Страница 2: ...it our webpage www stark fi for the complete product range including new products The manufacturer reserves the right for structural and technical changes without prior notice Therefore some pieces of information given in the manual may have changed after printing this manual Read before use Make sure you know your equipment before you start using it Equipment may be operated only by an individual...
Страница 3: ... 1 Operating instructions 9 7 2 Grading adjustmets 9 7 3 Detaching the road grader 10 7 4 Wireless controller 11 7 5 Removal of packed snow 12 7 6 Accessories 12 8 MAINTAINING THE ROAD GRADER 13 8 1 General safety precautions for the use and maintenance 13 8 2 Minimum requirements of the base machine 13 8 3 Tightening torque 13 8 4 Daily maintenance 14 8 5 Maintenance after every 10 hours 14 8 6 M...
Страница 4: ...tie 2 73100 LAPINLAHTI Finland tel 358 17 731 565 Declares that the above mentioned equipment meets the provisions of Directive 2006 42 EC on machinery and where applicable comply with the standards SFS EN ISO 12100 1 SFS EN ISO 12100 2 SFS EN 1050 The person authorized to compile technical documentation Lassi Mehtonen Managing director Kaskenviertäjäntie 2 73100 Lapinlahti FINLAND ...
Страница 5: ...te travel speed other traffic people and animals danger zones and objects that block your view children use of turn signal when driving NEVER use the machine if there is someone in the danger zone NEVER go under the attachment During maintenance the hydraulics of the base machine MUST be turned off The base machine MUST also be turned off and the parking brake MUST be applied The equipment must be...
Страница 6: ...the serial number of your road grader Product and model _______________________________Serial number___________________________________ 4 2 Maintenance services When replacing parts use original manufacturer spare parts only By using original spare parts you ensure dependable operation of the road grader and comply with the warranty policy To facilitate the supply of spare parts always inform the ...
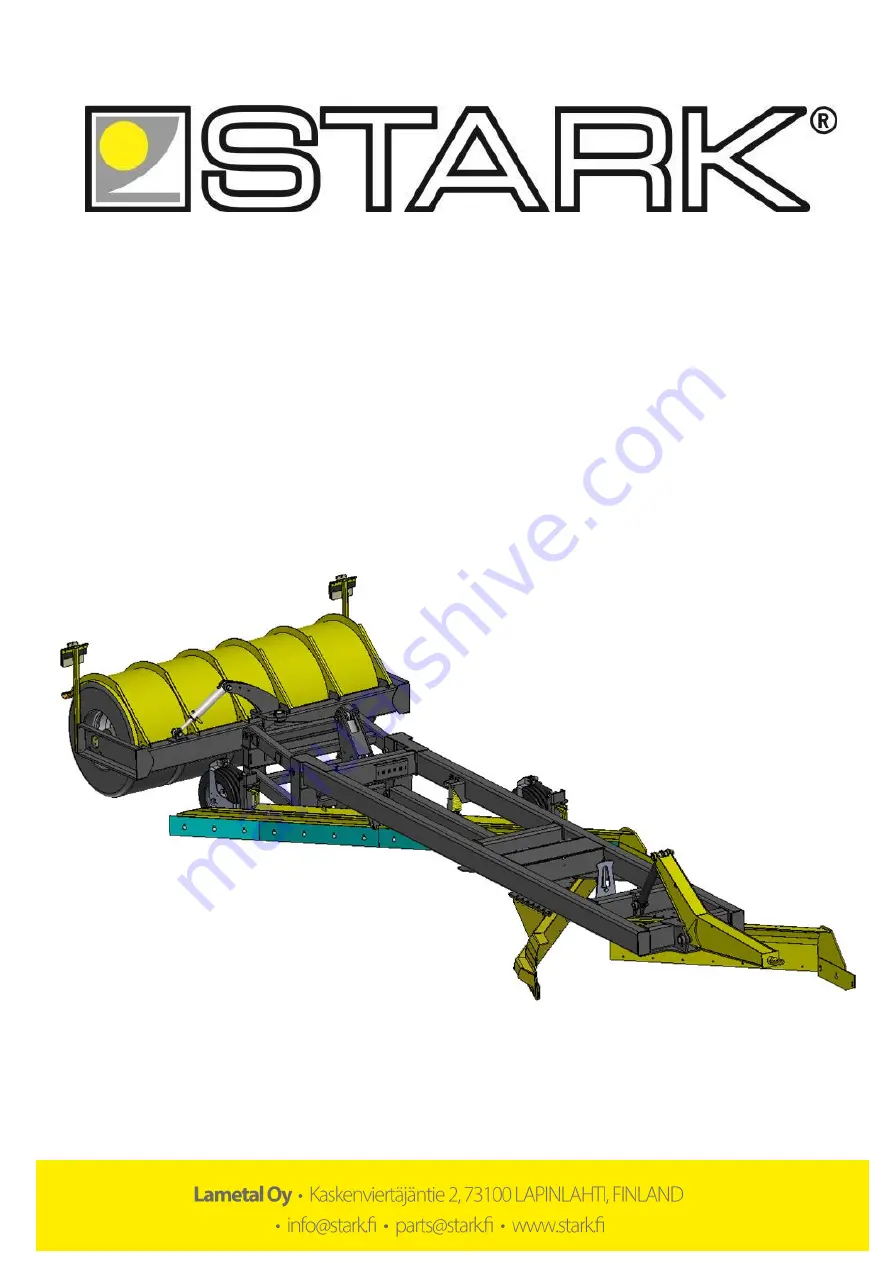
Страница 7: ...d grader 1 Frame of the road grader 2 Floating frame 3 Pull shaft 4 Front wing 5 Middle wing 6 Windrow spreader 7 Support wheels for windrow spreader 8 Tire packer 9 Ditch wing accessory 10 Extension for windrow spreader accessory 11 Pin blade for the ditch wing accessory 11 ...
Страница 8: ...e instructions on the use of the base machine 1 Make sure that the attachment and the base machine are compatible in terms of mechanical solutions hydraulics and electricity 2 The road grader is connected to the base machine s towing hook and hydraulic system 3 Connect the grader to the base machine s towing hook and move the tractor arms to lower position 4 Turn off the base machine engage the pa...
Страница 9: ...he transfer position with a synchronized lift If you do not press the back lift cylinder down first it won t go all the way up Press the grader down with a synchronized movement This way both of lift cylinders will move Adjust the main blades so that they will drag evenly with a lift cylinder located on back Adjust the desired slope of the road with a tilt cylinder Adjust the windrow blade to the ...
Страница 10: ... 3 Lift the ditch wing up with hydraulics wing locks upward position hydraulically When transferring road grader for long distances ditch wing must be secured to upwards stance with e g a cargo strap Turn off the base machine and remove pressure from the hydraulic hoses This facilitates the re installation Disconnect the hydraulic quick connectors and sockets and protect them Start the base machin...
Страница 11: ...is way base machine s directional valve only operates the rotation of the tire packer The warning light of the controller lights up 100 hours before the batteries are empty If there is an error in controller recode it There are 5 actions available for the controller 1 4 electrically controlled actions Hydraulic section picture 4 Tire packer s rotation 1 section Tilt of the grader 2 section Back li...
Страница 12: ... wing is rotated by removing the bolts holding it 32 pc of M16 bolts M30 bolt in the joint of the middle wing is loosened for rotation Some of the bolts are in the toolbox Picture 5 Picture 5 Middle wing s position 7 6 Accessories The following accessories are available for the road grader Flat pin and hardened metal blade set Ditch wing 1500 1800 Hydraulic extension for the windrow spreader Pin b...
Страница 13: ...people in the working area 8 2 Minimum requirements of the base machine Minimum weight of 6 000 kg With wireless controller 1 x 2 way hydraulic valve 7 pin trailer light plug 3 pin power socket Towing hook The road grader is attached to the towing hook of the base machine 1 Attach the road grader to the base machine and move the tractor arms to lower position 2 Turn off the base machine engage the...
Страница 14: ...s table 1 Lubrication recommended quality NLGI 2 grade grease or equivalent see a later section for instructions Check the mechanical condition of the road grader for distortion or rupture Check fastening bolts for tightness Check the drawbar eye for wear and tear Apply oil to the steel tenons so that they turn in the blade chassis Check the wheel pressures windrow wheel 3 0 bar and the tire packe...
Страница 15: ...lic cylinder of the tire packer 8 Joint bearings of the floating frame s lift cylinder 9 Joint bearings of the tire packers tilting cylinder 10 Joint bearings of the pull shaft s hydraulic cylinder 11 Pegs of the ditch wing accessory 12 Joint bearings of the ditch wing s hydraulic cylinder accessory 13 Rotation pegs of the ditch wing 2 pc accessory 14 Joint bearings of the ditch wing s padding cyl...
Страница 16: ...esponsibility of the client Max pressure 200 bar Max oil flow 100 L min Max return line pressure 80 bar 9 1 8 hose hydraulics Figure 1 Hydraulic chart for the 8 hose hydraulics E Base machine s control block 1 F Base machine s control block 2 G Base machine s control block 3 H Base machine s control block 4 A Pull shaft s lift cylinder B Floating frame s lift cylinder C Tire packer s hydraulic cyl...
Страница 17: ...chart for the 4 hose hydraulics With a wireless controller A Base machine s control block 1 B Base machine s control block 2 C Pull shaft s lift cylinder D Floating frame s lift cylinder E Tire packer s hydraulic cylinder F Tire packer s tilting cylinder ...
Страница 18: ...ure 3 Hydraulic chart for the 2 hose hydraulics A Base machine s control block 1 B Pull shaft s lift cylinder C Floating frame s lift cylinder D Tire packer s hydraulic cylinder E Tire packer s tilting cylinder With a wireless controller ...
Страница 19: ...as travel and waiting hours daily allowances travel expenses or costs arising from detaching and reinstalling the equipment The manufacturer does not compensate for indirect costs caused by repairs during the warranty period such as lost working hours Original parts replaced during the warranty period shall remain with the manufacturer The client must keep the damaged parts for six 6 months unless...