background image

6. Do not leave your tool unattended while switched on.  
7. Do not use or store your tool in damp or wet conditions.  

USEFUL HINTS & TIPS 


1. Your rotary tool will become warm after prolonged use and so must be switched off and allowed 
to cool down.  
2. To ensure smooth running, the spindle should be oiled periodically.  
3. Do not apply too much radial pressure to the accessory bits while polishing, cleaning, sanding or 
grinding. By doing this you will put a strain on the spindle and adversely affect the precision of the 
tool.  
4. Always work with a sensitive touch so as not to impede the efficiency of your mini tool.  
5. When drilling metal, always mark the drilling point with a centre punch first, so that your rotary 
tool does not slip.  
6. Always ensure that you have maximum contact between the accessory shaft and the collet chuck.  
7. Vary the speed on the tool for the work in hand, eg. Low speed for polishing & cleaning and high 
speed for engraving  

PLACING ACCESSORIES INTO THE TOOL 


Always switch the tool off first. Hold the locking button at the front of the tool down and undo the 
collet  chuck  (anti-clockwise).  Insert  the  collet  that  matches  the  shaft  size  of  the  accessory  to  be 
used.  Place  the  collet  nut  over  the  collet  and  then  insert  the  accessory  shaft  into  the  collet  chuck 
ensuring maximum shaft contact. Then tighten up the collet nut. (DO NOT USE PLIERS).  

FLEXYDRIVE ASSEMBLY 


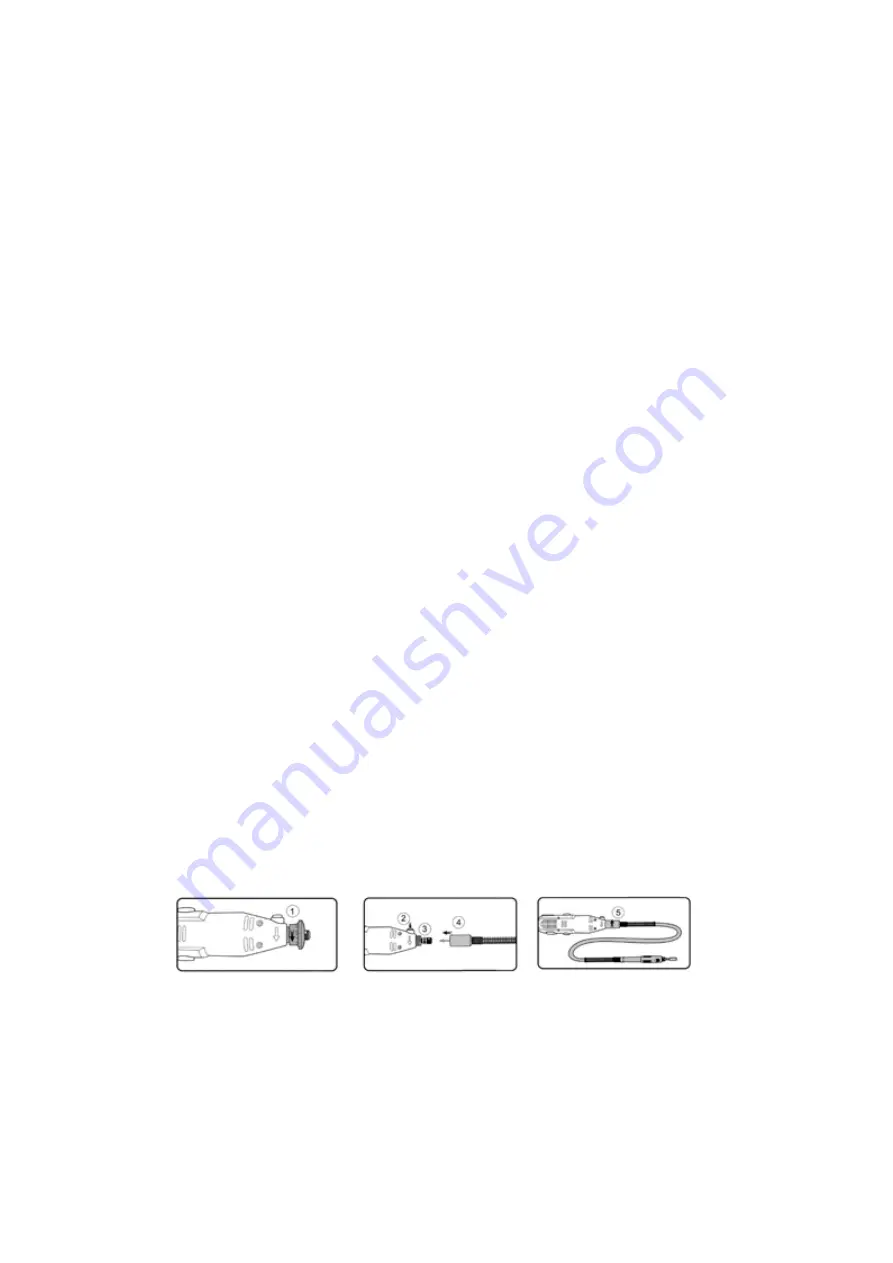
Remove the front ring nut from the tool by turning in an anti-clockwise direction. Partially unscrew 
the  blocking  ring  nut  from  the  spindle  .  Partially  extract  the  internal  transmission  cable  from  the 
flexydrive. Insert the flexydrive transmission cable into the spindle of the tool pushing it in as far as 
possible. Keep the spindle block button pressed in and screw the spindle blocking ring nut turning it 
in a clockwise direction. Tighten using the spanner for this purpose. Screw the threaded end of the 
flexydrive onto the body of the tool and tighten, screwing in a clockwise direction  

CHANGING THE INSERT AND ACCESSORIES ON THE FLEXYDRIVE 


To change the insert or to install accessories on the flexydrive, follow the same general procedure 
for insert change and for accessory assembly on the attachment. To block the spindle, turn it until 
the hole in the shaft is in line with the hole on the handle of the flexydrive Insert a 1/8” drill bit in 
the aligned holes to block the shaft. 


Содержание red line MG 1440

Страница 1: ...lly before using the product УВАГА Ознайомтеся з інструкцією перед експлуатацією виробу ВНИМАНИЕ Изучите инструкцию перед эксплуатацией изделия Гравер MG 1440 MG 1472 MG 18218 Гравер MG 1440 MG 1472 MG 18218 Mini grinder MG 1440 MG 1472 MG 18218 MG 1440 MG 1472 MG 18218 ...

Страница 2: ...е отображённые в настоящем руководстве и не влияющие на эффективную и безопасную работу инструмента УКАЗАНИЯ ПО БЕЗОПАСНОСТИ Для обеспечения безопасной и надежной работы с инструментом должны быть прочитаны и соблюдаться все инструкции Позаботьтесь о сохранении этой инструкции в течение всего срока службы инструмента 1 Содержите рабочее место в чистоте Обеспечьте хорошее освещение рабочего места 2...

Страница 3: ...го патрона особенно при длительном использовании одного и того же аксессуара 17 После использования всегда отключайте электроинструмент от электросети 18 Не предпринимайте ремонт инструмента самостоятельно При возникновении поломок или при нестабильной работе инструмента обратитесь в сервисный центр 19 Не оставляйте работающий инструмент без присмотра 20 Не используйте и не храните инструмент в ус...

Страница 4: ...ый патрон Затяните гайку цангового патрона 5 Смена и размещение насадок на гибком валу Придерживайтесь той же последовательности что описана выше для смены и размещения насадок на инструменте Утилизация Изделие не подлежит утилизации с бытовыми отходами Утилизируйте изделие надлежащим образом в соответствии с государственными нормами действующими в вашей стране Уход за прибором Периодически протир...

Страница 5: ...нструментом повинні бути прочитані і дотримуватися всі інструкції Подбайте про збереження цієї інструкції протягом усього терміну служби інструмента 1 Тримайте робоче місце в чистоті Забезпечте гарне освітлення робочого місця 2 Не використовуйте електроінструменти у вибухонебезпечних приміщеннях по близькості вогненебезпечних легкозаймистих рідин Електроінструменти створюють іскри які можуть стати...

Страница 6: ...тійно При виникненні поломок або при нестабільній роботі інструменту зверніться в сервісний центр 19 Не залишайте працюючий інструмент без нагляду 20 Не використовуйте і не зберігайте інструмент в умовах підвищеної вологості 21 Не змінюйте швидкість обертання під час роботи інструменту КОРИСНІ ПОРАДИ 1 При тривалому використанні інструмент може нагріватися Вимкніть його з розетки і дайте йому охол...

Страница 7: ...міни і розміщення насадок на інструменті Утилізація Використані батарейки не підлягають утилізації з побутовими відходами Подбайте про навколишнє середовище здайте їх на збірний пункт організований в відповідно до державних або місцевих норм Виріб не можна утилізувати з побутовими відходами Утилізуйте пристрій відповідним чином до державних норм що діють у вашій країні Догляд за пристроєм Періодич...

Страница 8: ...pcs Wight 1 7kg 1 6kg 2 25kg IMPORTANT Safety Instructions for all tools WARNING When using electric power tools important safety precautions must always be adhered to in order to reduce the risk of fire electric shock and personal injury PLEASE READ THE FOLLOWING CAREFULLY 1 KEEP WORK AREA CLEAN Untidy benches and work areas invite injuries 2 CONSIDER WORK AREA ENVIRONMENT Do not use power tools ...

Страница 9: ...ration 20 DO NOT OPERATE portable electric tools near flammable liquids or in gaseous or explosive atmospheres Motors in these tools normally spark and the sparks may ignite fumes MULTIFUNCTION POWER TOOL USE This rotary tool can be used for drilling grinding sanding and polishing as well as engraving cutting and removing rust in tight spaces or inaccessible places The tool can be used on most met...

Страница 10: ...et chuck anti clockwise Insert the collet that matches the shaft size of the accessory to be used Place the collet nut over the collet and then insert the accessory shaft into the collet chuck ensuring maximum shaft contact Then tighten up the collet nut DO NOT USE PLIERS FLEXYDRIVE ASSEMBLY Remove the front ring nut from the tool by turning in an anti clockwise direction Partially unscrew the blo...

Страница 11: ......

Отзывы: