background image

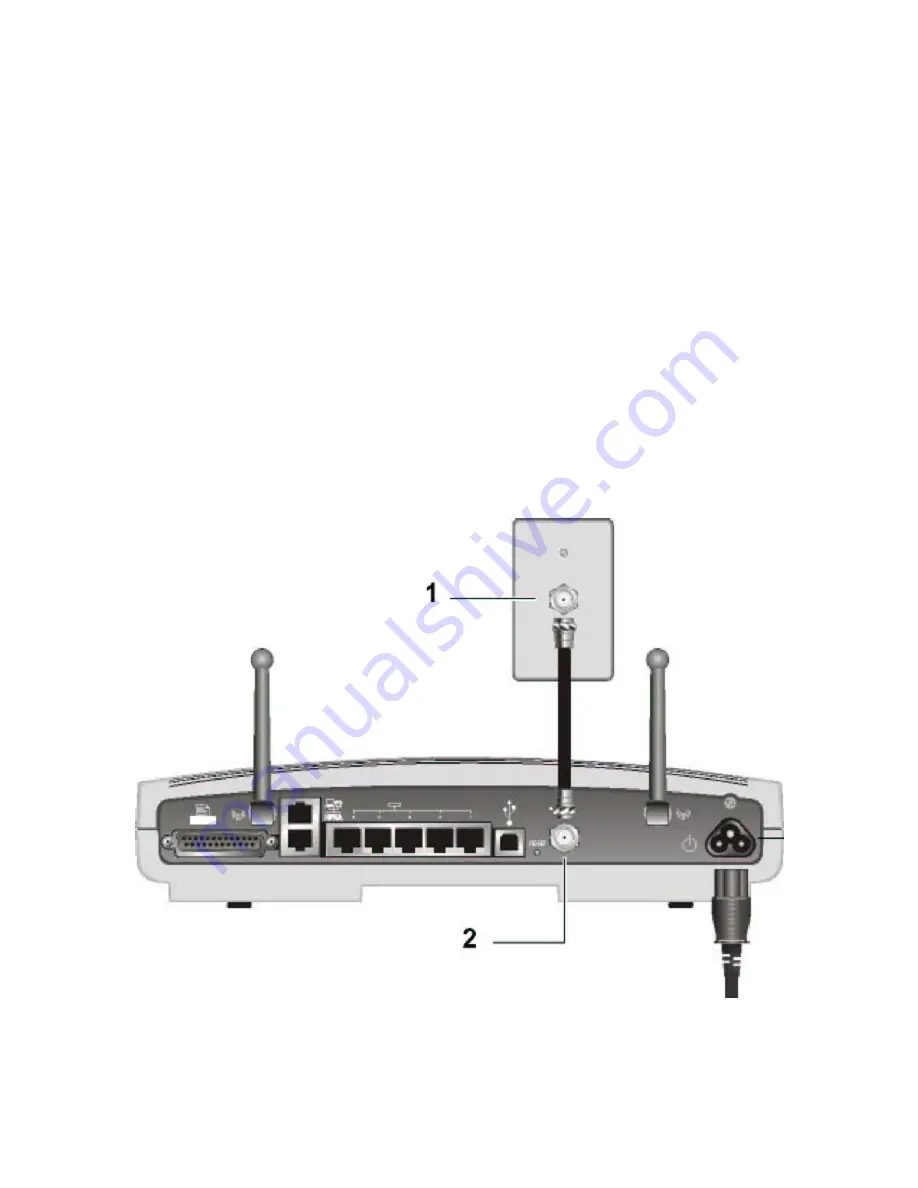
Connecting the SBG1000 to the Cable System 

Allow 5 to 30 minutes the first time you turn on the SBG1000 to find and lock on the appropriate 
communications channels. 

Be sure the computer is on and the SBG1000 is unplugged. 

Connect one end of the coaxial cable to the cable outlet or splitter. 

Connect the other end of the coaxial cable to the cable connector on the SBG1000. 

Hand-tighten the connectors to avoid damaging them. 

Insert the 

Motorola SBG1000 Wireless Cable Modem Gateway 

CD-ROM into the CD-ROM drive. 

Plug the power cord into the power connector on the SBG1000. 

Plug the power cord into the electrical outlet. 

This turns the Motorola SBG1000 Wireless Cable Modem 

Gateway on. You do not need to unplug it when not in use. 

Check that the lights on the 

Front Panel 

cycle through this sequence: 

• 

Power icon turns on when AC power is connected to the SBG1000 and indicates that the power supply is 

working properly

• 

RX (receive) light flashes while scanning for the receive channel and changes to solid green when the 

receive channel is locked. 

• 

TX (transmit) light flashes while scanning for the send channel and changes to solid green when the 

send channel is locked. 

• 

LNK (link) light flashes during SBG1000 registration and configuration and changes to solid green when 

the cable modem wireless gateway is registered. 

• 

Globe icon flashes when the SBG1000 is transmitting or receiving data. 

Connecting the SBG1000 to the cable system


 12

Содержание SBG1000

Страница 1: ...1 ...

Страница 2: ...000 18 Configuring the Gateway 19 Gateway STATUS Page 20 Gateway WAN Page 21 Gateway LAN nat config Page 23 Gateway LAN dhcp server config Page 24 Gateway LAN dhcp reservations Page 25 Gateway Virtual Server Status Page 26 Gateway Virtual Server ConfigurationPage 27 Gateway Port Trigger Predefined Page 28 Gateway Port Trigger Custom Page 29 Setting Up the Wireless LAN 30 Configuring a Unique Wirel...

Страница 3: ...dows 98 or Windows Me 52 Removing the USB Driver from Windows 2000 56 Removing the USB Driver from Windows XP 60 Configuring TCP IP 65 Configuring TCP IP in Windows 95 Windows 98 or Windows Me 66 Configuring TCP IP in Windows 2000 69 Configuring TCP IP in Windows XP 74 Verifying the IP Address in Windows 95 Windows 98 or Windows Me 78 Verifying the IP Address in Windows 2000 or Windows XP 79 Frequ...

Страница 4: ...etwork to share a single broadband connection files printers and other peripherals like scanners with or without wires The SBG1000 Eliminates the need for five separate products enabling you to maximize the potential of your existing resources Offers enhanced network security for wired and wireless users The features and physical appearance of your SBG1000 may differ slightly from the picture This...

Страница 5: ...urf the web all computers on the Ethernet wireless and USB communicate as if they were connected to the same physical network A built in DHCP server to easily configure a combined wired and or wireless Class C private LAN An advanced firewall supporting stateful inspection Intrusion detection Denial of service attack prevention Network Address Translation NAT Virtual private network VPN pass throu...

Страница 6: ... the wireless IEEE 802 11b connection One desktop Macintosh on a wireless connection One desktop PC on a wireless connection using a Motorola USB Adapter A laptop PC on a wireless connection connected using a Motorola PC Card One computer connected directly to Ethernet port one Three computers connected to Ethernet port two using a hub or switch One PC connected to the USB port Sample SBG1000 hybr...

Страница 7: ...1000 Wireless Cable Modem Gateway Ethernet ports support auto MDIX you can use either straight through or cross over cable to connect a hub switch or computer Use category 5 cabling for all Ethernet connections The physical wiring arrangement has no connection to the logical network allocation of IP addresses Sample SBG1000 Ethernet network connections 7 ...

Страница 8: ...s 2000 to the Motorola SBG1000 Wireless Cable Modem Gateway USB port For cabling instructions see Connecting a PC to the USB Port Sample USB connection Caution Before plugging in the USB cable be sure the Motorola SBG1000 Wireless Cable Modem Gateway CD ROM is inserted in the PC CD ROM drive 8 ...

Страница 9: ...als instead of wires to exchange data A wireless network eliminates the need for expensive and intrusive wiring to connect computers throughout the home or office Mobile users can remain connected to the network even when carrying their laptop to different locations in the home or office Each computer on a wireless LAN requires a wireless adapter 9 ...

Страница 10: ...ts and intrusion attempts Provides comprehensive logging for all User authentications Rejected internal and external connection requests Session creation and termination Outside attacks intrusion detection You can configure the firewall filters to set rules for port usage and to block specific IP domains and networks Wireless Security To prevent unauthorized eavesdropping of data transmitted over ...

Страница 11: ...P and Layer 2 Tunneling Protocol L2TP Is fully interoperable with any IPSec client or gateway and ANX certified IPSec stacks Print Server You can connect a printer to the Motorola SBG1000 Wireless Cable Modem Gateway back panel using a standard DB 25 connector The print server Enables Windows computers on the wired or wireless SBG1000 LAN to share a printer Supports the SMB LPR AppleTalk printing ...

Страница 12: ...al outlet This turns the Motorola SBG1000 Wireless Cable Modem Gateway on You do not need to unplug it when not in use 8 Check that the lights on the Front Panel cycle through this sequence Power icon turns on when AC power is connected to the SBG1000 and indicates that the power supply is working properly RX receive light flashes while scanning for the receive channel and changes to solid green w...

Страница 13: ... Desktop click Start 2 Select Run The Run window is displayed 3 Type winipcfg exe and click OK The IP Configuration window is displayed Obtaining an IP address in Windows 2000 or Windows XP You must do the following on each Ethernet client PC running Windows 2000 or Windows XP 1 On the Windows Desktop click Start 2 Select Run The Run window is displayed 3 Type cmd and click OK to display a command...

Страница 14: ...Caution Before plugging in the USB cable be sure the Motorola SBG1000 Wireless Cable Modem Gateway CD ROM is inserted in the PC CD ROM drive Setting Up the Wireless LAN For information about wireless LAN setup see Setting Up the Wireless LAN Connecting the Printer Connect the printer to the Motorola SBG1000 Wireless Cable Modem Gateway printer port If a cable was supplied with the printer use that...

Страница 15: ...eration you do not need to change most default settings The following caution statements summarize the issues you must be aware of Caution To prevent unauthorized configuration change the default password immediately when you first configure the Motorola SBG1000 Wireless Cable Modem Gateway See Changing the Default Password Firewalls are not foolproof Choose the most secure firewall policy you can...

Страница 16: ...rewall Configure and monitor the firewall see Setting the Firewall Policy Printer Configure the SBG1000 print server see Configuring the Print Server Admin Changing the Default Password Help Display information about the SBG1000 see Getting Help Info Display information about the SBG1000 Setup Program Reboot Restart the SBG1000 It is the same as pressing the reset button on the Rear Panel for less...

Страница 17: ...n change the default password immediately when you first configure the Motorola SBG1000 Wireless Cable Modem Gateway 2 Type the old password in the Old Password field The default password is motorola 3 Type the new password in the New Password field Please write down your new password here 4 Type the new password again in the Verify Password field 5 Click Apply to apply your changes 17 ...

Страница 18: ...tions will be lost and you may need to re configure your SBG 1000 Question I have forgotten my SBG1000 setup password but I do not want to reset the password using the SBG1000 reset button because this will also reset my SBG1000 to factory default settings What should I do Ans You can call our Customer Care Consultant at 6873 7373 We will be able to reset your password without resetting the settin...

Страница 19: ...y LAN nat config Page Gateway LAN dhcp server config Page Gateway LAN dhcp reservations Page Gateway Virtual Server Gateway Port Trigger Gateway LOG Page For some settings after you edit the field and click Apply you are warned that you must Reboot for your change to take effect Rebooting takes 10 to 15 seconds After rebooting you must log in again 19 ...

Страница 20: ...Gateway STATUS Page This page displays the gateway status information 20 ...

Страница 21: ...HCP Client If the cable service provider does not automatically assign a public IP address using DHCP they must provide a static IP address Select Disable DHCP Client When you disable the DHCP client you must type the static IP address subnet mask DNS server s and domain name if necessary in the fields provided Disable DHCP Client is off by default Static IP Address If Disable DHCP Client is on ty...

Страница 22: ... address to enter in these fields in dotted decimal format The default is None TCP Session Wait Sets the maximum time in minutes to wait before assuming a TCP session has timed Timeout out The default is 5 minutes UDP Session Wait Sets the maximum time in minutes to wait before assuming a UDP session has timed Timeout out The default is 5 minutes ICMP Session Wait Sets the maximum time in minutes ...

Страница 23: ...n Up to 32 NAT passthrough CPEs can be entered using the CPE MAC address In order to use the NAT Passthrough feature a separate public IP address must be provided for each CPE device you wish to simultaneously place in NAT Passthrough mode MAC Address Sets the MAC address of the passthrough client The format is 16 hexadecimal numerals DMZ Check the box to set the MAC address as a de militarized zo...

Страница 24: ...ts the starting IP address assigned by the SBG1000 DHCP server to clients in dotted decimal format The default is 192 168 0 2 of DHCP Users Sets the number of clients for the SBG1000 DHCP server to assign a private IP address There are 253 possible client addresses The default is 253 DHCP Server Lease Time Sets the time in seconds that the SBG1000 DHCP server leases an IP address to a client The d...

Страница 25: ...o bypass NAT and be exposed directly to the Internet When configuring a client as a NAT passthrough device you can specify whether it should be a de militarized zone DMZ host A DMZ host is completely exposed to the Internet Any device configured as a DMZ is open to Internet hackers and should be used with extreme caution Host Name If your ISP requires a hostname to access their network enter the h...

Страница 26: ...Gateway Virtual Server status page Use this page to check the status of Virtual Server Please refer to the following page to configure a Virtual server Gateway virtual server 26 ...

Страница 27: ...eed to enter LAN IP Address and change default values if necessary Server ID Up to 32 Virtual Servers can be configured Enter a unique identifier for your custom virtual server The typical practice is to use the protocol as a unique identifier e g ftp Port Start The require starting port Port End The required ending port LAN IP address The reserved LAN IP address for the server Enable Click Enable...

Страница 28: ...iggers triggers A Port Trigger is needed for certain applications that need one or more ports opened to operate properly The typical applications that need Port Triggers to operate properly are games video conferencing and file transfer e g FTP Note You must ensure your firewall policy allows traffic on the application control ports through the firewall for any Port Triggers you configure 28 ...

Страница 29: ...e properly The session chaining parameter is used to indicate whether the Port Triggers should chain subsequent traffic to the initial session or consider the traffic to be a new session Session Interval Enter the session interval appropriate for the custom application you are configuring If the Port Triggers detects traffic on the port range within the session interval it is considered to be traf...

Страница 30: ...US Page Wireless Network Page Wireless Security Basic Page Wireless Security Advance Page Wireless Statistics For some settings after you edit the field and click Apply you are warned that you must Reboot for your change to take effect Rebooting takes 10 to 15 seconds After rebooting you must log in again Wireless Status Page 30 ...

Страница 31: ...figure the ESSID 1 Start the SBG1000 Setup Program as described in Starting the SBG1000 Setup Program 2 On the left frame click Wireless 3 Click the NETWORK tab to display 4 In the ESSID field type a name It can be any alphanumeric case sensitive string up to 32 characters The default is Motorola Do not use the default ESSID Please write down your new ESSID for future reference ESSID 5 Click Save ...

Страница 32: ...ta to any other client devices on the wireless network Open authentication does NOT provide any security for data transmitted on the wireless network Shared Key Shared Key authentication provides privacy for the data transmitted on the wireless network Only device that is using Shared Key authentication and the WEP key exactly matches the access point WEP key then the access point will permit data...

Страница 33: ...protection for your network because only 802 11b stations that know your network name can be configured to associate with the SBG Note Disable ESSID broadcast operation is not part of the IEEE 802 11b standard MAC Access Control List The MAC ACL is used to restrict access to the wireless link to explicitly identified individual 802 11b station MAC addresses Up to 32 individual 802 11b station MAC ...

Страница 34: ...Wireless Statistics 1 On the left frame click Wireless 2 Click on Statistics 34 ...

Страница 35: ...most secure firewall policy you can To enable easy network setup the default firewall policy is Low which provides minimum security 4 Select one of the following Unless you have the necessary expertise and need to setup a custom firewall use High Medium or Low 5 Click Apply to apply your changes High Safest configuration highest security Medium Common configuration modest risk Low Minimum security...

Страница 36: ...tting the Firewall Policy Advanced users only can create a custom policy The FIREWALL setting None disables the firewall and provides no security The predefined policies provide outbound Internet access for computers on the SBG1000 LAN The SBG1000 firewall uses stateful inspection to allow inbound responses when there already is an outbound session running corresponding to the data flow For exampl...

Страница 37: ...ed Protocol The allowed protocols Port Range From To Sets the from and to port range which must contain all ports required by the protocol Protocol The protocol number associated with the IP packets to allow in the firewall policy Allow IB Inbound Filters inbound data from the Internet on the specified ports Allow OB Outbound Filters outbound data to the Internet on the specified ports Stateful in...

Страница 38: ... logged Firewall LOGS page fields Field or Button Description Enable Session Log Check this box to log session events Enable Blocking Log Check this box to log blocking events Enable Intrusion Log Check this box to log intrusions Apply Click to apply your changes 38 ...

Страница 39: ...hat supports bi directional communication you can enable Extended Capabilities Port ECP Mode which can provide a performance benefit over a standard port 4 Use the following pages to configure the print server for the necessary platform s 5 Power off the SBG1000 6 Connect the printer to the printer port on the SBG1000 Rear Panel as shown in Installation 7 Power on the printer 8 Power on the SBG100...

Страница 40: ...cally go to the SBG network print server you selected from Microsoft Network neighborhood Enable Abort Print Job Enable abort print job when you want any print jobs submitted to your printer to abort if the printer runs out of paper When abort print job is disabled the print server will not resume printing your print job until you have resolved the printer out of paper condition Response Time Ente...

Страница 41: ...Appletalk zone and printer type match Communication Protocol Standard Enable Standard if your printer uses a communication protocol that supports sending and receiving ASCII data The Standard protocol is typically supported on devices using RS 232 and centronics channels Binary Communication Protocol Enable Binary Communication Protocol BCP if your printer supports sending and receiving of binary ...

Страница 42: ... 1 On the left frame click Printer 2 Click the LPR tab Field or Button Description Printer IP address This is the IP address for the printer on your LAN This is the same IP address that has been assigned to the SBG on your LAN Queue Name Enter the queue name of the print server 42 ...

Страница 43: ...le Modem Gateway CD ROM is inserted in the CD ROM drive before you plug in the USB cable This CD contains the USB drivers and must be inserted and read by the PC before you connect the SBG1000 to the PC A few seconds after you complete the USB connection the Add New Hardware Wizard window is displayed 1 Click Next The following window is displayed Be sure Search for the best driver for your device...

Страница 44: ...for this devicels is displayed If the computer successfully locates the driver you can skip to step 6 If the computer does not locate the driver the previous window is displayed again 4 Select Specify a location and type the location of the CD ROM drive To load the driver successfully you may need to click Browse to manually select the NetMotCM sys file on the CD ROM 44 ...

Страница 45: ...displayed verify that the Motorola SBG1000 Wireless Cable Modem Gateway CD ROM is properly inserted in the CD ROM drive If you still cannot find the correct driver file click Cancel to cancel the installation and perform the procedure for Removing the USB Driver from Windows 98 or Windows Me Then repeat this procedure 45 ...

Страница 46: ...tion To install the files insert your Windows 98 CD ROM in the CD ROM drive and click OK After all the necessary files are loaded the following window is displayed to confirm a successful installation 8 Click Finish The Systems Settings Change window is displayed 9 Click Yes to restart the computer When you finish setting up the USB driver you can continue with Configuring TCP IP If you have diffi...

Страница 47: ...Gateway CD ROM is inserted into the CD ROM drive before you plug in the USB cable A few seconds after you complete the USB connection the Found New Hardware window is displayed 1 Click Next The following window is displayed Be sure Search for a suitable driver for my devicele is selected 47 ...

Страница 48: ...2 Click Next The following window is displayed Be sure CD ROM drives is the only box checked 3 Click Next The following window is displayed 48 ...

Страница 49: ...ollow steps 5 to 10 Otherwise you can skip to step 11 5 On the Insert Disk window click OK The Files Needed window is displayed 6 If necessary select the CD ROM drive in the Copy files from list 7 Click Browse 8 Locate the NetMotCM sys file in the CD ROM root directory 9 Double click the NetMotCM sys file The Files Needed window is displayed 49 ...

Страница 50: ...If you have any difficulties setting up the USB driver perform Removing the USB Driver from Windows 2000 and repeat this procedure Setting Up a USB Driver in Windows Me Be sure the Motorola SBG1000 Wireless Cable Modem Gateway CD ROM is inserted into the CD ROM drive before you plug in the USB cable A few seconds after you complete the USB connection the Add New Hardware Wizard window is displayed...

Страница 51: ...G1000 Wireless Cable Modem Gateway CD ROM is correctly inserted in the CD ROM drive When you finish setting up the USB driver you can continue with Configuring TCP IP Setting Up a USB Driver in Windows XP Be sure the Motorola SBG1000 Wireless Cable Modem Gateway CD ROM is inserted into the CD ROM drive before you plug in the USB cable A few seconds after you complete the USB connection the Found N...

Страница 52: ...k Finish to complete the installation Otherwise be sure the Motorola SBG1000 Wireless Cable Modem Gateway CD ROM is correctly inserted in the CD ROM drive When you finish setting up the USB driver you can continue with Configuring TCP IP Removing the USB Driver from Windows 98 or Windows Me 1 On the Windows Desktop right click one of In Windows 98 the Network Neighborhood icon In Windows ME the My...

Страница 53: ...The Network window is displayed 2 Click the Motorola SurfBoard SBG1000 USB Gateway 3 Click Remove The Network window no longer displays Motorola SurfBoard SBG1000 USB Gateway in the list 53 ...

Страница 54: ...th language choices is displayed 8 Press the Esc key on the keyboard to exit the start up screens 9 To start Windows Explorer click Start and select Run 10 In the Run window type explorer and click OK The Exploring window is displayed Windows Explorer may appear different than in the image There are variations between Windows versions and you can configure Windows Explorer as you like 11 Double cl...

Страница 55: ...rola SBG1000 Wireless Cable Modem Gateway CD ROM The SURFboard Cable Modem USB Driver Removal window is displayed 13 Click Remove Driver After you remove the USB driver re install it on the computer Setting Up a USB Driver in Windows 98 Setting Up a USB Driver in Windows Me 55 ...

Страница 56: ... the USB Driver from Windows 2000 1 On the Windows desktop click Start 2 Click Settings 3 Click Control Panel to display the Control Panel window 4 Double click System to display the System Properties window 56 ...

Страница 57: ...nager button to display the Device Manager window 7 On the Device Manager window double click Network Adapters 8 Click the Motorola SurfBoard SBG1000 USB Gateway The Uninstall icon displays on the window near the top 9 Click the Uninstall icon The following window is displayed 57 ...

Страница 58: ...key on the keyboard to exit the start up screens 15 To start Windows Explorer click Start and select Run to display the Run window 16 On the Run window type explorer and click OK to display Windows Explorer Windows Explorer may appear different than in the image There are variations between Windows versions and you can configure Windows Explorer as you like 17 Double click My Computer 18 Double cl...

Страница 59: ...oard Cable Modem USB Driver Removal window is displayed 20 Be sure the USB cable is disconnected 21 Click Remove Driver Informational messages similar to the ones shown are displayed on the SURFboard Cable Modem USB Driver Removal window After you remove the USB driver re install it following Setting Up a USB Driver in Windows 2000 59 ...

Страница 60: ...ndow 2 Click Control Panel to display the Control Panel window The display varies depending on the Windows XP view options 3 If a Category view similar to the image under step 2 is displayed click Performance and Maintenance to display the Performance and Maintenance window Otherwise skip to step 5 60 ...

Страница 61: ...4 Click System to display the System Properties window Skip to step 6 5 If a classic view similar to the following is displayed click System to display the System Properties window 61 ...

Страница 62: ...le click the Device Manager button to display the Device Manager window 8 Double click Network adapters 9 Click the Motorola SurfBoard SBG1000 USB Gateway The Uninstall icon displays on the window near the top 10 Click the Uninstall icon 11 Close the Device Manager and Control Panel windows 62 ...

Страница 63: ...start up screens 14 To start Windows Explorer click Start and select Run to display the Run window 15 Type explorer and click OK to display Windows Explorer Windows Explorer may appear slightly different than in the image There are variations between Windows versions and you can configure Windows Explorer as you like 16 Double click My Computer 17 Double click the Motorola CD icon D in the image 6...

Страница 64: ...board Cable Modem USB Driver Removal window is displayed 19 Be sure the USB cable is disconnected 20 Click Remove Driver Informational messages similar to the ones shown are displayed on the SURFboard Cable Modem USB Driver Removal window After you remove the USB driver re install it following Setting Up a USB Driver in Windows XP 64 ...

Страница 65: ...ion between computers Perform one of Configuring TCP IP in Windows 95 Windows 98 or Windows ME Configuring TCP IP in Windows 2000 Configuring TCP IP in Windows XP Follow the instructions in your Macintosh or UNIX user manual After configuring TCP IP perform one of the following to verify the IP address Verifying the IP Address in Windows 95 Windows 98 or Windows Me Verifying the IP Address in Wind...

Страница 66: ...figuration tab 5 Verify that TCP IP is installed for the adapter used to connect to the SBG1000 If TCP IP is installed skip to step 10 If TCP IP is not installed for the adapter continue with step 6 6 Select the adapter to use for the SBG1000 connection and click Add The Select Network Component Type window is displayed Although your SBG model number may be different than in the images in this gui...

Страница 67: ...k Protocol section of Select Network Protocol window 9 Click OK 10 Click TCP IP on the Network window If there is more than one TCP IP entry choose the one for the Ethernet card or USB port connected to the SBG1000 11 Click Properties The TCP IP Properties window is displayed 67 ...

Страница 68: ...cally 14 Click OK to accept the TCP IP settings 15 Click OK to close the Network window 16 Click OK when prompted to restart the computer and click OK again When you complete TCP IP configuration go to Verifying the IP Address in Windows 95 Windows 98 or Windows Me 68 ...

Страница 69: ... 1 On the Windows Desktop click Start 2 Select Settings and then Control Panel from the pop up menus to display the Control 3 Double click the Network and Dial up Connections icon to display the Network and Dial up Connections window 69 ...

Страница 70: ...al Area Connection number The value of number varies from system to system The Local Area Connection number Status window is displayed 5 Click Properties Information similar to the following window is displayed 70 ...

Страница 71: ...skip to step 10 If Internet Protocol TCP IP is not in the list click Install The Select Network Component Type window is displayed 7 Click Protocol on the Select Network Component Type window and click Add The Select Network Protocol window is displayed 8 Click Internet Protocol TCP IP 71 ...

Страница 72: ...The Local Area Connection number Properties window is re displayed 10 Be sure the box next to Internet Protocol TCP IP is checked 11 Click Properties The Internet Protocol TCP IP Properties window is displayed 72 ...

Страница 73: ...ected 13 Click OK to accept the TCP IP settings 14 Click OK to close the Local Area Connection number Properties window 15 Click OK when prompted to restart the computer and click OK again When you complete the TCP IP configuration go to Verifying the IP Address in Windows 2000 or Windows XP 73 ...

Страница 74: ...p click Start to display the Start window 2 Click Control Panel to display the Control Panel window The display varies depending on the Windows XP view options If the display is a Category view as shown below continue with step 3 Otherwise skip to step 5 74 ...

Страница 75: ...e Network and Internet Connections window in the or pick a Control Panel icon click Network Connections to display the LAN or High speed Internet connections Skip to step 6 5 If a classic view similar to below is displayed click Network Connections to display the LAN or High speed Internet connections 75 ...

Страница 76: ...yed be sure to select the one for your network interface 7 Select Properties from the pop up menu to display the Local Area Connection Properties window 8 On the Local Area Connection Properties window be sure Internet Protocol TCP IP is checked If it is not checked check it 76 ...

Страница 77: ...the Internet Protocol TCP IP Properties window verify that the settings are correct as shown above 11 Click OK to close the TCP IP Properties window 12 Click OK to close the Local Area Connection Properties window When you complete the TCP IP configuration go to Verifying the IP Address in Windows 2000 or Windows XP 77 ...

Страница 78: ...dpater Information field will vary depending on the system as shown in the following examples The values for Adapter Address IP Address Subnet Mask and Default Gateway on the PC will be different than in the image 4 Select the adapter name the Ethernet card or USB device 5 Click Renew 6 Click OK after the system displays an IP address If after performing this procedure the computer cannot access t...

Страница 79: ...play the IP configuration A display similar to the following indicates a normal configuration If an Autoconfiguration IP Address is displayed as in the following window there is an incorrect connection between the PC and the SBG1000 or there are cable network problems Check the cable connections and determine if you can view cable TV channels on your television After verifying the cable connection...

Страница 80: ...s ENTER If a valid IP address is displayed as shown Internet access should be available 2 Type exit and press ENTER to return to Windows If after performing this procedure the computer cannot access the Internet call your cable service provider for help 80 ...

Страница 81: ...pe of firewall is provided on the SBG1000 A The SBG1000 provides a stateful inspection firewall Q What wireless security measures are provided on the SBG1000 A To protect data transmitted over wireless connections the SBG1000 supports WEP encryption and MAC access control lists For information see Setting Up the Wireless LAN Q Why is there no Standby button A As a security measure current Motorola...

Отзывы: