US2-B32 / US2-BA32
Quick Setup Guide
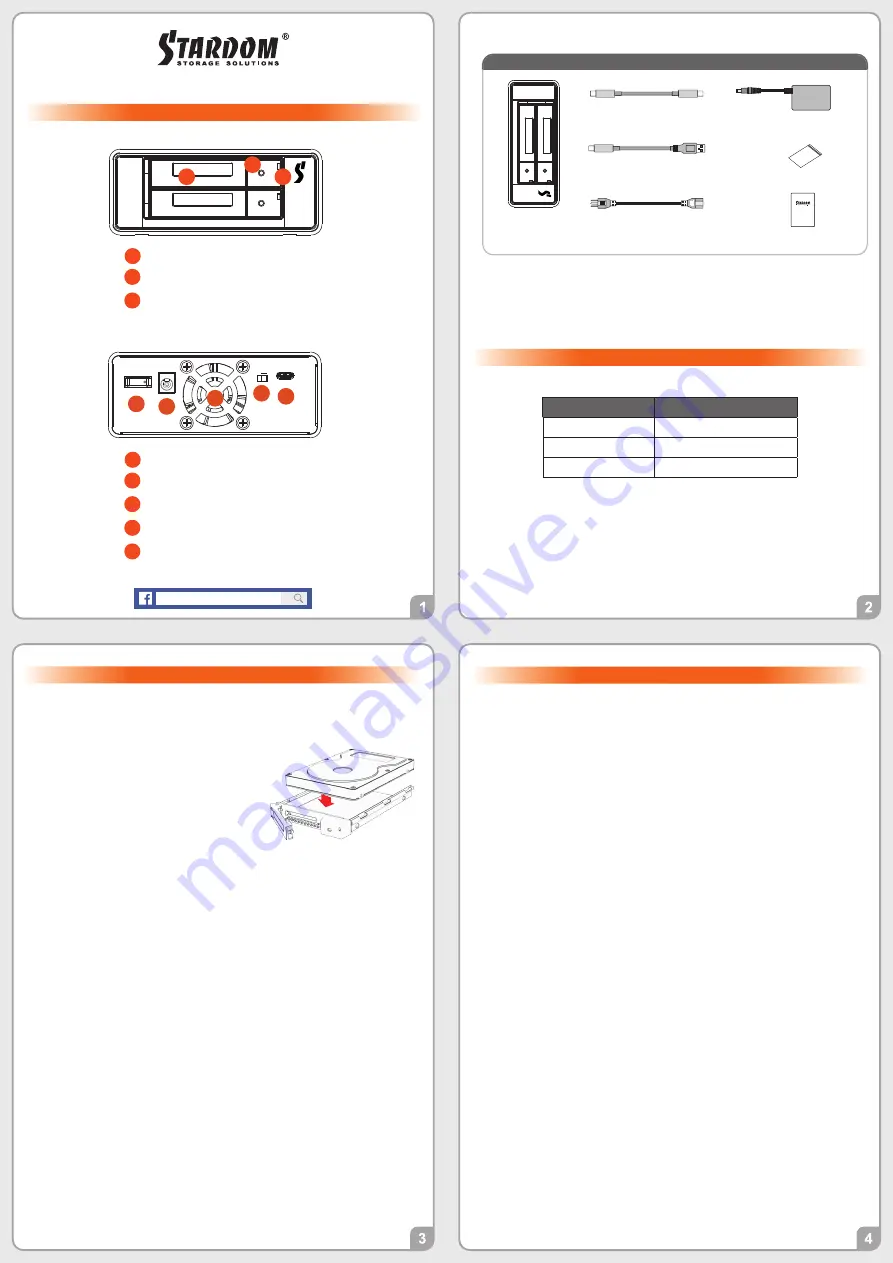
Product Illustration and Parts List
The Indication of HDD Status
Please follow the instructions below to complete the hardware installation.
Hardware Installation
Place the system on a stable surface. Ensure that the vent is not blocked and that it is
installed in a well-ventilated area. (Please keep the product away from moisture and other
environment that might be harmful to the product)
1.
2.
3.
4.
5.
6.
7.
8.
Please check the product and accessories for any defect or missing parts. If you have any
questions, please contact your product supplier.
Please visit the official website - Download page (http://www.stardom.com.tw/STAR-
DOM2016/download.php) to download other related resources.
˙
˙
Use the ejector pin included in the
accessory kit
to eject the HDD enclosure
handle, and then pull tray handle to remove
it.
Mount the 2.5" HDD onto the removable
tray.
When the
HDD
installation has been completed, insert the tray into the system horizontally
and secure the latch into place.
Use the RAID switch on the back of US2-BA32/US2-B32 to set the RAID mode to be used.
Depending on the computer's USB port type, select the corresponding USB cable in the
accessory to connect the computer to the US2-BA32/US2-B32 USB port.
Connect the power cord to the power adapter, connect the connectors at both ends to the
US2-BA32/US2-B32 and the power socket, and then start the US2-BA32/US2-B32
After the computer is turned on, the storage capacity will be automatically recognized by the
operating system. After the storage capacity is recognized successfully, please format the
system according to your desired storage format and follow the instructions of the operating
Important Notice
STARDOM is one brand under RAIDON TECHNOLOGY, INC.
Thank you for choosing STARDOM’s product.
The information provided in this manual was checked before publication, but the actual product
specifications may have changed before shipping; Latest product specifications and updates can be
found at www.STARDOM.com.tw or through your sales representative. No separate notifications will be
provided by our company.
If you have any questions about RAIDON products or would like to receive the latest product
information, instruction manuals, or firmware, please contact [email protected] for assistance.
All product-related content in this manual are copyrighted by RAIDON TECHNOLOGY, INC.
Stardom Storage Solutions
※
If you are using a USB 3.2 C to A cable, the Type-A on the host side needs to be
USB 3.2 Gen2 for best access performance.
V0.1 (Nov. 2022)
Front View
Fan
D
E
USB 3.2 Gen2 Type-C port (10Gbps)
F
G
Fan speed switch
H
Power socket
Power switch
C
B
A
E D
F
H
G
HDD enclosure handle
A
B
HDD access light
C
HDD enclosure pin release
Rear View
Product Parts List
Quick setup guide
x�
Screws and key
Product
x�
AC/DC Adapter
x�
USB �.� C to C Cable
x�
(for
US2-BA32/US2-B32
)
Power cable
x�
USB �.� C to A Cable
x�
(
for US2-BA32
)
Status
HDD Status Light
No U.2
Red light always on
Data access
Purple light
fl
ashing
U.2 idle
Purple light always on
The usable storage capacity of the hard disk after formatting will be less than the capacity
indicated on the hard disk.
To prevent data loss, do not remove US2-BA32/US2-B32 while the system is running.
Please always connect the USB cable to the computer to ensure the energy saving function
operating normally.
If the US2-BA32/US2-B32 needs to be shut down or disconnected, please ensure the HDD
is safely removed through your operating system before turning off the power.
If you are using a USB 3.2 C to A cable, the Type-A on the host side must be USB 3.2 Gen2
for best access performance.
We strongly recommend backing up important data stored on the US2-BA32/US2-B32 to
another storage device or a remote site. STARDOM will not be held liable for the damage or
loss of data you stored on the US2-BA32/US2-B32 .
1.
2.
3.
4.
5.
6.
The following items should be inside the package upon opening:


