

Provide a big storage capacity and the data transfer efficiency, but no data porotection
feature.
Because of this Mirroring feature, your two HDDs/SSDs will keep an identical data after
your wtiting works. In case one of the two HDDs/SSDs is defect, ST2-B31+ would still
work fine with only one of them. And once inserting a good HDD/SSD as the defect
replacement, it will do the rebuilding work by itself.
With JBOD mode, you could actually use the two HDDs/SSDs as the normal two
storages for your large memory capacity requirement, but no data porotection feature.
You could enjoy a double memory capacity from this BIG feature, but no data porotection
feature.
Front View
Rear View
HDD access light
A
HDD enclosure handle
B
HDD enclosure pin release
C
Power switch
D
Power socket
E
USB 3.1 Gen2 Type-C
G
(10Gbps)
RESET hole
F
Mini DisplayPort (DP1.1a)
H
RAID switch
I
Fan
J
The following items should be inside the package upon opening:
Product Parts List
The Indication of HDD Status
Note: Please avoid using hard disk drives from different manufacturers or different models
from the same manufacturer as this may impact system performance.
ST2-B31+ Quick Setup Guide
Product Illustration and Parts List
Please follow the steps below to complete the ST2-B31+ hardware setup process:
Hardware Installation
Important Notice
After the hard disk is formatted, the actual total capacity of the ST2-B31+ detected by the
computer operating system will vary from the sum of all hard disk capacities stated by the
manufacturer.
To prevent data loss, do not remove ST2-B31+ while the system is running.
Please always connect the USB cable to the computer to ensure the energy saving
function operating normally.
Once the system has been initialized, do not switch hard disks around during use. Doing
so may prevent the RAID from being recognized by the system.
Once RAID mode has been set up, the switching of hard drives will lead to the removal of
data from the hard disks. Please be sure to backup the data on the hard disk before
making any switches.
The product needs to be restarted after adding or changing the RAID mode, and the
update is guaranteed to be the new RAID mode.
When the Notebook which support USB PD function is only connected to ST2-B31+,
ST2-B31+ can provide up to 24W (12V/2A) power supply, but if then connected to other
power supply such like the original Notebook power supply, Notebook will automatically
judge which one will be the main power source, usually the one which can provide more
Wattage will be. At this time, ST2-B31+ may be interrupted and re-identified by the
Notebook. Therefore, before connecting to other power supplies, please make sure that
there are no data accessed between Notebook and ST2-B31+.
ST2-B31+ can only provide 24W at most, which is different from the original Notebook
power supply. It mainly to extend the Notebook's usage time. Take Macbook Pro 13" as an
example, the original power supply is 60W, assuming it take 2 hours for it to fully charge
the battery , use ST2-B31+ might need three times time. Therefore, if user need to use
Notebook for a long time, it is recommended to connect the original power supply first
before connect ST2-B31+.
If the ST2-B31+ needs to be shut down or disconnected, please ensure the HDD is safely
removed through your operating system before turning off the power.
We strongly recommend backing up important data stored on theST2-B31+ to another
storage device or a remote site. STARDOM will not be held liable for the damage or loss
of data you stored on the ST2-B31+.
If you need to install the operation system such like Windows or macOS into this device,
please refer to the user manual for details.
1.
2.
3.
4.
5.
6.
7.
8.
9.
10.
11.
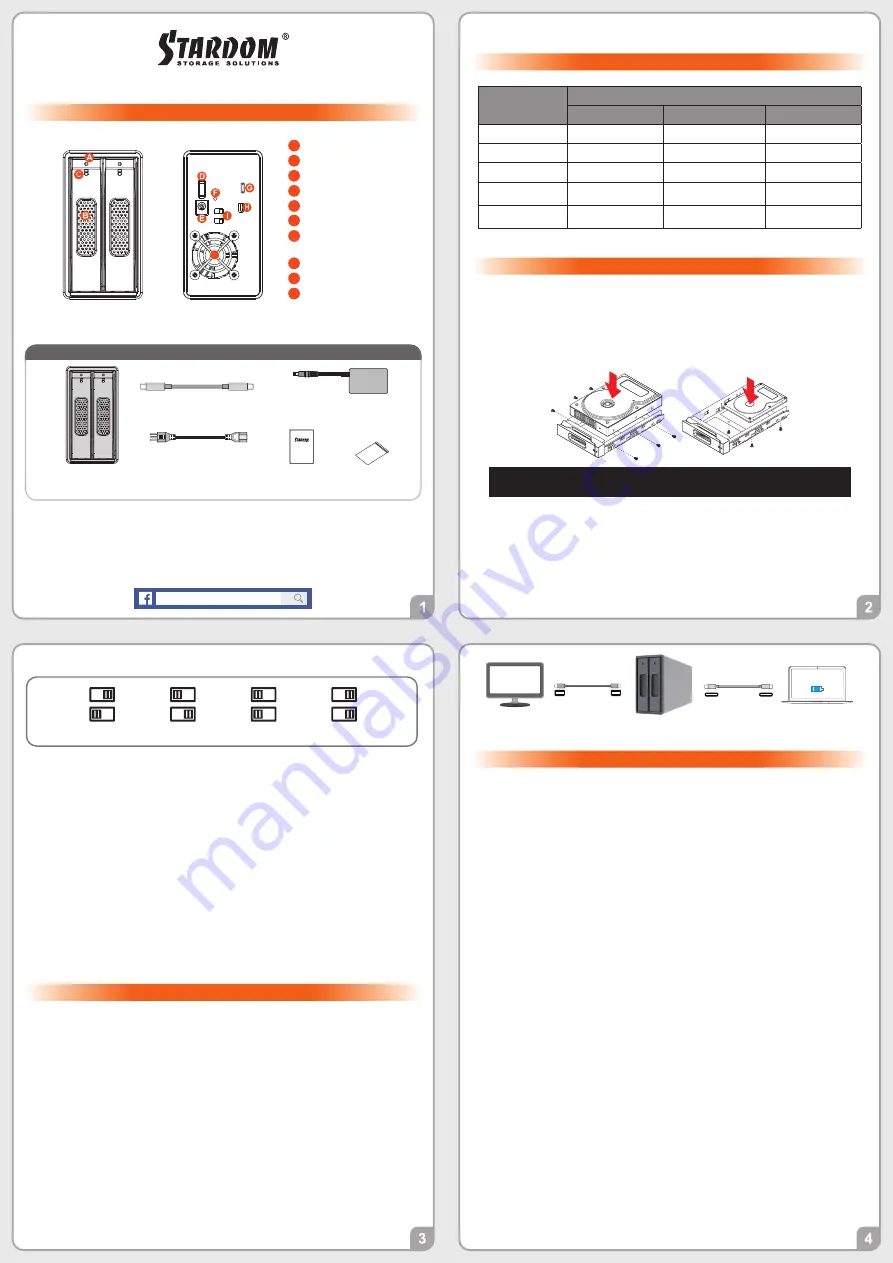
Use the ejector pin included in the accessory kit and inserted into the pin release opening
to eject the removable drive tray latch and extract the removable drive tray.
For 3.5" HDD/SSD, please secure it by use six the larger screws included in the
accessory kit. For 2.5" HDD/SSD, please secure it by use four the smaller screws
included in the accessory kit.
1.
2.
3.
4.
5.
6.
When the
HDD/SSD
installation has been completed, insert the tray into the system
horizontally and secure the latch into place.
Please set RAID mode at the back-plate of ST2-B31+ unit for RAID 1, RAID 0, JBOD,
and BIG.
Please connect the signal cable first, and then power cord later.
After completing hardware installation, turn on the power and follow the instruction of
Disk Utility to format the two HDDs, you then could start using your new ST2-B31+.
RAID 0
RAID 1
BIG
JBOD (default)
RAID 0
:
RAID 1
:
JBOD
:
BIG
:
RAID Mode Setting:
The Standard Procedure to Switch RAID Setting:
ST2-B31+ body
x1
Quick Setup
Guide
x1
USB 3.1 Cable
x1
AC/DC Adapter
x1
Power Cord
x1
Screws and
key
Please check the product and accessories for any defect or missing parts. If you have any
questions, please contact your product supplier.
Please visit the official website - Download page (http://www.stardom.com.tw/STARDOM2016/
download.php) to download drivers and other related resources.
˙
˙
J
Status
HDD Status Light
RAID 0, BIG
RAID 1
JBOD
HDD idle
Blue light always on
Blue light always on
Blue light always on
No HDD detected
Red light always on
Red light always on
Red light always on
Data access
Blue light flashing
Blue light flashing
Blue light flashing
Rebuilding data -
Source HDD
N/A
Breathing Blue Light
N/A
Rebuilding data -
Target HDD
N/A
Breathing Purple Light
N/A
Other Applications
Support USB Power Delivery (USB-PD)
USB Power Delivery (USB-PD) introduces charging technology and unified cable
standards. ST2-B31+ supports USB-PD. Use USB Type-C to USB Type-C cable, it can
provide up to 24W (5V/3A (15W), 9V/2A (18W), 12V/2A (24W)) power charging to the host.
If the connected host is a notebook that supports USB-PD (5V/9V/12V) charging, it will
remain charging after the notebook is powered off or restarted while the ST2-B31+ is
still power on.
If the ST2-B31+ cannot be recognized after the notebook restarted, please reconnect
the Type-C cable or restart the ST2-B31+.
1.
2.
3.
Support Mini DisplayPort
The
ST2-B31+
offers a Mini DisplayPort support DP1.1a, provides up to 4K@30Hz
resolution , and is compatible with monitor and cables with Mini DisplayPort.
By using third-party's mini DisplayPort adapter, it can be connected to the monitor
with DisplayPort interface.
By using third-party's active mini DisplayPort adapter, it can be connected to the
monitor with VGA, DVI and HDMI interface.
1.
2.
3.
Step 1
Step 2
Step 3
Step 4
Please first connect ST2-B31+ to your Mac.
Please set RAID Dip Switch to the position you demand.
Please use the Key to press the hidden RESET key at the back-panel, hold and wait for
the Blue-Purple LED blinking, and continue to hold it till a stable Blue light comes out.
Please turn off your ST2-B31+ , and turn it back on again. You now have reset ST2-B31+
with a new RAID mode successfully.
Stardom Storage Solutions
STARDOM
is one brand under
RAIDON TECHNOLOGY, INC.
Thank you for choosing
STARDOM’s
product.
The information provided in this manual was checked before publication, but the actual product
specifications may have changed before shipping; Latest product specifications and updates can be
found at
www.STARDOM.com
.tw or through your sales representative. No separate notifications will be
provided by our company.
If you have any questions about RAIDON products or would like to receive the latest product information,
instruction manuals, or firmware, please contact
for assistance.
All product-related content in this manual are copyrighted by
RAIDON TECHNOLOGY, INC.
4K
More Pixels
(4K@30Hz)
More Speed
(10Gbps)
Smart Charge
(24W)
Notebook
★
Notebook will need to support 5V/9V/12V charge.
v0.2 (Aug. 2019)


