

1
3
4
2
High
Low
L
RAIDON
is one brand under
RAIDON TECHNOLOGY, INC.
Thank you for choosing
RAIDON’s
product.
The information provided in this manual was checked before publication, but the actual product
specifications may have changed before shipping; Latest product specifications and updates can be
found at
www.RAIDON.com
.tw or through your sales representative. No separate notifications will be
provided by our company.
If you have any questions about RAIDON products or would like to receive the latest product information,
instruction manuals, or firmware, please contact S
for assistance.
All product-related content in this manual are copyrighted by
RAIDON TECHNOLOGY, INC.
GT����-B�� /GT����-BA��
Quick Installation Guide
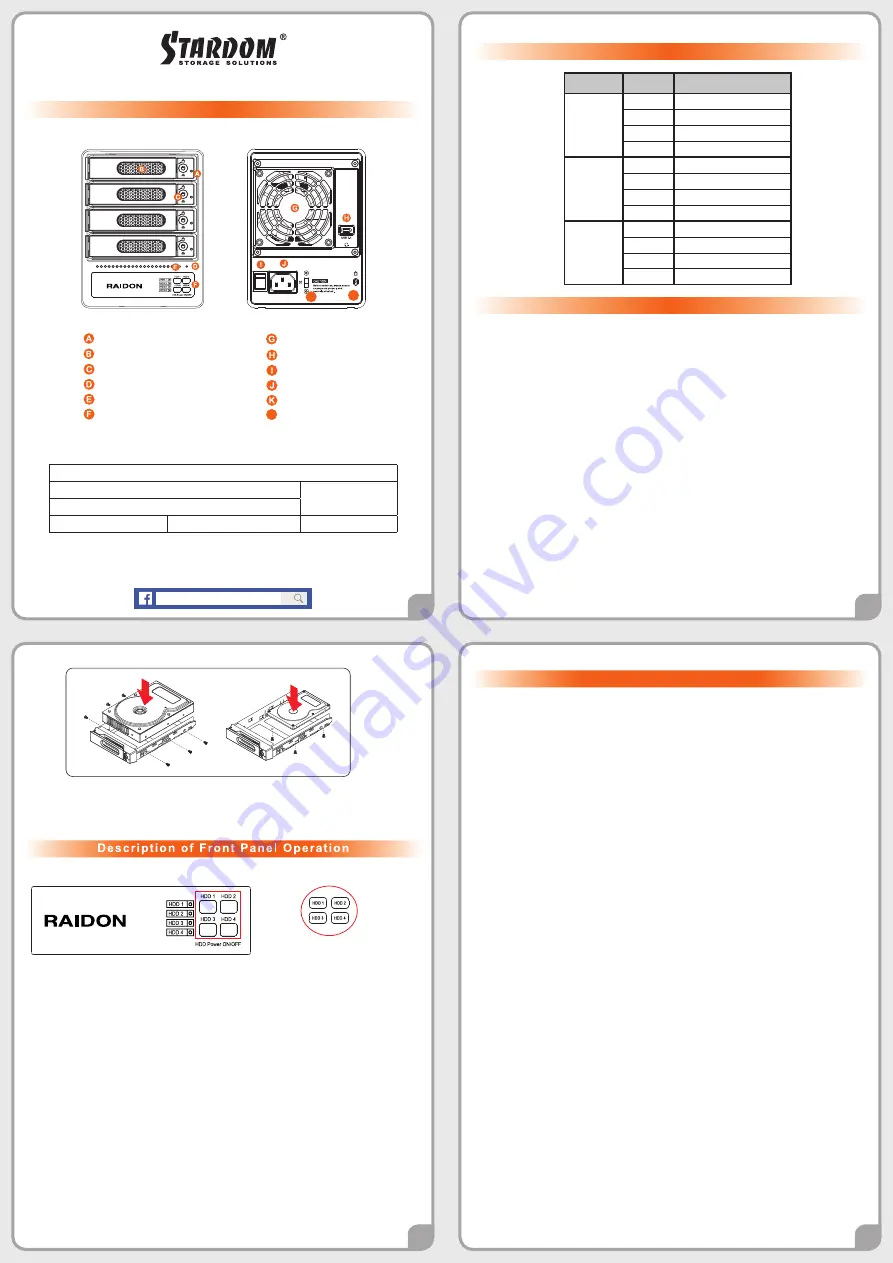
Package Contents and Product Views
Front view
Rear view
HDD access light
HDD enclosure pin release
HDD enclosure handle
Power status light
System status light
Fan
USB 3.2 Gen 2 Type-C
port
Power socket
Anti-theft lock
Main power switch
Fan speed switch
Raidon
Important Notice
When you need to turn off or remove the
GT5640
or a certain hard drive, be sure to
perform the safe removal of the hard drive through the operating system you are
operating before turning off the power.
It is highly recommended for users to back up important data contained within the
GT5640
unit on a regular basis or whenever the user feels necessary to a remote or a
separate storage device. Stardom will not be responsible for any lost of data caused
during the use of the unit or the recovery of the data lost.
1.
2.
Open the package and you should find the following :
Hardware Installation
Visual Status Indicator Definitions
1.
2.
3.
4.
5.
6.
7.
Place the system on a stable surface. Ensure that it is well ventilated without blockage to
the vent and kept away from areas near water and damage prone areas.
Use the ejector pin included in the accessory kit and inserted into the pin release opening
to eject the removable drive tray latch and extract the removable drive tray.
For 3.5" HDD/SSD, please secure it by use six the larger screws included in the accessory
kit. For 2.5" HDD/SSD, please secure it by use four the smaller screws included in the
accessory kit.
When the hard drive installation has been completed, insert the hard drive tray into the
system horizontally and secure the latch into place.
Connect the power cable to the
GT5640
, and then plug the power to the wall socket.
Boot-up the unit.
Select the corresponding (USB) cable from an accessory and connect it to the computer
and the
GT5640
relevant port respectively.
Using the buttons on the front to turn on /off HDD (please refer to section description of
front panel operation).
Please check the included parts and the product itself for any damage or missing
parts. If you have any questions, please contact the retailer or sales representative.
Please download the user manual from the official website (
www.raidon.com.tw
)
˙
˙
V�.� (July ����)
HDD Power button
GT5640
product x 1 ( with removable drive tray enclosed x4)
USB 3.2 C to C Cable x 1 (for
GT5640-
BA31 /
GT5640
-B31)
USB 3.2 C to
A
Cable x 1 (for
GT5640
-BA31)
Power Cable x1
Handle x1
Quick Installation Guide x1
Screws & Ejector pins
Press for � seconds to turn on or off
a single hard drive.
After the GT5640 is turned on, the computer should be able to recognize the four independent
hard disks. Please follow the operating system's instructions to complete the format process
and then the disks should be ready to used.
If you do not need to use one or more disks temporarily, you can turn the disk off through the
corresponding "hard disk power switch" to save power. And then use the same switch to turn
on the disk if you need to use it.
Even if one or more disks has been individually powered off, if the GT5640 is turned off
through the "power switch" or the "main power switch", next time when GT5640 is turned on
again, the power of the four disks will return to the on state.
1.
2.
3.
Status
HDD
Type C connect HOST
HDD 1
Red light always on
HDD 2
Red light always on
HDD 3
Red light always on
HDD 4
Red light always on
HDD 1
Blue light always on
HDD 2
Blue light always on
HDD 3
Blue light always on
HDD 4
Blue light always on
HDD 1
Blue light flashing
HDD 2
Blue light flashing
HDD 3
Blue light flashing
HDD 4
Blue light flashing
No HDD
Disk Idle
Disk Format
K
L


