


6
0
6
1
5
4
8
3
7
2
0
A
8
7
9
○
○
○
○
○
○
○
○
○
○
○
○
○
○
○
○
○
○
○
○
○
○
○
○
○
○
○
○
○
○
○
○
○
○
○
○
○
○
○
○
○
○
○
○
○
○
○
○
○
○
○
○
○
○
○
○
○
○
○
○
○
○
○
○
○
○
○
○
○
○
○
○
○
APPEARANCE AND NOMENCLATURE
Housed unit TCP100/2000 series
[TCP100]
[TCP2000 back]
1
Switch Cover
This cover protects the power switch of the system.
Push to open and close.
2
Power Switch
This switch turns the power of the system ON/OFF.
3
POWER LED
This LED indicates that the power of the system is on.
4
READY LED
This LED indicates that the card processing is ready.
5
OK LED
This LED indicates that the card has been processed
without error.
6
ERROR LED
This LED indicates that the card has not been read due
to an error e.g. jamming of the card in the reader/writer.
7
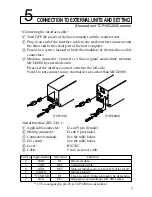
RS232C Serial Connector This connector interfaces the connection between host
computers and the reader/writer.
8
AC Power Inlet
Connect this inlet to the power source with the attached
AC power cable.
9
Cleaning Button
Push this button under the power ON condition, then
insert the cleaning card which is soaked with the clean-
ing liquid.
0
Modular Connector This interfaces the connection between MCD2000 (Star
original numerical key pad).
A
Interface convert switch This switch changes the available interface : RS232C
(right side) or modular connector (left side).
IMPORTANT!
A three terminal earth grounded power supply cable is attached to TCP100/
2000 housed unit. For safety, do not remove the ground pin.
4


