Star SM-T300 Скачать руководство пользователя страница 5

Table of Contents

1. Introduction ..................................................................................5

2. Setting Up the Printer ..................................................................6

2.1. Printer & Accessories

 ................................................................................

6

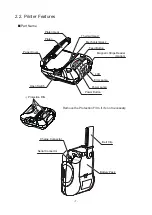
2.2. Printer Features ........................................................................................ 7
2.3. Replacing Paper Roll ................................................................................ 8

2.4. Power Supply 

 ......................................................................................... 10

2.4.1. Specified Battery Charger 

 .................................................................................. 10

2.4.2. Installing the Battery and the Belt Strap

 .............................................................. 10

2.4.3. Recharging the Battery Pack  ...............................................................................11

2.5. Memory Switch Settings 

......................................................................... 12

3. Interface......................................................................................15

3.1. RS-232C

 ................................................................................................. 15

3.2. Bluetooth .................................................................................................

16

3.3. Wireless LAN

 ..........................................................................................

16

4. Using the Printer........................................................................17

4.1. Control Panel .......................................................................................... 17

4.2. The Self Test

 ........................................................................................... 18

4.3. Instruction for Auto Power Down Mode

 ................................................... 18

5. Consumable Parts .....................................................................19

5.1. Paper Roll Specifications

 ........................................................................ 19

5.2. Recommended Thermal Paper RoIl ........................................................ 19
5.3. Printing Position ...................................................................................... 19

6. Specifications

 ............................................................................20

Содержание SM-T300

Страница 1: ...Mobile Printer SM T300 SERIES Models SM T300 SM T301 SM T302 Hardware Manual...

Страница 2: ...ng measures Reorient or relocate the receiving antenna Increase the separation between the equipment and receiver Connect the equipment into an outlet on a circuit different from that to which the rec...

Страница 3: ...s a copy machine Do not open the paper cover during printing Do not remove or reinstall the communication cable during printing or transmission Do not touch the connectors of the communication during...

Страница 4: ...away from heaters and other sources of extreme heat P Make sure that the surrounding area is clean dry and free of dust P Make sure that the printer is connected to a reliable power outlet It should n...

Страница 5: ...e Battery and the Belt Strap 10 2 4 3 Recharging the Battery Pack 11 2 5 Memory Switch Settings 12 3 Interface 15 3 1 RS 232C 15 3 2 Bluetooth 16 3 3 Wireless LAN 16 4 Using the Printer 17 4 1 Control...

Страница 6: ...th Ver 2 1 EDR 4 RS 232C Wireless LAN 802 11b g Support secure wireless communication Bluetooth 4 Bluetooth security mode 3 is avalable PIN code 16 characters maximum 4 Non discoverable mode can be of...

Страница 7: ...re damaged or missing please contact your dealer for assistance Battery Pack Communication Cable SERIAL CABLE SM T OPTIONAL Shoulder Strap Paper Printer Battery Charger Belt Clip Safety Instruction Sh...

Страница 8: ...laten Gear Power Button Feed Button Magnetic Stripe Reader Option Power Lamp Error Lamp LCD Open Switch Mechanism Ass y Thermal Head Charge Connector Serial Connector Belt Clip Battery Pack Protection...

Страница 9: ...after the printer has been used Let the thermal head cool for a few minutes before touching it WARNING 1 Do not touch the tear bar There is a tear bar inside the paper outlet slot Not only should you...

Страница 10: ...9 3 Insert a new paper roll as shown 4 Tear the excess paper off using the tear bar...

Страница 11: ...s not used for long period of time remove the battery pack from the printer 1 To install battery pack proceed as follows Insert the battery pack in the direction of the arrow 2 Reverse the order to re...

Страница 12: ...s of charging under normal conditions Do not remove the battery while it is charging The battery does not need to be fully discharged before recharging it The battery may be warm after charging or use...

Страница 13: ...sent COMMUNICATION mode in the LCD g Press the POWER button one time The interface mode has set to RS 232C mode Bluetooth WLAN g RS 232C u Press FEED button one time g You will see present BAUD RATE m...

Страница 14: ...e in the LCD Stop Bit g Density g Press the POWER button one time The density has set to high Density Medium g Density High If all the mode have set press the FEED button and the POWER button at the s...

Страница 15: ...w Density Low Density Medium Density Medium Density High Density High 7 Quality Low 75 mm s Low 75 mm s High 50 mm s High 50 mm s 8 BM Sensor No use No use Use Use 9 BM Sensor Sensitivity Low Low Medi...

Страница 16: ...In the following table the signals present on the Mini USB socket are listed Pin No Name Direction Function 1 TxD Output Transmit Data 2 RxD Input Receive Data 3 CTS 4 NC 5 GND Ground Caution When it...

Страница 17: ...2 Concerning security purpose we recommend to change PIN code by the original tool Please contact with our dealer to get it 3 3 Wireless LAN Category Specification Interface Network IEEE802 11b g Pro...

Страница 18: ...neously if the ER ROR lamp 5 turn signals POWER button is converted with MODE functions MODE functions are for use to change communication mode Refer to 2 5 Memory Switch Settings for details about mo...

Страница 19: ...leted the self test 4 3 Instruction for Auto Power Down Sleep Mode The printer in the Power Down Sleep Mode will recover to the Print Ready Mode when receiving commands or button operations However pr...

Страница 20: ...light 4 Color of paper may be changed by being scratched by nail or hard metal etc 5 2 Recommended Thermal Paper Roll Manufacturer Product Name Mitsubishi Paper Mills Limited P220AG Oji Paper Co Ltd P...

Страница 21: ...Mbytes RAM 8Mbytes Receive buffer size 1M bytes MSR SM T300 Not Supported MSR SM T301 ISO 7810 7811 7812 1st and 2nd Track Reading SM T302 ISO 7810 7811 7812 2nd and 3rd Track Reading LCD 128 32 Dots...

Страница 22: ...21 Dimensions External Dimensions 120 mm width 132 2 mm depth 58 3 mm height Weight 442 g Including Battery Pack Body Color Orange...

Страница 23: ...22...

Страница 24: ...ion of the manual OVERSEAS SUBSIDIARY COMPANIES STAR MICRONICS AMERICA INC 1150 King Georges Post Road Edison NJ 08837 3729 U S A Tel int 1 732 623 5555 Fax int 1 732 623 5590 STAR MICRONICS EUROPE LT...

Отзывы: