background image

A)

CHECKING THE CONTENTS – Check that the carton contains all of the following items.

•  Tabletop CD player unit

•  User’s manual

•  One pair RCA cable

•  One power cable

•  One fader start / relay cable

B)

INSTALLING THE UNIT

•  Place the unit on a flat, level surface.

•  Be sure the player is in a well-ventilated area where it will not be exposed to direct sunlight, high 

temperatures, or high humidity.

•  Try to place the unit as far as possible from Tvs and tuners, as the unit may cause undesirable interference.

•  The player will work normally when the unit is within 15 degrees of the vertical plane.  If the unit is tilted 

excessively, discs may not load or unload properly, or playback may be adversely affected.

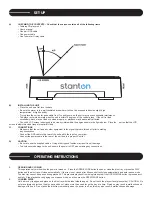
•  The unit’s LCD screen is designed to be clearly visible within the angles shown in the figure below.  Place the    unit so that the LCD

screen is within this visual range for optimal clarity.

C)

CONNECTIONS

•  Make sure that the unit and any other equipment in the signal chain are turned off prior to making 

any connections.

•  Connect the RCA cable to the rear of the unit and to the input on your mixer.

•  Connect the power cable to the rear of the unit and to a proper AC outlet.

D)

CAUTION

•  Be sure to use the supplied cables.  Using other types of cables may result in unit damage.

•  To avoid severe damage to the unit, besure the power is OFF when making any connections.

1.

OPENING AND CLOSING

This operation only works when the power is turned on.  Press the OPEN/CLOSE button to open or close the disc tray, or press the PLAY

button and the disc tray will close automatically.  If the tray is not closed after 60 seconds it will close automatically and enter pause mode.

The disc tray cannot be opened during playback.  This prevents playback from being interrupted if the OPEN/CLOSE button is pressed acci-

dentally.  Stop playback by engaging cue or pause mode, and then pres the OPEN/CLOSE button.

2.

LOADING DISCS

Hold a disc by its edges and place on the disc tray with the label side facing up.  Do not touch the play surface (glossy side).  CAUTION:  Do

not place foreign objects on the disc tray and do not place more than one disc on the tray at a time.  Doing so may result in malfunction and

damage of the unit.  Do not push the disc tray in manually when the power is off, as this may also result in malfunction and damage.

SET-UP

OPERATING INSTRUCTIONS

Содержание C.304

Страница 1: ...C C 3 3O O4 4 __________________________________________________________ PROFESSIONAL TABLETOP CD PLAYER __________________________________________________________ ...

Страница 2: ...ock The exclamation point within the equilateral triangle is intended to alert the user to the presence of important operation and maintenance servicing instructions in the literature accompanying this appliance Product complies with DHHs rule 21 CFR subchapter J in effect at date of manufacture To prevent electric shock do not use this polarized plug with an extension cord receptacle or other out...

Страница 3: ...re provided for ventilation and to ensure reliable operation of the product and to protect it from overheating and these openings must not be blocked or covered The opening should never be blocked by placing the product on a bed sofa rug or other similar surface This product should be placed in a built in installation such as a bookcase or rack unless proper ven tilation in the manufacturer s inst...

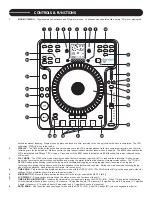
Страница 4: ...n when flashing enables the jog wheel to facilitate beat juggling by simply tapping the surface area of the jog wheel Touching and releasing the jog wheel once will return playback to the last marked cue Point During cue or pause mode touching the jog wheel will start playback while releasing it will return it to the cue point 4 TIME KNOB Fine tunes the time division parameter for use with the DSP...

Страница 5: ...gain to disable and stop sample playback The audio sample can even play when there is no disc inside The sampler pitch can be adjusted by turning the TIME KNOB or by pressing the button down and rotating the JOG WHEEL simultaneously The sampler volume can be adjusted by turning the RATIO KNOB or by pressing the button down and rotating the JOG WHEEL simultaneously By using the MODE button section ...

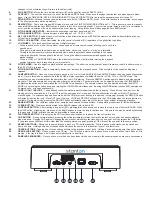
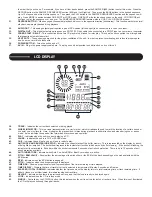
Страница 6: ...tain sound or cue point on a vinyl record Here it indicates the play position rotates during playback in either direction and stops during cue or pause mode It also indicates the speed of the forward and reverse search operation 40 PLAY Indicates when the unit is currently playing a CD 41 PAUSE Indicates the unit is in CUE or PAUSE mode 42 CUE Indicates the unit is at a cue point and is ready to p...

Страница 7: ...he input on your mixer Connect the power cable to the rear of the unit and to a proper AC outlet D CAUTION Be sure to use the supplied cables Using other types of cables may result in unit damage To avoid severe damage to the unit besure the power is OFF when making any connections 1 OPENING AND CLOSING This operation only works when the power is turned on Press the OPEN CLOSE button to open or cl...

Страница 8: ...op by pressing the IN button at the desired point in time This will cause the OUT button to flash green Set the end point of the seamless loop by pressing the OUT button at the desired point in time Playback will immediately return to the previously set IN point and play to the OUT point creating a seamless loop without interruption The RELOOP button will now be flashing green and the LOOP indicat...

Страница 9: ... in reverse until the reverse function is turned off 21 USING FX The six DSP FX can be used to creatively modify and manipulate the way music sounds They can be used individually or in unison stacked However only three FX can be used simultaneously as Filter and Phase Echo and Flanger and Pan and Transform are linked meaning that only one of the linked pair can be used at a time For example it s p...

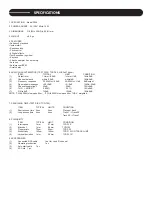
Страница 10: ... 2 5 0dB 3 0dB 16KHz 20dB 5 Channel separation 2 95dB 90dB 1KHz 0dB 6 T H D NOISE 1 0 006 0 01 1KHz 0dB 7 S N ratio 2 120dB 100dB 1KHz 0dB NOTE 1 With 20KHz low pass filter 2 With 20KHz low pass filter IHF A weighted 7 SEARCHING TIME TEST DISC TCD 792 ITEM TYPICAL LIMITS CONDITION 1 Short access time 2sec 4sec Play next track 2 Long access time 4sec 6sec Track 1 Track 20 Track 20 Track 1 8 PLAYABI...

Страница 11: ... which the merchandise was received Any returns to a non authorized dealer or to an authorized Stanton dealer not in the same country as the merchandise was intended to be sold or as set forth above will void this warranty To initiate a warranty repair you must contact the authorized Stanton dealer from whom you purchased the merchandise and follow such authorized Stanton dealer s return policy St...

Отзывы: