background image

9

5. Assembly

WARNING! The machine must be fully 

assembled before operation! Do not use a 

machine that is only partly assembled or

assembled with damaged parts.

Always use gloves during assembly.

Disconnect the spark plug connector from the 

spark plug.

INTENDED USE

1. This machine is designated with a maximum power 

output of max. 0.75 kW.

2. With attached trimming guard and fitted trimmer 

head, the grass trimmer is intended to be used to cut 

small weeds, grass or similar soft vegetation.

3. With attached trimming guard and fitted cutting 

blade, the brush cutter is intended to be used to cut 

weed, brush, small trees and similar vegetation with a 

thickness of up to 20mm.

4. It may not be used to work on unusual thick, dry or 

wet grass, e. g. pasture grass, or to shredder leaf.

5. For safety reasons it is essential to read the entire 

instruction manual before first operation and observe all 

instructions.

6. This machine is for private use only, not for any 

commercial applications.

It may not be used for any purposes other than 

described.

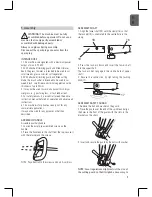
ASSEMBLY HANDLE

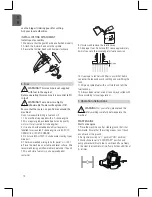
Assembly auxiliary handle

1. Loosen the outer pre-assembled screws on the 

handle.

2. Place the handle onto the shaft from the top, secure it 

with the retainer and the screws.

NOTE: Pay attention to the screws and nuts. Avoid loss.

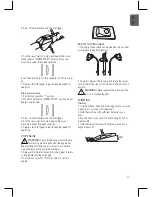
ASSEMBLY SHAFT

1. Align the lower shaft(19) with the clamp(16) so that 

the lock pin(18) is orientated to the centre hole in the 

clamp.

19

18

16

2. Press the lock pin down and insert the lower shaft 

into the upper shaft.

The lock pin must engage in the centre hole of upper 

shaft.

3. Secure the connection by tightening the locking 

knob(17).

17

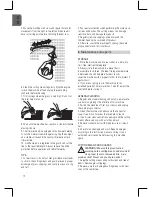
ASSEMBLY SAFETY GUARD

1. Remove the bolt and washer on the guard.

2. Place the guard over the end of the spindle and align 

the holes in the front of the guard with the slots in the 

brackets on the shaft.

3. Insert and secure the guard by the bolt with washer.

NOTE: Local regulations might restrict the size of 

the cutting guard so that it might be necessary to 

G

B

Содержание STR-750

Страница 1: ...Petrol grass trimmer Petrol grass trimmer STR 750 GB Original instructions ...

Страница 2: ...Manufactured under license by MATRIX GmbH Postauer Straße 26 D 84109 Wörth Isar www matrix direct net Stanley is a registered trademark of The Stanley Works or its affiliates and is used under license GB ...

Страница 3: ...3 A1 12 4 9 7 5 6 16 15 17 18 19 14 5 6 1 16 13 10 11 3 2 8 4 ...

Страница 4: ...4 Fig 1 Fig 4 Fig 8 Fig 10 Fig 2 Fig 5 Fig 7 Fig 11 Fig 3 Fig 6 Fig 9 Fig 12 ...

Страница 5: ...vice and remove the spark plug prior to maintenance work The distance between the device and people in the vicinity must be at least 15 m Tool lags behind Attention Hot parts Stay away Guaranteed sound power level Table of Contents 1 Symbols 5 2 Intended use 6 3 Safety instructions 6 4 Parts List 8 5 Assembly 9 6 FueL 10 7 Operation instructions 10 8 Maintenance and repairs 12 9 Technical data 14 ...

Страница 6: ...ng or jewellery which can be caught in moving parts Use of sturdy gloves non skid footwear and safety glasses is recommended 5 Use extra care when handling fuels They are flammable and the vapours are explosive The following points should be observed Use only an approved container Never remove the fuel cap or add fuel with the power source running Allow engine and exhaust components to cool down b...

Страница 7: ... where the fuel vapour will not reach an open flame or spark Always allow the machine to cool down before storing 3 When not in use store the machine out of the reach of children 4 Use only manufacturers recommended replacement parts and accessories 5 When transporting or storing the machine always fit the cutting device transport guard 6 Store the machine and its accessories in a dry clean place ...

Страница 8: ...rk plug connector if there s malfunctions Have the machine checked by a qualified professional and repaired if necessary before you put it into operation again 3 In case of fire stop the engine and unplug the spark plug connector Immediately use fire extinguishing measures if the switch of the machine is no longer accessible Warnings Never use water to extinguish a machine on fire Burning fuel mus...

Страница 9: ... instructions 6 This machine is for private use only not for any commercial applications It may not be used for any purposes other than described ASSEMBLY HANDLE Assembly auxiliary handle 1 Loosen the outer pre assembled screws on the handle 2 Place the handle onto the shaft from the top secure it with the retainer and the screws NOTE Pay attention to the screws and nuts Avoid loss ASSEMBLY SHAFT ...

Страница 10: ...ratio for petrol oil is 40 1 6 Place the machine on a stable and level surface We recommend laying an inflammable sheet under the unit 7 Mix and store fuel only in an approved petrol container 8 Unscrew and remove the fuel tank cap 9 Add proper fuel Do not overfill Leave approximately 5mm of space to the lower edge for fuel expansion 10 Use proper a funnel with filter to avoid that debris can ente...

Страница 11: ...otate for some time even after the engine has been switched off Wait until it comes to a complete stop before you place down the machine 1 Release throttle interlock and throttle trigger to return to idle before shutting off engine 2 Set ignition switch to STOP position to shut off engine ADJUST CUTTING ANGLE 1 The angle of gear head can be adjusted in 3 positions according to the performed work 2...

Страница 12: ...ctor and let it cool down 8 Maintenance and repairs STORAGE 1 Store the machine and its accessories in a dark dry frost free wellventilated place 2 Always store the machine in a place that is inaccessible to children The ideal storage temperature is between 10 and 30 degree For best results cover the machine with a proper cloth or foil to protect it against dust 3 If you are not going to use the m...

Страница 13: ...by pulling 3 Loosen the spark plug with the spark plug wrench and remove it 4 The colour of the electrode shall be light brown 5 Remove debris like oil with a brass brush Do not force the brush to avoid any damage 6 Dry the spark plug with a soft cloth if it is wet 7 Check the spark plug gap It should be 0 6 0 7mm 8 Replace with a new spark plug if you find damages like cracks or a splintered insu...

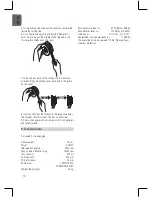
Страница 14: ...ould stick out 150 mm on each side 9 Screw the bumper anti clockwise until it is completely and safely locked 9 Technical data Air cooled 2 stroke engine Displacement 26 cm3 Power 0 75 kW Idle speed of engine 3000 rpm Max speed of double string 12500 rpm Tank capacity 400 ml Cutting width 430 mm String thickness 2 0 mm Spark plug TORCH L8RTC CHAMPION RCJ6Y Weight empty tank 5 0 kg Sound pressure l...

Страница 15: ...eed don t fit the terrain requirements Increase the engine speed Bad cutting performance The cutting means are not sharp enough Replace the cutting means The cutting means are not fitted correctly Fit the cutting means correctly Cutting height is wrong Adjust the cutting height The cutting trimming guard is clogged Clean the cutting trimming guard Excessive vibration noise or big smoke came out Th...

Страница 16: ...6 42 EC R TTED 1999 5 EC 2000 14 EC_2005 88 EC 97 68 EC_2012 46 EC 95 54 EC 2006 95 EC 2002 95 EC_2005 618 EC 2014 30 EU GB hereby declares the following conformity under the EU Directive and standards for the following article Matrix GmbH Postauer Str 26 D 84109 Wörth Isar Germany Fax 49 0 8702 45338 98 E Mail info matrix direct net The technical documentation is kept by our authorized representa...

Страница 17: ...servicing This also applies for failures to comply with the operating manual and the installation or spare and accessory parts that are not included in our range of products In the event of interference with of modifications to the appliance by unauthorised persons the warranty will be rendered void Damages that are attributable to improper handling over loading or natural wear and tear are exclud...

Страница 18: ...18 Petrol grass trimmer STR 750 GB WARRANTY Purchased at in city street Name of customer Street address Postal code city Telephone Date signature Fault description ...

Отзывы: