Stanley STHT77366 Скачать руководство пользователя страница 7

Manual Development Template 

GT&S Tech Docs Graphics Req #: XXXX 


Range    


6ft-492ft (1.8m-150m) 

Output   


PDF, JPG, Smart Measure Pro File  

Share Options   


Email, Message, Cloud Storage 

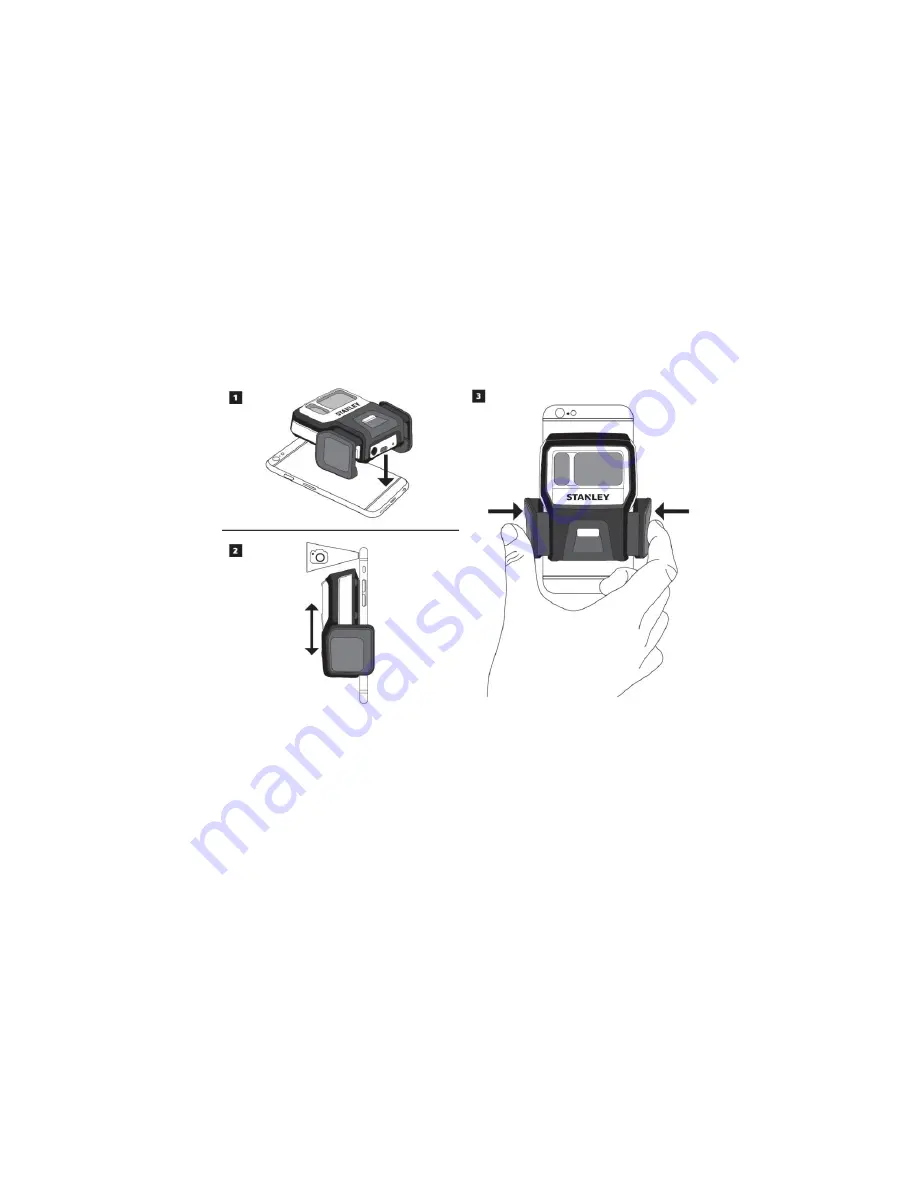
Mounting Your Smart Measure Pro 

1.  Centrally place Smart Measure Pro on the back of your device. 
2.  Ensure that Smart Measure Pro 

does not obstruct the view from your camera or flash

3.  Firmly squeeze the clamp mechanism onto your device 
4.  To verify, start your device

’s camera app and validate the correct placement. 

5.  To remove your Smart Measure Pro, press the clamp release button.  The clamp will 

automatically open and release your device.  We recommend compressing the clamp arms when 
your Smart Measure Pro is not in use. 

NOTE: Ensure that your Smart Measure Pro is mounted securely to your device before taking 
measurements, it should not move or rock.  Smart Measure Pro should sit flat against the back of 
your device and aim squarely with the camera of your device. 


Installing Your Smart Measure Pro App 

1.  The Smart Measure Pro app is available for download from the App Store or Google Play. 
2.  On your device, launch the 

App Store 

or

 Google Play. 

3.  Within the search box, search for 

Stanley Smart Measure Pro


4.  Follow the instructions to download and install the app on your device. 
5.  Once installed, the Smart Measure Pro app icon will appear on your device

’s screen. 

6.  You can launch the Smart Measure Pro app and test it out in Demo mode. Note however that 

without the Smart Measure Pro unit, you cannot generate accurate measurements. 


Содержание STHT77366

Страница 1: ...ery EX North America translations can be included in the imagery In the case where many translations are necessary in imagery ex EU imagery should utilize numerical alphabetical labeling followed by a...

Страница 2: ...Manual Development Template GT S Tech Docs Graphics Req XXXX 2 This page should be used for desired imagery direction...

Страница 3: ...ther trademarks and trade names are those of their respective owners User Safety Retain all sections of this manual for future reference WARNING To reduce the risk of injury read all safety and operat...

Страница 4: ...splash or immerse in water or other liquids DO NOT store or use in locations where the temperature may reach or exceed 40 5 C 105 F such as outside sheds or metal buildings in summer For best life st...

Страница 5: ...eiver Connect the equipment into an outlet on a circuit different from that to which the receiver is connected Consult the dealer or an experienced radio TV technician for help Canada Industry Canada...

Страница 6: ...pt to remove the battery from the device as you may damage the device To charge the unit connect the USB charging cable into the micro USB charging port on the unit and then plug it in to an appropria...

Страница 7: ...en your Smart Measure Pro is not in use NOTE Ensure that your Smart Measure Pro is mounted securely to your device before taking measurements it should not move or rock Smart Measure Pro should sit fl...

Страница 8: ...necessary the first time you use Smart Measure Pro For subsequent uses your Smart Measure Pro will automatically be paired with your device Note After connecting your Smart Measure Pro go into the Sma...

Страница 9: ...you need to ensure that 1 Your target is a flat surface and is all on the same plane 2 Your target is or has a rectangular shape on it to align the object 3 Your laser cross hair on the screen is poin...

Страница 10: ...ve aligned your app to the object you can measure the area of your object While on the Area tab you can tap and drag to create rectangular measurements Drag the outline of the rectangular shape to ali...

Страница 11: ...estimating purposes tap Calculator Specifications Range 6ft 492ft 1 8m 150m Laser Class 1 Laser Wavelength 895 905nm Auto Power Switch Off 3 minutes after no Bluetooth Connectivity Battery Type Integr...

Страница 12: ...or any reason you can return it within 30 days from the date of purchase with a receipt for a full refund IMPORTANT NOTE The customer is responsible for the correct use and care of the instrument More...

Отзывы: