12
Alignment
Software Alignment/Confirmation Mode
Overview of Software Alignment Mode
The “Software Alignment Mode” has been build in the
microprocessor in order to adjust and confirm the perfor-
mance of transceiver.
The purpose is to adjust transceiver simply and to con-
firm the performance of transceiver smoothly.
Starting Software Alignment Mode
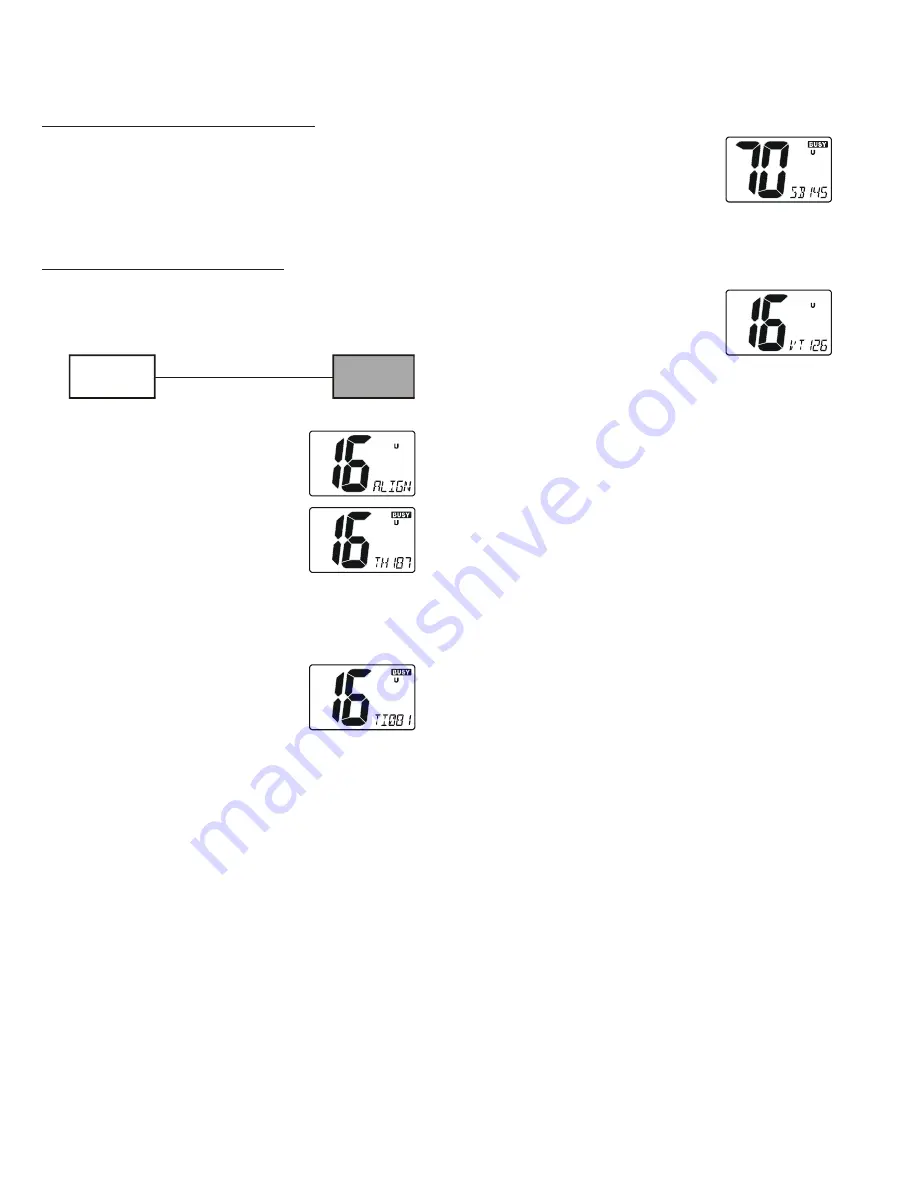
Set the channel to CH16, then turn the
VOL
knob
counter clockwise to turn off the radio.
Short the TEST points (
JP1001
).
Setup the test equipment as shown below.
Press the [
SCAN
(
MEM
)] key to re-
call the Alignment Item “SBxxx”.
Set the RF Signal Generator output
to 156.525 MHz, at a level of –4dB
μ
,
±3.0 kHz deviation with a 1 kHz audio tone.
Press the [
WX
] key.
Press the [
CALL
(
SET
)
MENU
] key to save the new set-
ting.
Press the [
SCAN
] key to recall the
Alignment Item “VTxxx”.
Press the [
WX
] key.
Press the [
CALL
(
SET
)
MENU
] key to
save the new setting.
This completes the Software Alignment Mode. To save
all settings and exit, press and hold the [
DISTRESS
] key
for one second. Turn the transceiver’s power off, then dis-
connect the Jumper from the TEST points (JP1001).
RF Signal
Generator
ANT
GX1000S
Turn the
VOL
knob clockwise to turn on the radio
while press and holding the
[
CALL
(
SET
)
MENU
] and [
DIS-
TRESS
] keys. The LCD will be as
shown in the illustration at the right.
Press the [
SCAN
(
MEM
)] key to re-
call the Alignment Item “THxxx”.
Set the RF Signal Generator output
to 156.800 MHz, at a level of –9dB
μ
,
±3.0 kHz deviation with a 1 kHz audio tone.
Press the [
WX
] key.
Press the [
CALL
(
SET
)
MENU
] key to save the new set-
ting.
Press the [
SCAN
(
MEM
)] key to re-
call the Alignment Item “TIxxx”.
Set the RF Signal Generator output
to 156.800 MHz, at a level of +3dB
μ
,
±3.0 kHz deviation with a 1 kHz audio tone.
Press the [
WX
] key.
Press the [
CALL
(
SET
)
MENU
] key to save the new set-
ting.
Содержание Eclipes DSC GX1000S
Страница 4: ...Exploded View Miscellaneous Parts 4 Note ...
Страница 5: ...Block Diagram 5 ...
Страница 6: ...Block Diagram 6 Note ...
Страница 14: ...14 MAIN Unit Note ...
Страница 24: ...24 Note MAIN Unit ...
Страница 31: ...31 ...


