Stack-On TD-24-GP-E-S Скачать руководство пользователя страница 11

INSTALACIÓN DE LA BATERÍA

Primero debe instalar la batería que se encuentra en 

la espuma de poliestireno de protección delantera.

NOTA : Al cambiar la batería , sujete siempre la 

batería conectando el casquillo mientras se 

desconecta o colocar la batería. No tire de los cables. 

Hacer esto podría causar que la fuente de 

alimentación se desconecte de la cerradura.

Este seguro utiliza una batería de 9V alcalina . Bajo 

condiciones normales de uso , las baterías duran 

aproximadamente 1 año. 

Cuando la batería está baja y se pulsa un botón en el 

teclado , una luz roja se encenderá un aviso de que la 

batería está baja .
Para probar la batería , introduzca su código de 

seguridad . Si la batería está baja la luz roja se 

encenderá momentáneamente.
Para reemplazar la batería , retire la cubierta 

presionando la lengüeta y girando la cubierta como 

se muestra en la ilustración. Reemplace la batería 

vieja y atornille la tapa en su lugar .

La Tapa

IMPORTANTE:

Su seguridad se entrega con un 

tornillo de bloqueo de seguridad que 

debe ser eliminado para que te 

permite bloquear su caja fuerte. De 

no hacerlo, pondrá en peligro la 

seguridad y la seguridad de su caja 

fuerte.

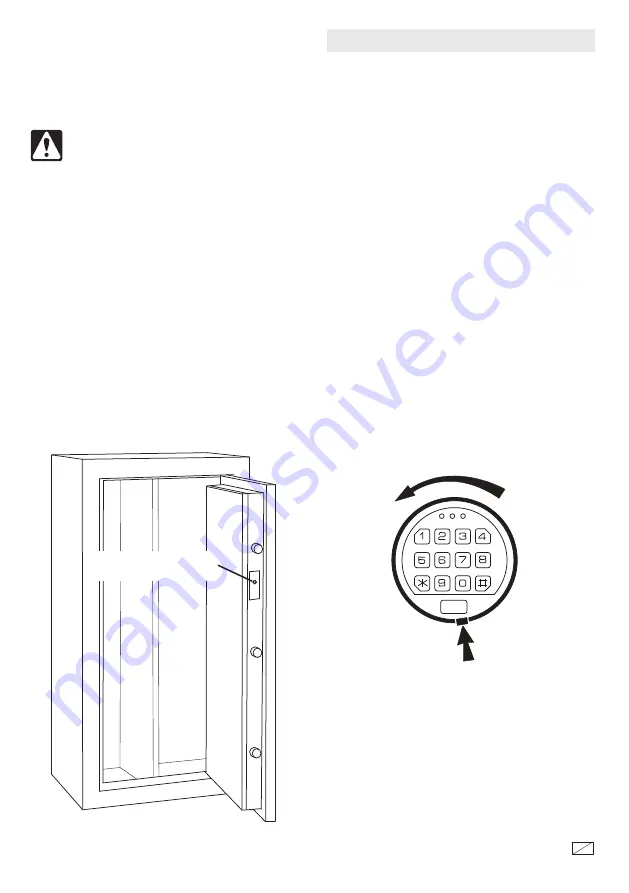
En primer lugar abrir la caja fuerte , girando el 

mango hacia la derecha y tirando de la puerta 

abierta.

Localice el tornillo de bloqueo de seguridad en el 

lado de la puerta ; destornillar con un 

destornillador Phillips , retire y deseche el tornillo.

Su salvo ahora se puede cerrar con llave . No 

bloquear el manual de instrucciones y / o llaves 

en la caja fuerte. Usted necesitará este manual 

para obtener las instrucciones de bloqueo y 

desbloqueo de la caja fuerte.

Tornillo de bloqueo de 

seguridad

40652-1512 

11 18

Содержание TD-24-GP-E-S

Страница 1: ...tions WARNING Tip Over Hazard A child or adult can tip the safe and be killed or seriously injured Failure to secure the safe as shown in these instructions can result in death or serious injury to ch...

Страница 2: ...ght will come on momentarily To replace the battery remove the cover by pressing the tab and turning the cover as shown in the illustration Replace the old battery and screw the cover back in place TA...

Страница 3: ...u will hear a beep The yellow light on the faceplate will be activated and will stay on for a period of time that should allow you to enter your code You can only enter your code while the yellow ligh...

Страница 4: ...unted to the floor For optimal safety and security the safe should be installed adjacent to a side wall with minimal space on either side of the safe in an isolated dry and secure area The safe should...

Страница 5: ...over causing personal injury NOTE This safe must be mounted to the floor Failure to do so will compromise the safety and security of the safe NOTE This safe must be secured to the floor Use the hardw...

Страница 6: ...move the key and screw the cover back in place 4 Enter your new security code following the instructions for entering your security code TAB GUN REST INSTALLATION The gun rests are supported on the wa...

Страница 7: ...structions on the attached form DOOR ORGANIZER ACCESSORIES Your door organizer provides a variety of storage options for your supplies Note Make sure the door accessories do not interfere with items i...

Страница 8: ...Purchased___ ___ ____ Owner s Address ___________________________ Unit or Apt Number _________________ City ___________________________ State _______________ Zip Code________________ Telephone Number...

Страница 9: ...of the safe and its contents Any repair dismantling or tampering undertaken without the prior written approval or direction of Stack On will nullify this guarantee Personal property in the safe is no...

Страница 10: ...VERTENCIA Peligro de Vuelco Un ni o o un adulto puede volcar la caja fuerte y ser matado o herido gravemente El fracaso para asegurar la caja fuerte como se muestra en estas instrucciones puede causar...

Страница 11: ...e Para reemplazar la bater a retire la cubierta presionando la leng eta y girando la cubierta como se muestra en la ilustraci n Reemplace la bater a vieja y atornille la tapa en su lugar La Tapa IMPOR...

Страница 12: ...luego soltarlo se escuchar un pitido La luz amarilla en la placa frontal se activar y permanecer encendida durante un per odo de tiempo que debe permitir que ingrese su c digo S lo se puede introduci...

Страница 13: ...ad y la seguridad ptima la caja de seguridad debe ser instalado adyacente a una pared lateral con un espacio m nimo a cada lado de la caja de seguridad en una zona aislada seco y seguro La caja fuerte...

Страница 14: ...te seguro se debe montar en el suelo De no hacerlo pondr en peligro la seguridad y la seguridad de la caja fuerte NOTA Este seguro debe fijarse al suelo Utilice el hardware proporcionado Colocar la ca...

Страница 15: ...r en el nuevo c digo retire la llave y el tornillo de la tapa en su lugar 4 Ingrese su nuevo c digo de seguridad siguiendo las instrucciones para ingresar su c digo de seguridad TAB RESTO DEL ARMA INS...

Страница 16: ...adjunto PUERTA ORGANIZADOR ACCESORIOS Su organizador puerta ofrece una variedad de opciones de almacenamiento para sus suministros Nota Aseg rese de que los accesorios de la puerta no interfieran con...

Страница 17: ...ra___ ___ ____ Direcci n propietario _____________________________ No Interior _________________ Ciudad ________________________ Estado _______________ C P ________________ No Tel fono ____ __________...

Страница 18: ...instalaci n de la caja fuerte y su contenido Cualquier reparaci n desmantelamiento o la manipulaci n realizada sin la aprobaci n previa por escrito o la direcci n de Stack On anular esta garant a La p...

Отзывы: