Stack-On SHD-AOTT-BG-E Скачать руководство пользователя страница 11

When you open the safe in the future enter the 

security code you have set followed by 

the    ....    key.

If an incorrect security code is entered 3 times 

the safe will beep 5 times (if the sound is turned 

on) and the red light will flash 5 times resulting 

in the safe being automatically locked out for 

60 seconds before you can try your code again.  

The safe will beep 1 time (if the sound is turned 

on) and the green light will flash once when the 

lockout period is over.

If an incorrect security code is entered 

1 additional time the safe will beep 5 times 

(if the sound is turned on) and the red light will 

flash 5 times resulting in the safe being 

automatically locked out for 5 minutes before 

the code can be tried again. 

The safe will beep 

1 time (if the sound is turned on) and the green 

light will flash once when the  lockout 

period is over.

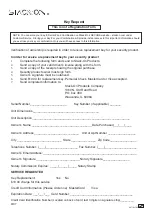
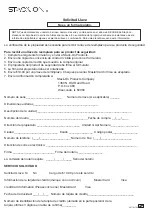
Write your new combination on this form or 

store your combination on our secure website at 

stackon.com under Customer Service.  If you 

write down your combination you must keep this 

information in a secure place, away from 

children, not inside the safe.

40716-1705

11 16

INTRODUCCIÓN DE SU CÓDIGO 

DE SEGURIDAD

Cuando abra la caja fuerte en el futuro, 

introduzca el código de seguridad que ha 

establecido seguido por la tecla           .

Si se introduce un código de seguridad incorrecto 

3 veces la caja fuerte emitirá un pitido 5 veces (si 

el sonido está encendido) y la luz roja 

parpadeará 5 veces, lo que hará que la seguridad 

se bloquee automáticamente durante 60 

segundos antes de poder probar su código de 

nuevo. La caja fuerte sonará 1 vez (si el sonido 

está encendido) y la luz verde parpadeará una 

vez cuando el período de bloqueo haya 

terminado.

Si se introduce un código de seguridad incorrecto 

1 vez más, la caja fuerte sonará 5 veces (si el 

sonido está encendido) y la luz roja parpadeará 5 

veces, lo que hará que la seguridad se bloquee 

automáticamente durante 5 minutos antes de 

que se pueda probar de nuevo el código . La caja 

fuerte sonará 1 vez (si el sonido está encendido) 

y la luz verde parpadeará una vez cuando el 

período de bloqueo haya terminado.

Escriba su nueva combinación en este formulario 

o guarde su combinación en nuestro sitio web 

seguro en stackon.com bajo Servicio al cliente. Si 

anota su combinación debe mantener esta 

información en un lugar seguro, lejos de los 

niños, no dentro de la caja fuerte.

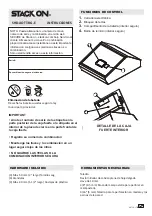
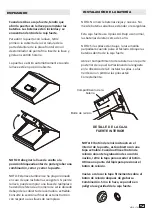
Para ingresar su propio código de seguridad, 

deberá seguir los siguientes pasos:

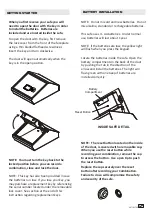
1.  Después de instalar las baterías, localice el 

botón de reinicio en la parte posterior de 

la puerta.

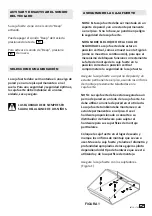
2.  Con la puerta de seguridad abierta, la llave 

debe estar en la posición de bloqueo. No puede 

programar el teclado si la llave está en la 

posición desbloqueada.

3.  Pulse el botón de reinicio con un lápiz y 

luego suéltelo. La luz parpadeará en verde con 

un pitido.

4.  Con la puerta abierta, ingrese su propio 

código de seguridad personal, que puede tener 

de 3 - 8 dígitos y con fi rme su nuevo código 

presionando la tecla             en el panel táctil 

electrónico. Tendrás 3 segundos para presionar 

la tecla              , de lo contrario tendrás que 

empezar de nuevo desde el primer paso. Habrá 

2 pitidos (si el sonido está encendido) y la luz 

verde parpadeará dos veces si su código ha sido 

ingresado correctamente. Antes de cerrar la 

puerta, ingrese el nuevo código de seguridad y 

presione la tecla              para asegurarse de que 

los pernos de bloqueo se retraigan.

Si el código falla, repita los pasos 2 - 4. Si el 

código funciona correctamente, debe bloquear 

la caja fuerte.

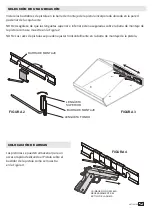
ABRIENDO LA CAJA FUERTE

BLOQUEO DE LA SEGURIDAD

NOTA SOBRE EL BLOQUEO DE LA SEGURIDAD: El 

mecanismo de bloqueo se desactiva

Aproximadamente 3 a 6 segundos después del

Combinación de datos, espere un

6 segundos desde el momento en que la 

combinación es entró para bloquear la 

caja fuerte.

Cuando opere el bloqueo con la llave, debe volver 

a poner la llave en la posición de bloqueo antes de 

poder cerrar y bloquear la puerta de seguridad.

NOTA: NO CIERRE LA PUERTA HASTA QUE HA 

CONFIRMADO QUE SU COMBINACIÓN HA 

SIDO ENTRADA CORRECTAMENTE.

Содержание SHD-AOTT-BG-E

Страница 1: ...ou will have access to this information Keep keys and combination in a secure place away from children DO NOT STORE KEYS OR YOUR COMBINATION INSIDE SAFE INSTRUCTIONS SHD AOTT BG E Battery Disposal Please dispose the used batteries per municipal or provincial law 1 Electronic Lock 2 Key Lock 3 Battery Compartment inside safe 4 Reset Button inside safe INSIDE SAFE DETAIL 4 M6 x 50 mm 2 long Lag Scre...

Страница 2: ... safe Open the battery compartment on the back of the door by pushing the tab in the direction of the arrow and install the batteries The light will flash green with one beep if batteries are installed correctly NOTE The reset button located on the inside of the door is covered with a removable cap When you use the reset button while recording your combination remove the cap to access the button Us...

Страница 3: ...After installing the batteries locate the reset button on the back of the door 2 With the safe door open the key must be in the locked position you can not program the keypad if the key is in the unlocked position 3 Press the reset button with a pen and then release it The light will flash green with one beep 4 With the door open enter your own personal security code which can be 3 8 digits long an...

Страница 4: ...k the mounting holes to be used Move the safe and drill the appropriate diameter and depth of pilot holes depending on the type of hardware being used and the mounting surface Secure the safe with the fasteners Figure 1 NOTE This safe must be mounted to a wall stud and a permanent shelf or the floor Failure to do so will compromise the safety and security of the safe FIGURE 1 SELECTING A LOCATION T...

Страница 5: ...in Figure 4 FIGURE 3 FIGURE 4 FIGURE 2 BOTTOM TAB TOP TAB PISTOL RACKS WEAPON PLACEMENT GUN MOUNT BAR GUN MOUNT BAR Install the pistol racks on the built in gun mount bar located on the back wall of the safe NOTE Make sure that top and bottom tabs are secured over the gun mount bar as shown in Figure 2 NOTE Pistol racks can be adjusted horizonally on the gun mount bar ...

Страница 6: ...n the threaded stem This will realign the door MAINTENANCE IMPORTANT Keep keys and your combination number in a secure place away from children Keep this record of your serial number and combination in a secure place separate from your safe To order a replacement key set follow the instructions on the attached form Tools Required Phillips screwdriver 5mm Allen wrench Do not use glass cleaners or s...

Страница 7: ..._____________ Date Purchased___ ___ ____ Owner s Address ___________________________ Unit or Apt Number _________________ City ___________________________ State _______________ Zip Code________________ Telephone Number ____ ___________________ Fax Number ____ ___________________ Owner s Email Address ________________________________________________________ Owner s Signature _______________________...

Страница 8: ...DOES NOT COVER ANY PRODUCT OR ANY PART OF ANY PRODUCT WHICH HAS BEEN SUBJECT TO EXCESSIVE USE ACCIDENT NEGLIGENCE ABUSE OR MISUSE INCORRECT MAINTENANCE ALTERATION OR REPAIR BY ANYONE OTHER THAN STACK ON IN ADDITION THIS WARRANTY DOES NOT COVER ANY ACCESSORIES OR PARTS USED WITH OR IN THE PRODUCT WHICH ARE NOT INCLUDED WITH THE ORIGINAL PURCHASE If Stack On is properly notified during the three yea...

Страница 9: ...mación Mantenga las llaves y la combinación en un lugar seguro lejos de los niños NO GUARDE LAS TECLAS O LA COMBINACIÓN INTERIOR SEGURA INSTRUCCIONES SHD AOTT BG E Eliminación de la batería Deseche las baterías usadas según la ley municipal o provincial 1 Cerradura electrónica 2 Bloqueo de teclas 3 Compartimento de la batería interior seguro 4 Botón de reinicio interior seguro FUNCIONES DE CONTROL...

Страница 10: ...rte la llave y gírela en sentido horario La puerta se abrirá automáticamente cuando la llave esté en posición abierta NOTA El botón de reinicio situado en el interior de la puerta está cubierto con una tapa extraíble Cuando utilice el botón de reinicio durante la grabación de su combi nación retire la tapa para acceder al botón Utilice una punta del lápiz para presionar el botón de reinicio Vuelva...

Страница 11: ...de instalar las baterías localice el botón de reinicio en la parte posterior de la puerta 2 Con la puerta de seguridad abierta la llave debe estar en la posición de bloqueo No puede programar el teclado si la llave está en la posición desbloqueada 3 Pulse el botón de reinicio con un lápiz y luego suéltelo La luz parpadeará en verde con un pitido 4 Con la puerta abierta ingrese su propio código de ...

Страница 12: ...á la seguridad de la caja fuerte Asegure la caja fuerte a un perno de pared y un estante permanente o el piso usando los orificios de montaje previamente taladrados en la caja fuerte NOTA La caja fuerte debe estar asegurada a un perno de pared en un lado de la caja fuerte Se debe utilizar un ancla de pared en el otro lado La caja fuerte también debe montarse en un estante permanente o en el piso Us...

Страница 13: ... BARRA DE MONTAJE BARRA DE MONTAJE Instale los bastidores de pistola en la barra de montaje de la pistola incorporada ubicada en la pared posterior de la caja fuerte NOTA Asegúrese de que las lengüetas superior e inferior estén aseguradas sobre la barra de montaje de la pistola como se muestra en la Figura 2 NOTA Los racks de pistolas se pueden ajustar horizontalmente en la barra de montaje de la ...

Страница 14: ...junto STACK ON PRODUCTS COMPANY P O BOX 489 WAUCONDA IL 60084 Herramientas necesarias Destornillador Phillips Llave Allen de 5mm Si la puerta de la caja fuerte comienza a frotar en el marco de la puerta abra la puerta según las instrucciones arriba Por las bisagras de la puerta encontrará un vástago roscado Utilice una llave Allen para apretar el Vástago roscado Esto realineará la puerta No use li...

Страница 15: ...Dirección del propietario ___________________________ Unidad or Apt Número _________________ Ciudad ___________________________ Esado _______________ Código postal________________ Número de teléfono ____ ___________________ Número de Fax ____ ___________________ Dirección de correo electrónico ________________________________________________________ Firma __________________________ Firma del notar...

Страница 16: ...ENTE NEGLIGENCIA ABUSO O MAL USO MANTENIMIENTO INCORRECTO ALTERACIÓN O REPARACIÓN POR CUALQUIER TERCERO QUE NO SEA STACK ON ADICIONALMENTE ESTA GARANTÍA NO CUBRE ACCESORIOS O PIEZAS USADAS CON O DENTRO DEL PRODUCTO QUE NO ESTÁN INCLUIDOS CON LA COMPRA ORIGINAL ESTA GARANTÍA ES EXCLUSIVA Y EXPRESAMENTE EN LUGAR DE CUALQUIER OTRA GARANTÍA EXPRESA O IMPLÍCITA INCLUSIVE LAS GARANTÍAS DE COMERCIABILIDA...

Отзывы: