background image

40540-1604

7 12

INSTRUCIONES

PS-15-05-B

Numero de Serie #

NOTA: Usted puede almacenar su Numero de Llave y 

su en el web site SEGURO de -  stack-on.com bajo la 

opcion que dice Customer Service. 

Al almacenar su Numero de Llave en este web site le 

proporcionara acceso instantanio ha esta informacion 

importante en caso de que usted pierda sus llaves.  

Nadamas usted tendra acceso ha esta informacion 

Herramientas necesarias:

perforar

Thin destornillador de cabeza plana

Destornillador Phillips

10 mm Llave

Taladro de 1/4 "(7 mm) poco

Hardware incluido:

(4) M6 x 15 mm (5/8 "de largo) Tornillos

(4) M6 tuercas Nylock

Localice las pilas adentro de la caja fuerte.   Abra el 

compartimiento para las pilas en la parte de atrás de la 

puerta oprimiendo la pestaña en el sentido indicado 

por la flecha e instale las pilas.

PARA COMENZAR

Cuando reciba su caja fuerte electrónica tendrá que 

abrirla con la llave para poder instalar las pilas.  Las 

baterías están incluidas y se encuentran dentro de la 

caja fuerte.

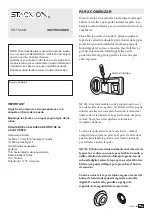
Para abrir la puerta con la llave, primero quitar la 

tapa de la cerradura desde la parte frontal de la placa 

frontal con un destornillador de cabeza plana de 

hoja delgada tal como se muestra. Inserte la llave y 

gire hacia la derecha. Mantenga la llave en la 

posición abierta y gire la perilla a la derecha para 

abrir la puerta.

Cierre de la tapa

IMPORTANT

Registre el número de serie que aparece en la 

etiqueta en frente de la puerta.

Mantenga las llaves en un lugar seguro lejos de los 

niños.

NO GUARDE LAS LLAVES ADENTRO DE LA 

CAJA FUERTE.

NOTA:  Esta tecla también se ha proporcionado en el 

caso de las baterías se agotan.  Si extravía su llave, puede 

solicitar una llave de reemplazo haciendo referencia al 

número de serie ubicado en la parte de abajo del panel 

central.  Véase la sección que hace referencia al 

reemplazo de llaves.

NOTA: El botón de reinicio situado en el interior de 

la puerta, se cubre con una tapa extraíble. Cuando se 

utiliza el botón de reinicio durante la grabación de 

su huella digital, retire la tapa para acceder al botón. 

Utilice una punta del lápiz para presionar el botón 

de reinicio.

Vuelva a colocar la tapa de forma segura a través del 

botón de reinicio después de registrar su huella 

digital. De no hacerlo, pondrá en peligro la 

seguridad y la seguridad de la caja fuerte.

®

Содержание PS-15-05-B

Страница 1: ...r with the key first remove the lock cover from the front of the faceplate using a thin bladed flathead screwdriver as shown Insert the key and turn clockwise Hold the key in the open position and turn the knob to the right to open the door Lock Cover IMPORTANT Record the serial number from the tag on the door front Keep keys in a secure place away from children DO NOT STORE KEYS INSIDE SAFE NOTE ...

Страница 2: ...ound is turned on and the scan will begin If the green light flashes twice with 2 beeps if the sound is turned on the scan has been accepted and you will have 5 seconds to turn the handle to open the door If the red light flashes once the scanner did not read your fingerprint and you must try again If the red light flashes 3 times the scanner read your fingerprint and did not accept it If there ar...

Страница 3: ...ries Do not mix alkaline standard or rechargeable batteries This safe uses 4 AA batteries Under normal use batteries will last about 1 year NOTE If the batteries are low the yellow light will flash when you press the scanner To replace the batteries open the battery compartment on the back of the door by pushing the tab in the direction of the arrow and install all new batteries BATTERY REPLACEMEN...

Страница 4: ...e and drill the pilot holes for the screws Replace the safe in the drawer and insert the screws through the mounting holes and drawer bottom Secure the bolt by tightening the Nylock nut on the screws Figure 1 Figure 1 SELECTING A LOCATION THE SAFE SHOULD ALWAYS BE KEPT OUT OF THE REACH OF CHILDREN This safe must be mounted into a drawer For optimal safety and security the safe should be installed ...

Страница 5: ..._________________ Date Purchased___ ___ ____ Owner s Address ___________________________ Unit or Apt Number _________________ City ___________________________ State _______________ Zip Code________________ Telephone Number ____ ___________________ Fax Number ____ ___________________ Owner s Email Address ________________________________________________________ Owner s Signature ___________________...

Страница 6: ...NY PRODUCT OR ANY PART OF ANY PRODUCT WHICH HAS BEEN SUBJECT TO EXCESSIVE USE ACCIDENT NEGLIGENCE ABUSE OR MISUSE INCORRECT MAINTENANCE ALTERATION OR REPAIR BY ANYONE OTHER THAN STACK ON IN ADDITION THIS WARRANTY DOES NOT COVER ANY ACCESSORIES OR PARTS USED WITH OR IN THE PRODUCT WHICH ARE NOT INCLUDED WITH THE ORIGINAL PURCHASE If Stack On is properly notified during the three year warranty perio...

Страница 7: ...pa de la cerradura desde la parte frontal de la placa frontal con un destornillador de cabeza plana de hoja delgada tal como se muestra Inserte la llave y gire hacia la derecha Mantenga la llave en la posición abierta y gire la perilla a la derecha para abrir la puerta Cierre de la tapa IMPORTANT Registre el número de serie que aparece en la etiqueta en frente de la puerta Mantenga las llaves en u...

Страница 8: ...el sonido está activado y la exploración se iniciará Si la luz parpadea en verde dos veces con 2 pitidos si el sonido está activado la exploración ha sido aceptada y tendrá 5 segundos para girar la manija para abrir la puerta Si la luz roja parpadea una vez el escáner no leyó su huella digital y tienes que probar de nuevo Si la luz roja parpadea 3 veces el escáner lee la huella dactilar y no lo ac...

Страница 9: ...No mezcle pilas alcalinas pilas estándar o recargables Este seguro utiliza 4 pilas AA En condiciones de uso normal las pilas duran aproximadamente 1 año NOTA Si las baterías están bajas la luz amarilla parpadea cuando se pulsa el escáner Para reemplazar las baterías abra el compartimiento de la batería en la parte posterior de la puerta empujando la lengüeta en la dirección de la flecha e instalar...

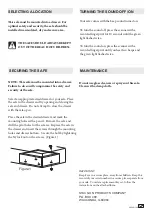
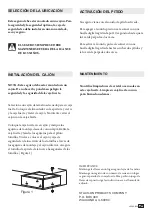
Страница 10: ... Asegure el tornillo de apriete de la tuerca hexagonales de los tornillos Figura 1 STACK ON PRODUCTS COMPANY P O BOX 489 WAUCONDA IL 60084 No utilice limpiadores de cristal o aerosoles en esta caja fuerte Limpie su caja fuerte con un paño húmedo nadamas MANTENIMIENTO IMPORTANTE Mantenga las llaves en un lugar seguro lejos de los niños Mantenga un registro de su número de serie en un lugar seguro s...

Страница 11: ... Compra___ ___ ____ Dirección propietario _____________________________ No Interior _________________ Ciudad ________________________ Estado _______________ C P ________________ No Teléfono ____ ___________________ No Fax ____ ___________________ Correo Electrónico del Propietario ______________________________________________ Firma del Propietario __________________________ Firma del Notario_____...

Страница 12: ...ABUSO O MAL USO MANTENIMIENTO INCORRECTO ALTERACIÓN O REPARACIÓN POR CUALQUIER TERCERO QUE NO SEA STACK ON ADICIONALMENTE ESTA GARANTÍA NO CUBRE ACCESORIOS O PIEZAS USADAS CON O DENTRO DEL PRODUCTO QUE NO ESTÁN INCLUIDOS CON LA COMPRA ORIGINAL ESTA GARANTÍA ES EXCLUSIVA Y EXPRESAMENTE EN LUGAR DE CUALQUIER OTRA GARANTÍA EXPRESA O IMPLÍCITA INCLUSIVE LAS GARANTÍAS DE COMERCIABILIDAD E IDONEIDAD PAR...

Отзывы: