


25
5.
When the lead is past the appendage and in the chamber, feed more lead into the heart so
that it regains its "J" shape.
6.
Take a firm grip on the stylet, then introduce more of the lead so that the electrode tip goes
as far as possible into the atrium. On fluoroscopy, the electrode tip will "tilt over" as proof that
it can go no further.
7.
With the clip-on tool or the fixation tool, extend the helix so that the lead is fixed to the atrial
wall. See Secure the Tip with the Clip-On Tool (page 25).
8.
Retract the entire stylet from the lead with a smooth and steady motion.
9.
Check that the lead is properly anchored by introducing more of it into the heart until the
loop that forms either lies on the bottom of the atrium, or is about to enter the inferior vena
cava or the right ventricle. Retract any excess lead until it acquires the correct "J" shape.
10.
Ask the patient to breathe deeply and check that the lead keeps its "J" shape.
11.
Ask the patient to cough to ensure that the electrode is securely anchored.
Ventricular Lead Placement
1.
Advance the lead into the atrium.
2.
Pull the stylet back a few centimeters to reduce the risk of the lead damaging the valves or
penetrating the heart muscle when it continues down into the ventricle.
3.
Continue to advance the lead. When the tip reaches the desired implant location, retract the
stylet an additional ten centimeters or more.
4.
With the clip-on tool or the fixation tool, extend the helix to fix the lead tip to the ventricular
wall. If the tip is correctly secured, the lead will be felt to jerk slightly.
5.
Remove the stylet completely. Adjust the lead so that it lies in the desired position in the
ventricle.
Secure the Tip
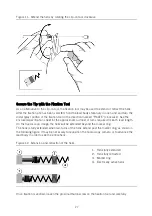
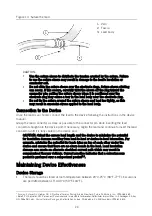
Secure the Tip with the Clip-On Tool
The lead is packaged with the clip-on tool only.
Insert the stylet into the lead and pinch open the clip-on tool. Place the lead terminal pin into the
open notch of the clip-on tool so that the pin snaps into place and release the handles. Rotate the
clip-on tool clockwise to extend the helix. To remove the clip-on tool, pinch it together and
withdraw it from the lead connector.
NOTE: The stylet should be removed before testing the lead for mechanical stability or
making intraoperative measurements.
Содержание Tendril MRI LPA1200M
Страница 1: ...Tendril MRI Pacing leads Model LPA1200M User s Manual ...
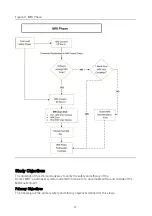
Страница 13: ...11 Figure 1 Lead Safety Phase The figure below depicts the MRI Phase ...
Страница 28: ...26 Figure 10 Open the clip on tool 1 Insert lead into notch ...
Страница 35: ......
Страница 36: ......
Страница 37: ......


