background image

20

This telephone provides two types of
Caller ID.

CALLER ID

Displays the name and number of each
caller after the phone begins ringing
(requires Caller ID service from your
telephone company).

CALLER ID ON CALL WAITING

Shows the name and number of each
caller on Call Waiting after you hear the
Call Waiting tone (requires Caller ID on
Call Waiting service).

The phone has a Call Log, which stores
the name, number, date, and time of
the last 50 calls received. You can
review the Call Log to see who called
while you were out. You can speed-dial
numbers from the Call Log. And you
can store names and numbers from the
Call Log into your directory.

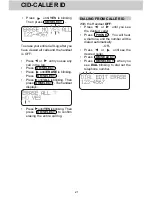
Reviewing The Call Log

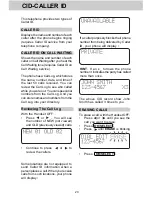
With the Handset OFF:

Press      or      .  You will see
the number of NEW (not viewed)
and OLD (previously viewed) calls.

CID-CALLER ID

If a caller purposely blocks their phone
number from being delivered by Caller
ID, your phone will display :

Continue to press       or      to
review the callers.

Some locations are not equipped  to
send Caller ID information when a
person places a call. When you receive
calls from such locations, your phone
will display :

HINT: If an x_ follows the phone
number it indicates the party has called
more than once.

The above CID record show John
Smith has called 3 times to you.

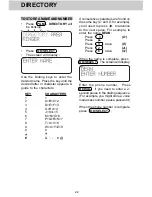
ERASING CALLS

To erase a call; with the Handset OFF:

Press     or      until you see the
call you want to erase.

Press  OK/SELECT .

Press      until ERASE is blinking

Press   OK/SELECT  .

Содержание vt1923

Страница 1: ... key other than the OFF MUTE or VOLUME Keys In addition INTRODUCTION the Handset keypad and LCD illuminate while the Handset rings to signal an incoming call This is very useful in a dark enviroment The Sprint cordless phone also provides a one way Page Find Pressing the Base PAGE key will cause the Handset to ring in a manner which distinguishes it from normal incoming ringing This can be used to...

Страница 2: ... Programmable Ringer Types This manual is designed to make you familiar with the Sprint cordless phone We strongly recommend you read the manual before using your phone SPECIAL FEATURES 900 MHz Operation Fully Digital Link between Handset and Base with ADPCM voice coding Digitally Scrambled Voice Communication Name Number CID display 2 row by 16 character 5x7 dot matrix alpha numeric LCD 50 CID me...

Страница 3: ...ION 5 Battery Pack 2 6 Wall Mounting Bracket 7 Belt Clip 8 Owner s Manual To purchase replacement battery packs call VTECH Communications at 1 800 595 9511 Telephone Line Cord AC Power Adapter Handset Battery Pack 2 Base Unit Wall Mounting Bracket Belt Clip Owner s Manual OWNER S MANUAL ...

Страница 4: ... corrected FCC Part 15 Warning Changes or modifications to this unit not expressly approved by the party responsible for compliances could void the user s authority to operate the equipment The equipment has been tested and found to comply with part 15 of the FCC rules These limits are designed to provide reasonable protection against harmful interference in a residential installation This equipme...

Страница 5: ...ase Unit contains no user serviceable parts The Handset contains a user replaceable battery pack If it is determined that your telephone equipment is malfunctioning the FCC requires that it not be used and that it be unplugged from the modular jack until the problem has been corrected Repairs to this telephone equipment can only be made by the manufacturer or its authorized agents or by others who...

Страница 6: ... or heat register This product should not be placed in a built in installation where proper ventilation is not provided 7 This product should be operated only from the type of power source indicated on the marking label If you are not sure of the type of power supply to your home consult your dealer or local power company 8 Do not allow anything to rest on the power cord Do not locate this product...

Страница 7: ...om lighting 14 Do not use the telephone to report a gas leak in the vicinity of the leak SAVE THESE INSTRUCTIONS CAUTION TO REDUCE THE RISK OF FIRE OR INJURY TO PERSONS BY BATTERY READ AND FOLLOW THESE INSTRUCTIONS 1 Use only the appropriate type and size battery pack specified in the instruction manual provided for this product 2 Do not dispose of the battery pack in a fire The cell may explode C...

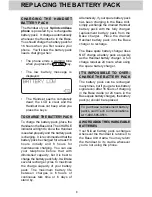
Страница 8: ...e not using the phone REPLACING THE BATTERY PACK CHARGING THE HANDSET BATTERY PACK The Handset of your Sprint cordless phone is powered by a rechargeable battery pack It charges automatically whenever the Handset is in the Base You should charge the battery pack for 16 hours when you first receive your phone You ll know the battery pack needs charging when The phone emits a warning tone when you p...

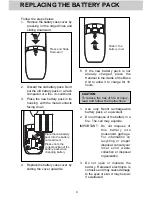
Страница 9: ...ery pack in its housing with the metal contacts facing down 5 If the new battery pack is not already charged place the Handset in the cradle of the Base Unit to allow it to charge for 16 hours CAUTION To reduce the risk of fire or injury read and follow the Instructions 1 Use only Sprint rechargeable battery pack or equivalent 2 Do not dispose of the battery in a fire The cell may explode IMPORTAN...

Страница 10: ...to provide operational backup in case of a power failure If you have a fully charged battery pack in the Spare Battery pack charger and there is a power outage you will still be able to place and receive calls for up to five hours REPLACING A DRAINED HANDSET BATTERY The Spare battery pack can also be used to replace a drained Handset battery pack to ensure uninterrupted use Be sure to put the drai...

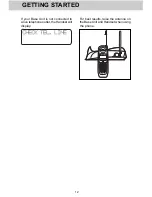
Страница 11: ...hone line cord to a live telephone outlet and the TEL LINE jack located on the back edge of the Base Unit AC POWER ADAPTER Plug the AC power adapter into a live electrical outlet and the DC POWER CONNECTOR into the back of the Base Unit Place the Handset into the Base Unit cradle Make sure the Charging light is illuminated Charge for at least 16 hours before first using the phone The Handset can c...

Страница 12: ...12 GETTING STARTED If your Base Unit is not connected to a live telephone outlet the Handset will display For best results raise the antenna on the Base Unit and Handset when using the phone ...

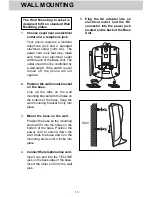
Страница 13: ...the holes on the bottom of the base Snap the wall mounting bracket firmly into place 3 Mount the base on the wall Position the base so the mounting studs will fit into the holes on the bottom of the base Position the power cord to extend down the wall Slide the base down on the mounting studs until it locks into place 4 Connect the telephone line cord Insert one end into the TEL LINE jack on the b...

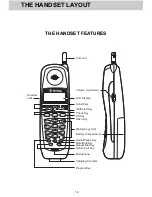
Страница 14: ... Microphone Charging Contacts Program Key Dialing Keys 0 9 LCD Display Scroll Keys OK Select Key Antenna Battery Compartment Volume Up Down Headset Jack Phone Key Off Key Flash Key Redial Pause Key Mute Hold Key Repeat Dial Key Return Call Key ...

Страница 15: ...15 THE BASE UNIT LAYOUT THE BASE UNIT FEATURES ...

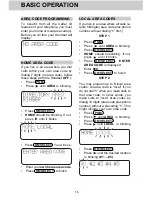
Страница 16: ...blinking If not press until it blinks Press OK SELECT ENTER AREA CODE is displayed Enter 000 Press OK SELECT to finish STEP 2 You may program up to 5 local area codes An area code is local if you do not dial 1 when you make calls to that area code In other words you make calls to local area codes by dialing 10 digits area code plus phone number without a preceding 1 This might include your own are...

Страница 17: ...he side of the Handset There are 4 volume levels MUTE When you mute a call the other person cannot hear you but you can hear them To mute a Handset call press MUTE during the call The Handset will display Press MUTE again to return to normal 2 way conversation HOLD To put a Handset call on hold press and hold the MUTE HOLD key for 2 seconds The Handset will display Neither you nor the other person...

Страница 18: ...he Handset will display Once you have reviewed your new messages the MESSAGE WAITING indication on the Handset and the MESSAGE light on the Base will turn off MESSAGE TIPS After hearing your messages wait until the Message Waiting indicators turn off before you make another call This will ensure the indicators do not remain on after the messages are reviewed If after reviewing all new voice messag...

Страница 19: ... are 4 ringer styles The current setting is blinking Press or to hear the other ring styles OR turn the Handset ringer OFF When the desired ringer typer is blinking press OK SELECT to confirm your selection To turn the Handset ringer ON again use the above the steps Press or to raise or lower the ringer volume Press OK SELECT When you confirm the volume level Press OK SELECT Press until VOL is bli...

Страница 20: ...from the Call Log into your directory Reviewing The Call Log With the Handset OFF Press or You will see the number of NEW not viewed and OLD previously viewed calls CID CALLER ID If a caller purposely blocks their phone number from being delivered by Caller ID your phone will display Continue to press or to review the callers Some locations are not equipped to send Caller ID information when a per...

Страница 21: ...L is blinking Then press OK SELECT The handset displays Press until YES is blinking Then press OK SELECT to confirm erasing the entire call log CID CALLER ID DIALING FROM CALLER ID With the Handset OFF Press or until you see the desired caller Press PHONE You will hear a dial tone and the number will be dialed automatically OR Press or until see the desired caller Press OK SELECT Press OK SELECT w...

Страница 22: ...the name DEAN Press 3 D Press Press 3 twice E Press 2 A Press 6 twice N When the name is complete press OK SELECT The screen will display Press OK SELECT The screen will display Use the Dialing keys to enter the desired name Press the key until the desired letter or character appears A guide to the characters Enter the phone number Press REDIAL if you need to enter a 2 second pause in the dialing ...

Страница 23: ... necessary Press OK SELECT Press until ERASE is blinking Press OK SELECT If you want to edit the name press a to erase letters Use the dialpad to enter new letters When the name is correct press OK SELECT If you want to edit the number press a to erase digits Use the dialpad to enter new digits When the number is correct press OK SELECT You will then hear a long beep The name and number have been ...

Страница 24: ... l l o w i n g o p e r a t i o n a l characteristics apply to Sprint Headsets The same may also apply to other non Sprint supplied Headsets but Sprint assumes no responsibility for their performance The Sprint brand compatible Headset has a reversible monaural design You can wear your Headset on either ear leaving one ear free for room conversation The headband can be adjusted to fit the contour o...

Страница 25: ...ates contact your local telephone company RETURN CALL This key will dial the last person who called you whether you answered the call or not This is most useful if you do not subscribe to Caller ID REPEAT DIAL This key will repeatedly dial the last number you called For example if you dial a number that s busy press OFFaa then REPEAT DIAL then OFF again For up to 30 minutes your line will keep try...

Страница 26: ...ORMS Electrical storms can sometimes cause power surges harmful to electronic equipment For your own safety use caution when using electric appliances during storms CLEANING YOUR TELEPHONE Your telephone has a durable plastic casing that should retain its luster for many years Clean it only with a soft cloth slightly dampened with water or a mild soap Do not use excess water or cleaning solvents o...

Страница 27: ... can sometimes cause interference Try moving the appliance or the Base Unit to another outlet You Get Noise Static Or A Weak Signal When You re Away From The Base Unit You may be out of range Either move close to the Base or relocate the Base Unit The layout of your home may be limiting the range Try moving the Base Unit to another position The Handset Does Not Ring When You Receive A Call Make su...

Страница 28: ... trying this a few times do the following in the order listed 1 Disconnect the power to the Base 2 Disconnect remove the Handset battery pack 3 Remove the base unit battery pack where applicable 4 Walt a few minutes 5 Connect power to the Base 6 Install the handset battery pack 7 Install the base unit battery pack where applicable 8 Place the handset in the base unit cradle If the handset has not ...

Страница 29: ...mplied or statutory including warranties of fitness for a particular purpose are limited to the time period listed and are otherwise excluded from this warranty Sprint may at its option void the warranty if unauthorized repairs are attempted Additionally Sprint shall not be liable for any incidental or consequential damage or commercial loss nor for any other loss or damages Sprint assumes no resp...

Страница 30: ...E RANGE Maximum power allowed by FCC and IC Actual operating range may vary according to environmental conditions at the time of use SIZE Handset 18 x 5 7 x 4 1cm L x W xT M a x i m u m A n t e n n a excluded Base 20 5 x 17 x 70cm L x W x T Maximum Antenna excluded WEIGHT Handset 150 grams Base 295 grams POWER REQUIREMENTS Handset Self contained nickel cadmium rechargeable battery supply 3 6V nomi...

Страница 31: ... Call Waiting 18 Paging The Handset 18 Message Indicator 18 Message Tips 18 Setting The Handset Ringer 19 Handset Ringer Volume 19 CID CALLER ID 20 Caller ID 20 Caller ID On Call Waiting 2 0 Reviewing The Call Log 20 Erasing Calls 20 Dialing From Calleer ID 21 DIRECTORY 22 To Store A Name And Number 22 Storing A Caller ID Record In The Directory 23 Making Directory Calls 23 Editing A Directory Ent...

Страница 32: ...Printed in China SP1923 91 4073 11 00 ISSUE 0 ...

Отзывы: