Spraying Systems Co CW1500A Series Скачать руководство пользователя страница 6


4.


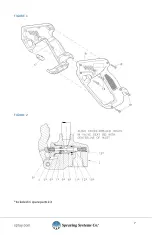
Remove the five Screws (19) and Housing (18). See Figure 1, Page 7 

5.


Lift out all internal parts, leaving all parts assembled. Trigger Lock Plug 

(17) should remain in Housing (18) 

6.


Clamp the Valve Body (2) and remove Retaining Screw (4) containing 

Gasket (5), Back-Up Ring (6) and O-ring (7). See Figure 2, Page 7 

7.


Remove Stem (9), Valve Seat (8) with Back-Up Ring (11) and O-ring 

(12), as well as Ball (10) and Spring (13). 

PARTS REPLACEMENT/ASSEMBLY PROCEDURE: 

1.


Install new Back-Up Ring (11) and O-ring (12) on new Valve Seat (8). 

2.


Clamping Valve Body (2) insert the following new parts: Spring (13), 

Ball (10) and Valve Seat Sub-Assembly (8, 11 & 12) into Valve Body. 

NOTE:  Cross-drilled holes in Valve Seat (8) should be in line with inlet of 

valve body to minimize pressure loss. See “Figure 2”. 

3.


Remove Gasket (5), O-ring (7), and Back-up Ring (6), from Retaining 

Screw (4) and replace with new parts. 

IMPORTANT:  O-RINGS (7 & 12) AND BACK-UP RINGS (6 & 11) MUST BE 

INSTALLED IN THE CORRECT POSITION AS SHOWN OR THE 

SPRAY GUN WILL LEAK AND PERMANENTLY DAMAGE THE 

O-RINGS. SEE “FIGURE 2”. 

4.


Insert new Stem (9) through Retaining Screw Sub-Assembly (4 thru 7), 

inserting rounded end through O-ring (7). 

5.


Install and tighten Retaining Screw Sub-Assembly and Stem into Valve 

Body (2) with new Gasket (5). 

6.


Insert new Spring (3) over Stem (9). 

7.


Re-assemble into Housing (18). 

NOTE: Be careful not to lose Trigger Spring (3). 


Содержание CW1500A Series

Страница 1: ...CW1500A Series GunJet Spray Gun USER GUIDE spray com MI CW1500A...

Страница 2: ...the exception of the valve seat sub assembly the CW1500A and CW1500AW GunJet spray guns are identical and require the same installation and operating procedures The Model CW1500A and CW1500AW GunJet s...

Страница 3: ...A MINIMUM OF 4 0 FEET 1 22 M FROM THE TRIGGER MECHANISM DO NOT ASSEMBLE DISCHARGE NOZZLE DIRECTLY INTO THE SPRAY GUN 1 DO NOT aim gun at any person or any part of the body Fluids under high pressure c...

Страница 4: ...igh reactionary force of this unit 3 DO impress on other people in the spraying area the importance of obeying strict safety precautions for everyone s safety 4 DO develop a habit of shutting off the...

Страница 5: ...O rings at each end of the coil remain intact 4 THE COVER MUST BE FULLY TIGHTENED AGAINST THE BODY since the cover retains the fluid module in place and creates a seal for the air and liquid connectio...

Страница 6: ...ll 10 and Valve Seat Sub Assembly 8 11 12 into Valve Body NOTE Cross drilled holes in Valve Seat 8 should be in line with inlet of valve body to minimize pressure loss See Figure 2 3 Remove Gasket 5 O...

Страница 7: ...7 FIGURE 1 FIGURE 2 Included in spare parts kit...

Страница 8: ...North Avenue and Schmale Road P O Box 7900 Wheaton IL 60187 7901 Tel 1 800 95 SPRAY Intl Tel 1 630 665 5000 Fax 1 888 95 SPRAY Intl Fax 1 630 260 0842 www spray com MI CW1500A Spraying Systems Co 201...

Отзывы: