background image

108

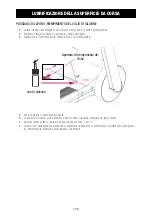
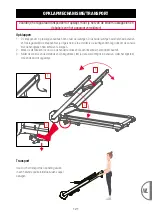
CENTRAGGIO DEL TAPIS ROULANT

CENTRAGGIO DEL TAPIS ROULANT

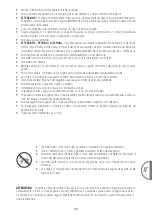
Posizionare il tapis roulant su una superficie piana e impostarlo su un massimo di 3,5 km / h,
per verificare se il nastro scivola. Regolare le viti per allinearlo (all'estremità posteriore del dispositivo).
Vedere la Figura 3: parti ed elementi di controllo.

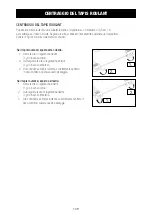
Se il tapis roulant si sposta verso destra:

1.  Girare la vite di regolazione destra 

½ giro in senso orario.

2.  Quindi girare la vite di regolazione sinistra 

½ giro in senso antiorario.

3.  Ora controlla se il tapis roulant è correttamente centrato. 

In caso contrario, ripetere questo passaggio.

Se il tapis roulant si sposta a sinistra:

1.  Girare la vite di regolazione sinistra 

½ giro in senso orario.

2.  Quindi girare la vite di regolazione destra 

½ giro in senso antiorario.

3.  Ora controllare se il tapis roulant è correttamente centrato. In 

caso contrario, ripetere questo passaggio.

1.

2.

1.

2.

Содержание FX3 Pro

Страница 1: ...1 FX3 Pro Laufband DE EN ES FR IT NL ...

Страница 2: ......

Страница 3: ...ltig durch und verwenden Sie das Gerät den Anweisungen entsprechend Die Betriebssicherheit und die Funktion des Gerätes können nur dann ge währleistet werden wenn die Sicherheitshinweise in diesem Benutzerhandbuch beachtet werden Wir übernehmen keine Haftung für Schäden die durch unsachgemäßen Gebrauch bzw fehlerhafte Bedienung entstehen i Bitte stellen Sie sicher dass alle Personen die das Gerät ...

Страница 4: ...ns gibt es auch auf Social Media Instagram Seite https www instagram com sportstech de https www facebook com sportstech de Facebook Seite Hol dir die neuesten Produktinfos Trainingsinhalte uvm auf unserer Aufbau Benutzung Abbau 1 QR Code scannen 2 Videos anschauen 3 Schnell und sicher starten ...

Страница 5: ...HT 9 AUFBAUANLEITUNG 10 KLAPPMECHANISMUS TRANSPORT 11 AUFSTELLEN LAGERUNG 12 KONSOLE 13 LAUFPROGRAMME 14 NUTZUNG DES PULSGURTES 14 FEHLERMELDUNGEN DISPLAYANZEIGEN 15 WARTUNG UND PFLEGE 17 SCHMIEREN DES LAUFGURTS 18 GERÄT STRAFFUNG 19 LAUFGURT ZENTRIERUNG 20 DEHNUNGSÜBUNGEN 21 ANWENDUNGSSOFTWARE APP 22 DECLARATION OF CONFORMITY 134 ...

Страница 6: ...lls ein Eingreifen durch die Aufsichtsperson notwendig wird Verwenden Sie keine Sprays oder Aerosol Produkte in der Nähe des Geräts um dieses nicht zu beschädigen Halten Sie das Gerät trocken und fern von Nässe und Feuchtigkeit Die Motorabdeckung kann während der Benutzung erhitzen Stellen Sie das Gerät auf eine hitzeresistente Unter lage Halten Sie den Stromstecker sowie das Stromkabel fern von h...

Страница 7: ...itsclip an Ihrer Kleidung an um das Gerät im Notfall stoppen zu können Überprüfen Sie vor dem Einschalten ob der Laufgurt ausreichend geschmiert und angespannt ist Der Laufgurt muss mittig verlaufen Stellen Sie sicher dass alle sichtbaren Schrauben angezogen sind Wenn der Stromstecker beschädigt ist muss dieser durch Fachpersonal ausgetauscht werden Schalten Sie das Gerät nie im zusammengeklappten...

Страница 8: ...üftungen Stellen Sie das Gerät nicht in einer Garage einem überdachten Innenhof in der Nähe von Wasser oder im Freien auf 2 m 1 m 0 3 m 1 m Stellen Sie sich während Sie das Gerät programmieren und andere Vorbereitungen treffen nicht auf den Laufgurt sondern nutzen Sie die seitlichen Trittflächen Starten Sie das Gerät niemals mit einer hohen Geschwindigkeit und versuchen Sie niemals anschließend au...

Страница 9: ...en Bluetooth Maximales Benutzergewicht 120 kg Paketmaße 1795 x 891 x 370 mm Konsole Handyhalterung und Haftauflage Handläufe Buchse für Sicherheits schlüssel Faltknöpfe Schnellentriegelung Stellschrauben für Laufbandausrichtung Öl Einfüllöffnung Standfüße Drehknopf Sicherung Netzkabelanschluss Netzschalter Stellschrauben für Laufbandspannung Sicherheitsschlüssel Netzkabel Inbusschlüssel Handyhalte...

Страница 10: ...e am Ende der unteren Stützarme die Schrauben der Füße hin ein oder herausdrehen Nehmen Sie gegebenenfalls eine Wasserwaage zur Hilfe Beim Betreten der Lauffläche darf diese nicht wackeln oder schräg stehen Überprüfen Sie den Ausgleich der Bodenunebenheiten vor der Benutzung des Gerätes Öffnen Sie die Verpackung und entnehmen Sie den Inhalt Stellen Sie das Gerät auf eine ebene Fläche Stellen Sie s...

Страница 11: ...n nach hinten zu klappen 2 Lösen Sie die Standrohre indem Sie auf den Hebel treten der sich links unten am Gerät befindet 3 Nachdem die Konsole und die Standrohre gelöst sind lassen Sie diese vorsichtig nach unten sodass das Gerät zu einer Ebene zusammengeklappt ist Für den Transport halten Sie das Gerät einfach in geneigter Position bis sich die Räder leichtgängig bewegen 1 1 2 3 Vor dem Transpor...

Страница 12: ...e Stütze eingerastet ist bevor Sie das Gerät loslassen LAGERUNG Lagern Sie das Gerät in einer sauberen und trockenen Umgebung im Haus Lagern Sie das Gerät nie im Freien Stellen Sie sicher dass der Stromschutzschalter nach der Benutzung ausgeschaltet und der Stromstecker gezogen ist Zum Lösen der Standfüße halten Sie das Gerät oben am Ende des Gerätes fest und drücken Sie mit Ihrem Fuß auf die Entr...

Страница 13: ...ste erneut um wie der zu der ursprünglich eingestellten Geschwindigkeit zurückzukehren Sicherheitssperre Buchse für Sicherheitsschlüssel Egal mit welcher Geschwindigkeit das Gerät arbeitet oder welcher Modus aktiv ist Wenn der Sicherheitsschlüssel aus der Sicherheitssperre Buchse abgezogen bzw entfernt wird stoppt das Gerät sofort der Motor schaltet sich automatisch ab Auf dem Display wird im Fens...

Страница 14: ...er Modus anzeigt befindet sich das Gerät im Stand by Modus 2 Drücken Sie die Ermüdungs Taste auf dem Handlauf um zur Modus Auswahl zu gelangen 3 Drehen Sie den Drehknopf um den gewünschten Modus auszuwählen P Zeitintervall Programm C Laufziel Programm 4 Drücken Sie den Drehknopf einmal um im Zeitintervall P die Zeit einzustellen oder das Laufziel C festzulegen Die jeweilige Anzeige auf dem Display...

Страница 15: ...trom 2 Prüfen Sie ob die beweglichen Betriebsteile des Geräts blockiert sind 3 Prüfen Sie ob ein Schmierstoffmangel vorliegt 4 Prüfen Sie das Gerät auf extremen Verschleiß 5 Prüfen Sie auf Kurzschluss im Motor 6 Kontrollieren Ersetzen Sie die Steuerungseinheit 10 Schutz vor Überspannungen 1 Prüfen Sie die Spannung der Stromversorgung 2 Kontrollieren Ersetzen Sie die Steuerungseinheit 11 Überstroms...

Страница 16: ...Das Gerät läuft mit der eingestellten Geschwindigkeit weiter 16 Motorblockade Prüfen Ersetzen Sie den Motor 17 Überhitzung des Leistungsmoduls Prüfen Ersetzen Sie den Controller Einige oder alle Knöpfe funktionieren nicht 1 Prüfen Ersetzen Sie die Schaltknöpfe 2 Prüfen Ersetzen Sie die Konsole 3 Entfernen SIe die Konsolenhaube um die Knöpfe zu testen 4 Prüfen Sie ob die Knöpfe funktionieren nachde...

Страница 17: ...ie Hand trocken ist und keine Reste von Silikonöl aufweisen eine Schmierung des Gerätes ist erforder lich 2 Die beweglichen Teile sollen sich frei und leise drehen Anomalien an beweglichen Teilen beeinträchtigen die Sicherheit des Geräts Kontrollieren Sie regelmäßig alle Schrauben am Gerät und ziehen Sie diese gegebenenfalls an nach EMPFEHLUNGEN WICHTIG Um die folgenden Arbeitsschritte durchzuführ...

Страница 18: ...Sie dafür z B ein scharfes Messer Öffnen Sie die Öl Einfüllöffnung für das Schmiermittel Die Öffnung befindet sich auf der vorderen linken und rechten Seite am Hauptrahmen des Laufbandes Schalten Sie das Gerät ein und lassen Sie es mit einer langsamen Geschwindigkeit von maximal 1 km h laufen Geben Sie das Schmieröl vorsichtig und langsam in die Einfüllöffnung Das Schmiermittel verteilt sich nun g...

Страница 19: ...n Sie dafür den mitgelieferten Sechskantschlüssel Um den Laufgurt zu straffen 1 Drehen Sie die linke Stellschraube für Laufgurtspannung Siehe Abbildung 4 Anschlüsse und Bedienelemente am vorderen Ende des Gerätes 2 Umdrehung gegen Uhrzeigersinn 3 Drehen Sie die anschließend die rechte Stellschraube für Laufgurtspannung Siehe Abbildung 4 Anschlüsse und Bedienelemente am vorderen Ende des Gerätes 4 ...

Страница 20: ...hts bewegt 1 Drehen Sie die rechte Einstellschraube Umdrehung im Urzeigersinn 2 Danach drehen Sie die linke Einstellschraube Umdrehung gegen den Uhrzeigersinn 3 Prüfen Sie nun ob der Laufgurt ordentlich zentriert ist Wenn dies nicht der Fall ist wiederholen Sie diesen Schritt Wenn sich der Laufgurt nach links bewegt 1 Drehen Sie die linke Einstellschraube Umdrehung im Urzeigersinn 2 Dann drehen Si...

Страница 21: ...leichgewicht besser zu halten nach hinten greifen und den rechten Fuß nach oben ziehen Die Ferse so nahe wie möglich an das Gesäß heranbringen Halten Sie diese Stellung für 15 Sekunden und wiederholen es mit dem linken Fuß 5 INNENSCHENKEL DEHNUNG Setzen Sie sich hin mit den Fußsohlen gegeneinander und Ihre Knie weisen nach außen Die Füße so nahe wie möglich an den Unterleib heranziehen Drücken Sie...

Страница 22: ... verschiedenen YouTube Tutorials weitergeleitet Dort erhalten Siemehr Informationen über die App s und das Gerät Android iOS FitShow Testen Sie Kinomap jetzt 7 Tage kostenlos oder wählen Sie die GRATIS FitShow App Hinweise zur Nutzung der App Sie sollten nur Apps installieren deren Quellen Sie vertrauen Sportstech Brands Holding kann keine Haftung für Software übernehmen die von Drittanbietern ber...

Страница 23: ...ltlich zurückzunehmen Dieser gesetzlichen Verpflichtung kommen wir über die DR Deutsche Recycling Service GmbH take e way GmbH nach Daneben können Sie Elektroaltgeräte an den Sammelstellen der öffentlich rechtlichen Entsorgungsträger abgeben Sie leisten einen wichtigen Beitrag zur Wiederverwendung zum Recycling und zur sonstigen Verwertung von Altgeräten dadurch dass sie Ihre Altgeräte einer getre...

Страница 24: ...24 ...

Страница 25: ...starting up and beginning of training and use the device according to the instructions The operational safety and function of the device can only be guaranteed if the safety instructions in this user manual are observed We shall not assume any liability for damages resulting from improper use or incorrect operation i Please ensure that all people using the device have read and understood the user ...

Страница 26: ... We are also on social media Instagram page https www instagram com sportstech de https www facebook com sportstech de Facebook page Get the latest product information training content and much more on our Assembly use disassembly 1 Scan the QR code 2 Watch videos 3 Start fast and safely ...

Страница 27: ...STRUCTIONS 32 FOLDING MECHANISM TRANSPORT 33 INSTALLATION STORAGE 34 CONSOLE 35 RUNNING PROGRAMS 36 USE OF THE PULSE RATE BELT 36 ERROR MESSAGES DISPLAY MESSAGES 37 MAINTENANCE AND CARE 39 LUBRICATE THE TREAD 40 TREADMILL TIGHTENING 41 TREADMILL CENTERING 42 STRETCH EXERCISE 43 APPLICATION SOFTWARE APP 44 DECLARATION OF CONFORMITY 134 ...

Страница 28: ...readmill while it is being used Wear comfortable and appropriate clothing during use Do not use the device wearing just socks or barefoot Al ways wear suitable sportswear Do not wear clothing or objects that are loose or that could get caught in the device Keep clothes or towels away from the device s running belt Always wear suitable sports shoes with high slip resistance The use of shoes with he...

Страница 29: ... tightened If the power plug is damaged it must be replaced by qualified personnel Never switch on the device when it is folded Always walk towards the console never backwards on the device The device is intended exclusively for private home use and not for commercial purposes Place and use the device on a dry level and non slip surface with sufficient clearance on all sides see Setting up the dev...

Страница 30: ...ree space at the rear of the device 2 There must be at least 1 meter of free space on both sides of the device 3 There must be at least 30cm of free space at the front of the device to allow the device to be folded up and the power cord to be routed safely Donotplacethedeviceinfrontoffumecupboardsorventilationsystems Do not use the device in a garage covered courtyard near water or outdoors While ...

Страница 31: ...s Bluetooth Maximum user weight 120 kg Package dimensions 1795 x 891 x 370 mm Console Mobile phone holder and adhesive pad Handrails Security key socket Folding buttons Quick release Set screws for treadmill alignment Oil filler opening Feet Rotary button Fuse Power cord connection Power switch Adjusting screws for treadmill tension Transport wheels Stabilizing feet Security key Power cord Hex key...

Страница 32: ...ning the screws of the feet in or out at the end of the lower support arms If neces sary use a spirit level When stepping on the tread it must not wobble or stand at an angle Check the leveling of the bumps before using the treadmill Open the packaging and remove the contents Place the treadmill on a flat surface Make sure that your assembly area is clean and that you have enough space Position th...

Страница 33: ...ackets backwards with the handles 2 Release the stanchions by stepping on the lever on the bottom left of the device 3 After the console and stanchions have been released carefully lower them so that the device folds up to evenly For transporting simply hold the treadmill in an inclined position until the wheels move smoothly 1 1 2 3 Before transport or folding the device must be disconnected from...

Страница 34: ...re you release the treadmill STORAGE Store the device in a clean and dry environment indoors Never store the device outdoors Make sure that the circuit breaker is switched off after use and the power plug is removed To release the feet hold the treadmill at the top at the end of the treadmill and press down on the release with your foot Hold the release button down while carefully lowering the tre...

Страница 35: ...n to the originally set speed Security lock Socket for security key No matter at what speed the treadmill works or which mode is active If the safety key is removed or distanced from the safety lock socket the treadmill stops immediately the motor switches off automatically The message ER1 appears on the display in the time window Display Function Speed Shows the current speed of the treadmill in ...

Страница 36: ...ows P1 P10 reciprocal mode the device is in standby mode 2 Press the fatigue button on the handrail to access the mode selection 3 Turn the rotary button to select the desired mode P time interval program C running target program 4 Press the rotary button once to set the time or to set the running goal C in the time interval P The respective indication on the display flashes P time setting 10 30 m...

Страница 37: ...eck whether the moving operating parts of the device are blocked 3 Check whether there is a lack of lubricant 4 Check the device for extreme wear 5 Check for short circuit in the motor 6 Check replace the control unit 10 Protection against power surges 1 Check the voltage of the power supply 2 Check replace the control unit 11 Excess current protection 1 Check for overload 2 Check whether the movi...

Страница 38: ...anged and are not counted further The treadmill continues to run at the set speed 16 Engine blockage Check replace the motor 17 Overheating of the power module Check replace the controller Some or all of the buttons don t work 1 Check replace the buttons 2 Check replace the console 3 Remove the console hood to test the buttons 4 Check that the buttons work after you reconnect the power cord ...

Страница 39: ...treadmill is sufficiently lubricated If the hand is dry and there are no residues of silicone oil lubrication of the treadmill is necessary 2 The moving parts should rotate freely and quietly Anomalies in moving parts affect the safety of the device Regularly check all screws on the device and secure tighten them if necessary RECOMMENDATIONS IMPORTANT To carry out the following work steps make sur...

Страница 40: ...the tip Use e g a sharp knife Open the oil filler opening for the lubricant The openings are on the front left and right sides of the main frame of the treadmill Turn on the treadmill and leave it at a slow speed running at a maximum of 1 km h Pour the lubricating oil carefully and slowly into the filler opening The lubricant is now distributed evenly Refill the lubricant continuously Oil filler o...

Страница 41: ...et screws for treadmill tension Use the supplied hex key for this To tighten the treadmill 1 Turn the left screw for treadmill tension See Figure 4 Connections and controls at the front end of the device 2 turn counter clockwise 3 Then turn the right adjusting screw for treadmill tension See Figure 4 Connections and controls at the front end of the device 4 turn counterclockwise IMPORTANT A treadm...

Страница 42: ...gure 3 Parts and Controls Wenn sich das Laufband nach rechts bewegt 1 Turn the right adjusting screw turn clockwise 2 Then turn the left adjusting screw turn counterclockwise 3 Now check whether the treadmill is properly centered If not repeat this step When the treadmill moves to the left 1 Turn the left adjusting screw turn clockwise 2 Then turn the right adjusting screw turn counterclockwise 3 ...

Страница 43: ... QUADRICEPS STRETCH With one hand against a wall for balance reach behind you and pull your right foot up Bring your heel as close to your buttocks as possible Hold for 15 counts and repeat with left foot 5 INNER THIGH STRETCH Sit with the soles of your feet together and your knees pointing outward Pull your feet as close to your groin as possible Gently push your knees toward the floor Hold for 1...

Страница 44: ... beginning of the manual will guide you to various YouTube tutorials There you can access more information about the App and the device Android iOS FitShow Check out Kinomap for 7 days now for free or choose the FREE FitShow app Notes on using the App You should only install apps from sources you trust Sportstech Brands Holding cannot accept any liability for software provided by third parties Ple...

Страница 45: ...on 17 2 ElektroG and in conjunction with Section 17 1 ElektroG We comply with this legal obligation through DR Deutsche Recy cling Service GmbH take e way GmbH You can also hand in your electrical equipment at the designated collection points of the public waste disposal au thorities By disposing of your old devices according to the legal requirements you make an important contribution in the reus...

Страница 46: ...46 ...

Страница 47: ... a ejercitarse y use el dispositivo de acuerdo a las instrucciones La seguridad y funcionamiento operativos del dispositivo solo puede garantizarse si se tienen presentes las instrucciones de seguridad en este manual de usuario Nosotros no asumimos ninguna responsabilidad por daños resultantes del uso inadecuado o incorrecto del dispositivo i Por favor asegúrese de que todas las personas que usen ...

Страница 48: ...mbién estamos en redes sociales Instagram https www instagram com sportstech de https www facebook com sportstech de Facebook Obtenga la última información sobre nuestros productos entrenamientos y mucho más aquí Montaje Utilizar Desmontaje 1 Escanear el código QR 2 Ver vídeos 3 Comienza rápido y seguro ...

Страница 49: ...NISMO DE PLEGADO TRANSPORTE 55 INSTALACIÓN ALMACENAMIENTO 56 CONSOLA 57 PROGRAMAS DE CARRERA 58 USO DE PULSÓMETRO 58 MENSAJES DE ERROR INDICACIONES DE LA PANTALLA 59 MANTENIMIENTO Y CUIDADO 61 LUBRICAR LA SUPERFICIE DE RODADURA 62 APRIETE DE LA BANDA DE RODADURA 63 CENTRADO DE LA CINTA DE CORRER 64 EJERCICIOS DE ESTIRAMIENTO 65 SOFTWARE APLICACIÓN 66 DECLARATION OF CONFORMITY 134 ...

Страница 50: ...ays o productos en aerosol cerca del aparato para evitar dañarlo Guarde el aparato en un lugar limpio y seco La cubierta del motor puede calentarse durante el uso Coloque el aparato sobre una superficie resistente al calor Mantenga el enchufe y el cable de alimentación alejados de superficies calientes Coloque el aparato en una superficie firme y recta con un radio de seguridad suficiente véase In...

Страница 51: ...ada La banda de rodadura debe estar centrada Asegúrese de que todos los tornillos visibles están apretados Si el enchufe está dañado debe ser sustituido por personal cualificado No encienda nunca el aparato cuando esté plegado Corra o camine siempre en dirección a la consola nunca de espaldas al aparato El aparato está destinado exclusivamente para uso doméstico privado y no con fines comerciales ...

Страница 52: ...ber un espacio libre de al menos 21 metro libre a ambos lados del aparato 3 Debe haber un espacio libre de al menos 30 cm en la parte delantera del aparato para poder plegarlo y pasar el cable de alimentación con seguridad No coloque el aparato delante de campanas de humos o rejillas de ventilación No coloque el aparato en un garaje patio cubierto cerca del agua o al aire libre 2 m 1 m 0 3 m 1 m M...

Страница 53: ...iones del paquete 1795 x 891 x 370 mm Consola Soporte para móvil y almohadilla adhesiva Pasamanos Cerradura para llave de seguridad Botones para plegado Desbloqueo rápido Tornillos para ajustar la cinta de correr Abertura para aceite Pie Botón gira torio Protección Entrada de alimentación Interruptor de red Tornillos para ajustar la tensión de la cinta de correr Ruedas para transporte Pies estabil...

Страница 54: ...acia fuera en el ex tremo de los brazos de soporte inferiores Si es necesario use un nivelador con agua para ayudar Al pisar la banda ésta no debe ni vibrar ni pararse en ángulo Compruebe que el suelo esté nivelado antes de utilizar la cinta de correr Abra el paquete y saque el contenido Coloque la cinta de correr sobre una superficie nivelada Asegúrese de que la superficie es lo suficientemente g...

Страница 55: ...la consola y las asas 2 Desbloquee los tubos verticales presionando la palanca situada en la parte inferior izquierda de la unidad 3 Después de que la consola y los tubos verticales se desbloqueen bájelos con cuidado para que la unidad se pliegue Para el transporte simplemente mantenga la cinta de correr en una posición inclinada hasta que las ruedas se muevan suavemente 1 1 2 3 Antes de transport...

Страница 56: ...ue el soporte esté bien encajado antes de soltar la cinta ALMACENAMIENTO Guarde el dispositivo en un lugar limpio y seco No utilice el dispositivo al aire libre Después del uso asegúrese de que el interruptor esté apagado y la alimentación desconectada Para soltar los pies de apoyo sostenga la cinta por la parte superior al final de superficie de rodadura y empuje hacia abajo el desbloqueo con el ...

Страница 57: ...elocidad original establecida Cierre de seguridad cerradura para llave de seguridad No importa a qué velocidad esté corriendo la cinta de correr o qué modo esté activo Si se quita la llave del cierre de seguridad cerradura la cinta se detendrá inmediata mente el motor se apagará automáticamente En la pantalla aparecerá ER1 en la ventana del tiempo Indicadores Funciones Velocidad Muestra la velocid...

Страница 58: ...us la unidad está en modo de espera 2 Presione el botón de fatiga en el pasamanos para entrar en la selección de modo 3 Gire el botón giratorio para seleccionar el modo deseado P Programa de intervalo de tiempo C Programa con objetivo 1 Presione el botón giratorio una vez para ajustar el tiempo en el intervalo de tiempo P o para fijar el objetivo de carrera C El indicador correspondiente de la pan...

Страница 59: ...móviles del dispositivo no estén bloqueadas 3 Compruebe que haya suficiente lubricante 4 Revise el dispositivo para ver si hay un desgaste extremo 5 Compruebe que no haya un cortocircuito en el motor 6 Compruebe sustituya la unidad de control 10 Protección contra las subidas de tensión 1 Compruebe el voltaje de la fuente de alimentación 2 Compruebe sustituya la unidad de control 11 Protección cont...

Страница 60: ... de correr seguirá funcionando a la velocidad establecida 16 Bloqueo del motor Revise reemplace el motor 17 Sobrecalentamiento del módulo de potencia Revise reemplace el controlador Alguno o todos los botones no funcionan 1 Compruebe sustituya los interruptores 2 Compruebe sustituya la consola 3 Retire la cubierta de la consola para probar los botones 4 Compruebe que los botones funcionan después ...

Страница 61: ...a la cinta está suficientemente lubricada Si la mano está seca y no muestra ningún residuo de aceite de silicona lubrique la cinta de correr 2 Las partes móviles deben girar sin suavemente y en silencio Las anomalías en las partes móviles afectan a la seguridad del dispositivo Revise todos los tornillos de la unidad con regularidad y apriételos si es necesario RECOMENDACIONES IMPORTANTE Para reali...

Страница 62: ... por ejemplo Abra la abertura del depósito de aceite para el lubricante Las aberturas están situadas en la parte delantera izquierda y derecha de la estructura principal de la cinta de correr Encienda la cinta de correr y déjala correr a baja velocidad hasta un máximo de 1 km h Con cuidado y despacio vierta el aceite lubricante en la abertura del depósito El lubricante se distribuye de manera unif...

Страница 63: ...proporciona Para apretar la cinta de correr 1 Gire el tornillo de ajuste izquierdo para la tensión de la cinta de correr Véase la imagen 4 conexiones y controles en la parte delantera de la unidad 2 Haga medio giro en sentido contrario a las agujas del reloj 3 Entonces gire el tornillo de ajuste de la derecha Véase la figura 4 conexiones y controles en la parte delantera de la unidad 4 Haga medio ...

Страница 64: ...r se mueve a la derecha 1 Haga medio giro del tornillo de ajuste derecho en el sentido de las agujas del reloj 2 Haga medio giro del tornillo de ajuste izquierdo en el sentido contrario de las agujas del reloj 3 Ahora compruebe que la cinta de correr esté bien centrada Si no es así repita este paso Cuando la cinta de correr se mueve a la izquierda 1 Haga medio giro del tornillo de ajuste izquierdo...

Страница 65: ... mueva su otra mano hacia atrás y levante su pie derecho Lleve su talón lo más cerca posible de sus glúteos Aguante durante 15 segundos y repita con el pie izquierdo 5 ESTIRAMIENTO DEL MUSLO INTERIOR Siéntese con las suelas de sus pies juntas y sus rodillas apuntando hacia afuera Empuje sus pies hacia su ingle tan cerca como sea posible Empuje sus rodillas suavemente hacia el suelo Aguante durante...

Страница 66: ... manual le llevará varios tutoriales en YouTube Allí encontrará más información sobre la aplicación y el dispositivo Android iOS FitShow Prueba ya Kinomap durante 7 días sin coste alguno o escoge la app FitShow GRATIS Consejos para el uso de las aplicaciones Instale solo aplicaciones de fuentes de confianza Sportstech Brands Holding no se hace responsab le de softwares proporcionados por terceros ...

Страница 67: ...elación con el artículo 17 apartado 1 de la ley alemana sobre aparatos eléctricos y electrónicos Cumplimos con esta obligación legal a través de la empresa DR Deutsche Recycling Service GmbH take e way GmbH También se puede entregar el aparato eléctrico viejo en los puntos de recogida designados por las autoridades locales de eliminación de residuos Contribuye de manera importante a la reutilizaci...

Страница 68: ...68 ...

Страница 69: ...de votre entraînement et utilisez l appareil conformément aux instructions La sécurité et le fonctionnement opérationnelles de l appareil ne peuvent être garanties que si les consignes de sécurité contenues dans ce manuel d utilisation sont respectées Nous n assumons aucune responsabilité pour les dommages résultant d une mauvaise utilisation ou d un fonctionnement incorrect i Veuillez vous assure...

Страница 70: ...ciaux la page Instagram https www instagram com sportstech de https www facebook com sportstech de la page Facebook Retrouve les dernières informations sur les produits le contenu des entraînements et bien plus encore sur notre Montage utilisation démontage 1 Scannez le code QR 2 Regarder les vidéos 3 Démarrez rapidement et en toute sécurité ...

Страница 71: ...DE PLIAGE TRANSPORT 77 INSTALLATION STOCKAGE 78 CONSOLE 79 PROGRAMME DE COURSE 80 UTILISATION DE LA CEINTURE CARDIOFRÉQUENCEMÈTRE 80 MESSAGES D ERREUR ÉCRAN D AFFICHAGE 81 MAINTENANCE ET ENTRETIEN 83 LUBRIFICATION DE LA SURFACE DE COURSE 84 TENSION DU TAPIS DE COURSE 85 CENTRAGE DE LA SURFACE DE COURSE 86 EXCERCICE D ÉTIREMENT 87 LOGICIEL D APPLICATION APP 88 DECLARATION OF CONFORMITY 134 ...

Страница 72: ...s de sprays ou de produits aérosols à proximité de l appareil afin d éviter de l endommager Gardez l appareil au sec et loin de toute source d humidité Le couvercle de protection du moteur peut chauffer pendant l utilisation Placez l appareil sur une surface résistant à la chaleur Gardez la fiche et le cordon d alimentation loin de surfaces chaudes Placez l appareil sur une surface dure et plane a...

Страница 73: ...ffisamment lubrifiée et tendue La bande de course doit se dérouler de façon centrée Assurez vous que toutes les vis visibles soient bien serrées Si la fiche d alimentation est endommagée elle doit être remplacée par une personne qualifiée Ne mettez jamais l appareil en marche lorsqu il est replié Courez toujours en direction de la console jamais vers l arrière de l appareil N utilisez pas l appare...

Страница 74: ...de l appareil cet espace doit être d au moins 1 mètre 3 À l avant de l appareil l espace libre doit être d au moins 30 cm afin de permettre de le replier et de faire passer le câble d alimentation en toute sécurité Ne placez pas l appareil devant des conduits ou des aérations Ne placez pas l appareil dans un garage un patio couvert près de l eau ou à l extérieur 2 m 1 m 0 3 m 1 m Ne vous tenez pas...

Страница 75: ... emballage 1795 x 891 x 370 mm Console Support pour téléphone portable et Coussinet adhésif Mains courantes Douille pour la clé de sécurité Boutons de pliage Déconnexion rapide Vis de réglage pour l inclinaison du tapis de course Orifice de remplissage d huile Pieds d appui Bouton Protection Connexion du cordon d ali mentation Interrupteur Vis de réglage de la tension du tapis de course Roues de t...

Страница 76: ...eur ou vers l extérieur les vis des pieds situées à l extrémité des bras d appui inférieurs Utilisez un niveau à bulle si nécessaire Lorsqu on marche sur la surface de course celle ci ne doit pas vaciller ou être bancale Vérifiez que le sol soit de niveau avant d utiliser le tapis de course Ouvrez l emballage et retirez le contenu Placez le tapis de course sur une surface plane Assurez vous que l ...

Страница 77: ...re la console et les poignées vers l arrière 2 Débloquez les montants en marchant sur le levier situé en bas à gauche de l appareil 3 Une fois que la console et les montants sont déverrouillés abaissez les avec précaution pour que l appareil se retrouve replié et de niveau Pour le transport il suffit de maintenir le tapis de course en position inclinée jusqu à ce que les roues se déplacent en douc...

Страница 78: ...enclenchées avant de lâcher le tapis de course STOCKAGE Entreposez l appareil dans un environnement propre et sec à l intérieur Ne stockez jamais l appareil à l extérieur Assurez vous après utilisation que l interrupteur soit sur éteint et que le cordon d alimentation soit retiré de la prise Pour débloquer les pieds d appui tenez fermement le tapis de course en haut à son extrémité Appuyez sur le ...

Страница 79: ...ur le bouton pour revenir à la vitesse réglée initialement Dispositif de verrouil lage douille pour clé de sécurité Peu importe la vitesse à laquelle le tapis de course est utilisé ou le mode qui est actif Si la clé de sécurité est retirée du dispositif de verrouillage douille le tapis de course s arrête immédiatement le moteur s éteint automatiquement Le message ER1 s affiche sur l écran dans la ...

Страница 80: ...l écran affiche P1 P10 mode réciproque l appareil est en mode veille 2 Appuyez sur le bouton fatigue situé sur la main courante pour accéder à la sélection du mode 3 Tournez le bouton pour sélectionner le mode souhaité P Programme par intervalles C Programme par objectif de course 4 Appuyez une fois sur le bouton pour régler l heure dans le programme par intervalles P ou pour régler l objectif de ...

Страница 81: ...i les éléments mobiles de l appareil sont bien bloqués 3 Vérifiez qu il n y ait pas un manque de lubrifiant 4 Vérifiez si l usure de l appareil n est pas extrême 5 Vérifiez s il y a eu un court circuit dans le moteur 6 Contrôlez Remplacez l unité de commande 10 Protection contre les surtensions 1 Vérifiez la tension de l alimentation électrique 2 Contrôlez Remplacez l unité de commande 11 Protecti...

Страница 82: ...rises en compte Le tapis de course continuera de fonctionner à la vitesse définie 16 Arrêt du moteur Vérifiez Remplacez le moteur 17 Surchauffe du module de puissance Vérifiez Remplacer le contrôleur Certains ou tous les boutons ne fonctionnent pas 1 Vérifiez Remplacez les boutons 2 Vérifiez Remplacez la console 3 Retirez le couvercle de la console pour tester les boutons 4 Vérifiez si les boutons...

Страница 83: ...ain est sèche et ne présente aucun résidu d huile de silicone la lubrification du tapis de course est nécessaire 2 Les pièces mobiles doivent tourner librement et silencieusement Les anomalies touchant les pièces mobiles compromettent la sécurité de l appareil Contrôlez régulièrement toutes les vis de l appareil et le cas échéant fixez resserrez les RECOMMANDATIONS IMPORTANT Pour effectuer les opé...

Страница 84: ...ple un couteau bien aiguisé Ouvrez l orifice de remplissage d huile pour le lubrifiant Les ouvertures sont situées sur les côtés avant gauche et avant droit du cadre principal du tapis de course Allumez le tapis de course et laissez le fonctionner à une faible vitesse d un maximum de 1 km h Versez lentement et avec précaution l huile lubrifiante dans l orifice de remplissage Le lubrifiant se répar...

Страница 85: ...e tapis de course 1 Tournez la vis de réglage gauche prévue pour régler la tension du tapis de course Voir la figure 4 raccordement et éléments de commande à l extrémité avant de l appareil 2 Un tour dans le sens inverse des aiguilles d une montre 3 Ensuite tournez la vis de réglage droite prévue pour régler la tension du tapis de course Voir la figure 4 raccordement et éléments de commande à l ex...

Страница 86: ...la droite 1 Tourner la vis de réglage de droite Un tour dans le sens des aiguilles d une montre 2 Puis tournez la vis de réglage de gauche Un tour dans le sens inverse des aiguilles d une montre 3 Vérifiez maintenant que la surface de course soit bien centrée Si ce n est pas le cas répétez cette étape Si la surface de course se déplace vers la gauche 1 Tourner la vis de réglage de gauche Un tour d...

Страница 87: ...ne seule main contre un mur pour l équilibre essayez d atteindre votre derrière et etendez votre pied droit Apportez votre talon aussi près que possible de vos fesses Comptez 15 fois et répétez avec le pied gauche 5 ETIREMENT DE LA CUISSE Asseyez vous avec les plantes de vos pieds ensemble et vos genoux pointant vers l extérieur Tirez vos pieds aussi près de votre aine que possible Poussez douceme...

Страница 88: ...ra d accéder à plusieurs tutoriels YouTube Vous y obteniez davantage d informations sur l application et sur l appareil Android iOS FitShow Essayez Kinomap dès maintenant et sans frais pendant 7 jours ou choisissez l application GRATUITE FitShow Informations sur l utilisation de l application Vous ne devriez installer que des applications pour lesquelles vous êtes sûr des sources Sportstech Brands...

Страница 89: ...s et électroniques usagés Nous remplissons cette obligation légale par l intermédiaire de DR Deutsche Recycling Service GmbH take e way GmbH En outre vous pouvez déposer vos anciens équipements électriques et électro niques dans les points de collecte des services publics d élimination des déchets Vous apportez une contribution importante à la réutilisation au recyclage et aux autres formes de val...

Страница 90: ...90 ...

Страница 91: ...amento e di utilizzare il dispositivo seguendo le istruzioni La sicurezza e la funzio nalità del dispositivo possono essere garantite solo se vengono rispettate le istruzioni di sicurezza contenute nel presente manuale d uso Non ci assumiamo alcuna responsabilità per i danni derivanti da un uso improprio o da un uso errato del dispositivo i Assicurarsi che tutte le persone che utilizzano il dispos...

Страница 92: ...l pagina Instagram https www instagram com sportstech de https www facebook com sportstech de pagina Facebook Scopri le ultime novità sui prodotti contenuti per l allenamento e molto altro ancora sul nostro Montaggio Utilizzo Smontaggio 1 Scannerizza il QR Code 2 Guarda il video 3 Inizia ad allenarti veloce e sicuro ...

Страница 93: ...ANISMO DI CHIUSURA A RIBALTINA TRASPORTO 99 INSTALLAZIONE STOCCAGGIO 100 CONSOLE 101 PROGRAMMI DI CORSA 102 UTILIZZO DEL CINTURINO CARDIOFREQUENZIMETRO 102 ERRORE ICONE SUL DISPLAY 103 MANUTENZIONE E CURA 105 LUBRIFICAZIONE DELLA SUPERFICIE DA CORSA 106 REGOLAZIONE TENUTA 107 CENTRAGGIO DEL TAPIS ROULANT 108 ESERCIZI DI STRETCHING 109 SOFTWARE DI UTILIZZO APP 110 DECLARATION OF CONFORMITY 134 ...

Страница 94: ...o Tenere il dispositivo asciutto e lontano dall umidità Il coperchio del motore può riscaldarsi durante l uso Posizionare l apparecchio su una superficie resistente al calore Tenere la spina di alimentazione e il cavo di alimentazione lontano da superfici calde Posizionare l apparecchio su una superficie solida e piana con un raggio di sicurezza sufficiente vedere Impost azione dell apparecchio As...

Страница 95: ... centrata Assicuratevi che tutte le viti visibili siano serrate Se la spina di alimentazione è danneggiata deve essere sostituita da personale qualificato Non accendere mai il dispositivo quando è piegato Camminare sempre verso la console mai all indietro sull unità Il dispositivo è inteso solo per uso domestico privato e non per scopi commerciali Posizionare e utilizzare l apparecchio su una supe...

Страница 96: ...di spazio libero su entrambi i lati dell unità 3 Ci deve essere uno spazio libero di almeno 30 cm nella parte anteriore dell unità per permettere di piegare l unità e far passare il cavo di alimentazione in modo sicuro Non posizionare l unità davanti a cappe o bocchette di ventilazione Non mettere l unità in un garage in un patio coperto vicino all acqua o all aperto 2 m 1 m 0 3 m 1 m Durante la p...

Страница 97: ...ni del pacchetto 1795 x 891 x 370 mm consolle Porta cellulare e Adesivo corrimano Presa per chiave di sicu rezza Pulsanti per piegare sgancio rapido Set viti per l allineamen to del tapis roulant Apertura di riempimento dell olio Piedini di appoggio Manopola Sicurezza Collegamento del cavo di alimentazione Interruttore viti di fermo per avvitare il tapis roulant Rulli di trasporto Piedini di stabi...

Страница 98: ... corsa in senso orizzontale ruotando verso l interno e l esterno le viti dei piedini poste all estre mità dei bracci di supporto inferiori Se necessario utilizzare una livella a bolla d aria La superficie di corsa non deve oscillare o rimanere inclinata Controllare che la superficie d appoggio del tapis roulant sia piana Aprire la confezione e rimuovere il contenuto Posizionare il tapis roulant su...

Страница 99: ...e alle maniglie 2 Rilasciare i tubi portanti facendo pressione sulla leva in basso a sinistra del dispositivo 3 Dopo aver allentato la console e i tubi portanti muoverli attentamente verso il basso in modo tale che il dispositi vo possa piegarsi fino ad un certo livello Per il trasporto tenere semplicemente il tapis roulant in posizione inclinata fino a quando le ruote si muovono senza intoppi 1 1...

Страница 100: ...suppor to sia perfettamente incastrato prima di lasciar andare il tapis roulant STOCCAGGIO Conservare il dispositivo in un ambiente pulito e asciutto al chiuso Non riporre mai il dispositivo all aperto Assicurarsi che l interruttore sia spento e che La spina di alimentazione sia stata rimossa Per rilasciare i piedi di supporto tenere il tapis roulant in alto e premere verso il basso il pulsante di...

Страница 101: ...mpostata originariamente Bloccaggio di sicurezza boccola per chiave di sicurezza Indipendentemente dalla velocità di funzionamento del tapis roulant o dalla modalità attiva se la chiave di sicurezza viene rimossa dal blocco di sicurezza boccola il tapis roulant si arresta immediatamente il motore si spegne automaticamente e apparirà il messaggio ER1 appare sul display nella finestra temporale Icon...

Страница 102: ...ay mostra P1 P10 modalità reciproca il dispositivo è in modalità standby 2 Premere il pulsante di affaticamento sul corrimano per accedere alla selezione della moda lità 3 Ruotare la manopola per selezionare la modalità desiderata P programma intervallo di tempo C programma di destinazione in esecuzione 1 Premere la manopola per una volta per impostare l ora o per impostare l obiettivo di corsa C ...

Страница 103: ...i mobili in movimento del dispo sitivo sono bloccate 3 Controllare se c è mancanza di lubrificante 4 Controllare il dispositivo per verificare se si sta usurando 5 Verificare la presenza di cortocircuiti nel motore 6 Controllare sostituire la centralina 10 Protezione contro le sovratensioni 1 Controllare la tensione dell alimentazione 2 Controllare sostituire la centralina 11 Protezione da sovraco...

Страница 104: ...t continua a funzionare alla velocità impostata 16 blocco motore Controllare sostituire il motore 17 Surriscaldamento del modulo di potenza Controllare sostituire il controller Alcuni o tutti i pulsanti non funzionano 1 Controllare sostituire i pulsanti 2 Controllare sostituire la console 3 Rimuovere il cofano della console per verificare il corretto funzionamento dei pulsanti 4 Verificare che i p...

Страница 105: ...ficato Se la mano è asciutta e non ci sono residui di olio di silicone è necessario lubrificarlo 2 Le parti mobili devono ruotare liberamente e silenziosamente Anomalie nelle parti mobili mettono a repentaglio la sicurezza del dispositivo Controllare regolarmente tutte le viti sul dispositivo e serrarle stringerle se necessario RACCOMANDAZIONI IMPORTANTE Per eseguire le seguenti fasi di lavoro ass...

Страница 106: ...Utilizzare ad es un coltello affilato Aprire l apertura di riempimento dell olio Le aperture si trovano sui lati anteriore sinistro e destro del telaio principale del tapis roulant Accendi il tapis roulant e lascialo a bassa velocità per max 1 km h Versare l olio lubrificante con attenzione e lentamente nell apertura di riempimento Il lubrificante è ora distribui to uniformemente Riempire continua...

Страница 107: ...golare la tenuta del tapis roulant Utilizzare la chiave esagonale in dotazione Per stringere il tapis roulant 1 Ruotare la vite sinistra per regolare la tenuta Vedi Figura 4 Collegamenti e controlli nella parte frontale del dispositivo 2 giro in senso antiorario 3 Quindi girare la vite di regolazione destra per regolare la tenuta Vedi Figura 4 Collegamenti e controlli nella parte frontale del disp...

Страница 108: ...ta verso destra 1 Girare la vite di regolazione destra giro in senso orario 2 Quindi girare la vite di regolazione sinistra giro in senso antiorario 3 Ora controlla se il tapis roulant è correttamente centrato In caso contrario ripetere questo passaggio Se il tapis roulant si sposta a sinistra 1 Girare la vite di regolazione sinistra giro in senso orario 2 Quindi girare la vite di regolazione dest...

Страница 109: ...sollevare il piede destro verso l alto Portare il tallone più vicino alle natiche possibile Trattenere per 15 conteggi e ripetere con il piede sinistro 5 STRETCHING INTERNO COSCIA Sedersi con le suole dei piedi unite e le ginocchia che puntano verso l esterno Avvicinare i piedi all inguine il più possibile Spingere delicatamente le ginocchia verso il pavimento Trattenere per 15 conteggi 6 TOCCARE ...

Страница 110: ...ll inizio del manuale ti guiderà a vari tutorial di YouTube Lì otterrai maggiori informa zioni sull app e sul dispositivo Android iOS FitShow Provate l app kinomap gratuitamente per 7 giorni oppure scegliete l app GRATUITA FitShow Note sull uso dell app Si dovrebbero installare solo le applicazioni da una fonte affidabile Sportstech Brands Holding non si assume alcuna responsabilità per software f...

Страница 111: ...Rispettiamo questo obbligo legale tramite la DR Deutsche Recycling Service GmbH take e way GmbH Inoltre è possibile consegnare i vecchi apparecchi elettrici ed elettronici presso i punti di raccolta delle autorità pubbliche di smaltimento dei rifiuti Darete un importante contributo al riutilizzo al riciclaggio ed ad altri tipi di recupero di vecchie apparecchiature inviando le vostre vecchie appar...

Страница 112: ...112 ...

Страница 113: ...het apparaat kunnen profiteren en er vele jaren geniet van hebben De bedrijfsveiligheid en de werking van het apparaat kunnen alleen worden gegarandeerd als de veiligheidsinstructies in deze gebruiksaanwijzing in acht worden genomen We aanvaarden geen aansprakelijkheid voor schade veroorzaakt door oneigenlijk gebruik of verkeerde bediening i Zorg ervoor dat alle personen die het apparaat gebruiken...

Страница 114: ...ook actief op social media Instagram pagina https www instagram com sportstech de https www facebook com sportstech de Facebook pagina Raadpleeg voor de meest recente productinformatie trainingen en nog veel meer onze Montage Gebruik Demontage 1 Scan de QR code 2 Bekijk video s 3 Begin snel en veilig ...

Страница 115: ... INSTRUCTIES 120 OPKLAPMECHANISME TRANSPORT 121 OPSTELLEN OPSLAG 122 CONSOLE 123 LOOPPROGRAMMA S 124 GEBRUIK VAN DE HARTSLAGMETER 124 FOUTMELDINGEN DISPLAYWEERGAVE 125 ONDERHOUD EN ZORG 127 SMEREN VAN HET LOOPVLAK 128 LOOPBAND AANSPANNEN 129 DE LOOPBAND CENTREREN 130 STRETCHOEFENINGEN 131 APPLICATIESOFTWARE APP 132 DECLARATION OF CONFORMITY 134 ...

Страница 116: ...d het apparaat droog en uit de buurt van water en vocht De motorkap kan tijdens gebruik warm worden Plaats het apparaat op een hittebestendige ondergrond Houd de stekker en het netsnoer uit de buurt van hete oppervlakken Plaats het apparaat op een stevige en vlakke ondergrond met een voldoende grote veiligheidsstraal zie Opstelling van het apparaat Zorg ervoor dat er tijdens het gebruik geen voorw...

Страница 117: ...ijn vastgedraaid Als de stekker is beschadigd moet deze worden vervangen door gekwalificeerd personeel Schakel het apparaat nooit in wanneer het is opgeklapt Loop altijd in de richting van de console nooit achteruit op het apparaat Het apparaat is uitsluitend voor thuisgebruik en is niet voor commerciële doeleinden bestemd Plaats en gebruik het apparaat op een droge vlakke en slipvrije ondergrond ...

Страница 118: ...zijn aan weerszijden van het apparaat 3 Er moet aan de voorkant van het apparaat minstens 30 cm ruimte zijn om het apparaat te kunnen opklappen en het netsnoer veilig te kunnen geleiden Plaats het apparaat niet voor afzuigkappen of ventilatieopeningen Zet het apparaat niet in een garage op een overdekt terras in de buurt van water of buiten OPSTELLING VAN HET APPARAAT 2 m 1 m 0 3 m 1 m Ga tijdens ...

Страница 119: ... gebruikersgewicht 120 kg Pakketafmetingen 1795 x 891 x 370 mm Console Mobiele telefoonhouder en Hechtend pad Leuningen Bus voor veiligheidssleutel Knoppen voor opklappen Snelontgrendeling Verstelschroeven voor de uitlijning van de loopband Olievulopening Standvoeten Draaiknop Zekering Aansluiting van het netsnoer Stroomscha kelaar Verstelschroeven voor de loopbandspan ning Transportwielen Stabili...

Страница 120: ...n de onderste steunarmen de schroeven van de voeten naar binnen of naar buiten te draaien Neem indien nodig een waterpas als hulpmateriaal Bij het betreden van het loopvlak mag het niet wiebelen of schuin staan Controleer of de vloer effen is voordat je de loopband gebruikt Open de verpakking en haal er het apparaat uit Plaats de loopband op een vlakke ondergrond Zorg ervoor dat de plaats van opst...

Страница 121: ...aar achteren te klappen 2 Maak de standbuizen los door op de hendel te drukken die zich linksonder het apparaat bevindt 3 Nadat de console en de standbuizen zijn losgemaakt laat je deze voorzichtig naar beneden zodat het apparaat tot één vlak wordt opgeklapt Hou voor het transport de loopband gewoon in een hellende positie totdat de wielen soepel bewegen 1 1 2 3 Voordat je het apparaat transportee...

Страница 122: ... ervoor dat de steun is vastgeklikt voordat je de loopband loslaat OPSLAG Bewaar het apparaat op een schone en droge plaats in huis Bewaar het apparaat niet buitenshuis Zorg ervoor dat de stroomschakelaar na gebruik is uitgeschakeld en dat de stekker is uitgetrokken Om de standvoeten los te maken houd je de loopband boven aan het uiteinde van de loopband vast en druk je met je voet de ontgrendelin...

Страница 123: ...jk ingestelde snelheid Beveiliging Bus voor veiligheidssleutel Ongeacht de snelheid van de loopband of welke modus actief is Als de veiligheidss leutel uit de veiligheidsvergrendeling bus wordt getrokken en verwijderd stopt de loopband onmiddellijk de motor schakelt automatisch uit Op het display dat de tijd weergeeft verschijnt het bericht ER1 Display Functie Snelheid Toont de huidige snelheid va...

Страница 124: ... P1 P10 inverse modus wordt weergegeven bevindt het apparaat zich in de stand by modus 2 Druk op de vermoeidheidsknop op de leuning om naar de modusselectie te gaan 3 Draai aan de draaiknop om de gewenste modus te selecteren P programma tijdsintervallen C programma loopdoel 1 Druk eenmaal op de draaiknop om de tijd van het tijdsinterval P of om het loopdoel C in te stellen De betreffende indicator...

Страница 125: ...troom 2 Controleer of de bewegende delen van het apparaat zijn geblokkeerd 3 Controleer of er genoeg smeermiddel is 4 Controleer het apparaat op extreme slijtage 5 Controleer op kortsluiting in de motor 6 Controleer vervang de besturingseenheid 10 Bescherming tegen overspanningen 1 Controleer de spanning van de voeding 2 Controleer vervang de besturingseenheid 11 Overstroombeveiliging 1 Controleer...

Страница 126: ...verder geteld De loopband blijft met de ingestelde snelheid lopen 16 Motor geblokkeerd Controleer vervang de motor 17 Oververhitting van de vermogens module Controleer vervang de controller Sommige of alle knoppen werken niet 1 Controleer vervang de schakelknoppen 2 Controleer vervang de console 3 Verwijder de consolekap om de knoppen te testen 4 Controleer of de knoppen werken nadat je het netsno...

Страница 127: ...voldoende gesmeerd Als de hand droog is en er geen resten van siliconenolie zijn de loopband moet worden gesmeerd 2 De bewegende delen moeten vrij en geruisloos draaien Afwijkingen in bewegende delen beïnvloeden de veiligheid van het apparaat Controleer regelmatig alle schroeven van het apparaat en haal deze indien nodig aan AANBEVELINGEN BELANGRIJK Om de volgende handelingen uit te voeren moet je...

Страница 128: ... de punt af Gebruik hiervoor bijvoorbeeld een scherp mes Open de olievulopening voor het smeermiddel De openingen bevinden zich aan de linker en rechtervoorzijde van het hoofdframe van de loopband Zet de loopband aan met een lage snelheid van maximaal 1 km u Giet de smeerolie voorzichtig en langzaam in de vulopening Het smeermiddel wordt nu gelijkmatig verdeeld Vul het smeermiddel regelmatig bij O...

Страница 129: ...oor de meegeleverde inbussleutel Om de loopband meer aan te spannen 1 Draai de linker verstelschroef voor de spanning van de loopband zie afbeelding 4 aansluitingen en bedieningselementen aan het voorste uiteinde van het apparaat 2 slag linksom 3 Draai vervolgens de rechter verstelschroef voor de spanning van de loopband zie afbeelding 4 aansluitingen en bedieningselementen aan het voorste uiteind...

Страница 130: ...ie afbeelding 3 onderdelen en bedieningselementen Als de loopband naar rechts beweegt 1 Draai de rechter verstelschroef slag rechtsom 2 Draai vervolgens de linker verstelschroef slag linksom 3 Controleer nu of de loopband goed gecentreerd is Herhaal deze stap als dit niet het geval is Als de loopband naar links beweegt 1 Draai de linker verstelschroef slag rechtsom 2 Draai vervolgens de rechter ve...

Страница 131: ...ar achteren en trek je rechtervoet omhoog Breng de hiel zo dicht mogelijk bij de billen Houd deze positie 15 seconden vast en herhaal deze handeling met je linkervoet 5 STRETCHING BINNENKANT DIJEN Ga zitten met de voetzolen tegen elkaar en je knieën naar buiten gericht Trek je voeten zo dicht mogelijk naar je buik toe Druk je knieën zachtjes op de grond Houd 15 seconden vast 6 TENEN AANRAKEN Buig ...

Страница 132: ...ding leidt je naar verschillende YouTube tutorials Daar krijg je meer informatie over de app en het apparaat Android iOS FitShow Probeer Kinomap nu 7 dagen gratis of kies voor de GRATIS FitShow app Opmerkingen over het gebruik van de app Installeer alleen apps waarvan je de bronnen vertrouwt Sportstech Brands Holding kan geen aan sprakelijkheid aanvaarden voor software die door derden wordt geleve...

Страница 133: ...apparatuur kosteloos terug te nemen Deze wettelijke verplichting komen we na via de DR Deutsche Recycling Service GmbH take e way GmbH Daarnaast kun je afgedankte elektrische apparatuur afleveren aan de inzamelingspunten van de publieke afvalverwer kingsinstanties Zij leveren een belangrijke bijdrage aan het hergebruik de recycling en de andere nuttige toepassing van afgedankte apparatuur door jou...

Страница 134: ...ichtlinie 2011 65 EU RoHS Richtlinie Richtlinie 2009 125 EC Ökodesign Richtlinie in Verbindung mit EG 1275 2008 sowie dass die Bestimmungen der angewandten harmonisierten Normen und anderen technischen Spezifikationen erfüllt Harmonisierte Normen nach der Richtlinie 2006 42 EG Maschinen Richtlinie o EN 957 6 2010 A1 2014 o EN 12100 2010 Harmonisierte Normen nach der Richtlinie 2014 53 EU Funkanlag...

Страница 135: ...135 ...
Страница 136: ...136 Verkauf durch Distributed by Distribuido por Distribué Distribuito da Verkoop via Sportstech Brands Holding GmbH Potsdamer Platz 11 10785 Berlin 49 30 220 663 520 www sportstech de ...

Отзывы: