SPL Skytech TK109 Скачать руководство пользователя страница 16

post flight habit to acoid unforeseeable problems. 
Warning: If left connected in the flight vehicle for 
long duration, the battery may be damaged due 
to over-discharge, or even become fire hazards 

4D 

Turn off the transmitter. If transmitter is not to be 
used for a long duration, please remove the 
battery for storage. Warning: If the AA batteries 
are left in the transmitter, potential leakage could 
occur which may damage the transmitter, and 
create fire hazards 

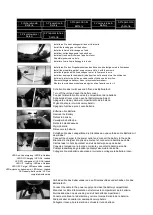
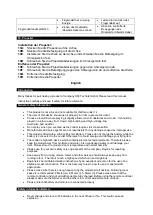
6.1A:   Turn on the quadrocopter. 

6.1B:   Turn on the remote control. The LED on Quadcopter lit as soon as the remote control is 

connected. 

6.1C:   Place the copter on a flat surface and press both levers in the lower right position for 2-3 

seconds. The LED on the quadcopter will begin flashing rapidly. After 2-3 seconds the LED 

change to normal light, press the left lever once up and back down. The transmitter ring once 

it means the quadcopter restarted/reset succesfully. 

6.2A:  Photo: When the camera is turned on, press the Camera / Video button upwards. 

The remote will beep once and a red LED blinks on the camera to indicate that a photo was 

taken. 

Video: When the camera is turned on, press the Camera / Video button down. 

The remote control will beep twice and the red LED on the camera flashes permanently to 

indicate that a video is recorded. Press the button again to stop recording video, the LED 

stops flashing and the green LED will stay constant. 

Note: Use the altitude hold mode during the photo or video recording to capture better 

pictures and more stable videos. 

6.3A:   Push the button to keep the altitude, the quadrocopter will remain at its current 

altitude. Press the button again to exit the mode. 

6.3B:   If you wish to adjust the altitude of the quadcopter after enabling the altitude-hold mode, 

move the throttle lever forwards or backwards to make trim adjustments. 

6.4A:   Press the Headless mode key to activate the headless mode. The remote will beep once and 

the LED on Copter begin flashing. To exit the headless mode, press this button again. The 

remote will beep once and the LED wil stop flashing and stay constant. 

6.4B:   When headless mode is activated the copter flies in the direction in which you push the lever, 

nomatter how it is oriented. This makes it easy to bring the copter home when it is far away 

from you. After the copter has landed and the throttle has been at zero for 5 seconds, the 

quadcopter will enter standby mode and the LED stops flashing and stay constant. 
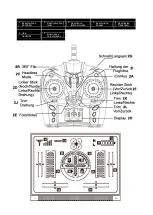
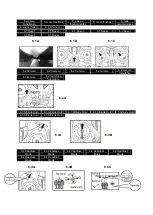
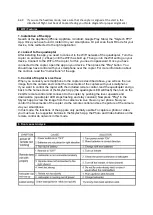
5. Fly Operation

5A 

Throttle up: Climb 

5A 

Throttle down: Decend 

5B 

Rudder left: Nose Yaws left 

5B 

Rudder right: Nose Yaws right 

5C 

Elevator up: Forward 

5C 

Elevator down: Backward 

5D 

Aileron left: left 

5D 

Aileron right: right 

5E 

forward / backward adjustment 

5F 

Left / Right yaw adjustment 

5G 

Left / Right Rotation Adjustment 

5H 

3D Flip & Roll 

6. more functions

Содержание Skytech TK109

Страница 1: ...Skytech TK109 Bedienungsanleitung Instruction Manual...

Страница 2: ...eveelh eid cantidad ilo quantit 1 Skytech TK109 1 2 Fernsteuerung Remote control T l commande Afstandsbediening Control remoto zdalne sterowanie telecomando 1 3 Rotorbl tter Blades H lice Propeller H...

Страница 3: ...g Operating instructions Mode d emploi Gebruiksaanwijzing Manual de usuario instrukcja obs ugi Istruzioni per l uso 1 9 Telefonhalterung phone holder support de t l phone telefoonhouder soporte para t...

Страница 4: ...Beschreibung Controller DescriptionCont roller Description t l commande Beschrijving Zender Descripci n Transmisor Opis nadajnik Descrizione Telecomando 2 2 2 2 2 2 2...

Страница 5: ...rie Schakel de stroom uit en open het batterijcompartiment Apague la unidad y abra el compartimiento de la bater a Wy cz zasilanie i otw rz komor baterii Spegnere l unit e aprire il vano batterie Schl...

Страница 6: ...Sie Batterie nach dem Flug Remove the Battery after flight Retirez la batterie apr sle vol Verwijder de batterijna de vlucht Retire la bater adespu s del vuelo Wyjmij bateri po locie Rimuovere la batt...

Страница 7: ...5 Steuerung 5 Control 5 Contr le 5 Controle 5 Control 5 kontrola 5 Controllo 5A 5B 5C 5D 5E 5F 5G 5H...

Страница 8: ...t 6 2 Kamera 6 2 Camera 6 2 Cam ra 6 2 camera 6 2 c mara fotogr fica 6 2 kamera 6 2 macchina fotografica 6 4 Headless Mode 6 4 Headless Mode 6 4 Headless Mode 6 4 Headless Mode 6 4 Headless Mode 6 4 H...

Страница 9: ...tzteile 9 Spare Parts 9 Pi ces de re hange 9 Wisselstukken 9 Piezas de repuesto 9 cz ci zamienne 9 i pezzi di ricambio 10 Propeller 10 Propeller 10 Propeller 10 Propeller 10 Propeller 10 Propeller 10...

Страница 10: ...it einer sehr hohen Geschwindigkeit diese k nnen Ihnen oder Ihrer Umgebung erheblichen Schaden zuf gen Seien Sie sehr vorsichtig mit dem Umgang der sich drehende Rotorblatter halten Sie diese unbeding...

Страница 11: ...Copter fangen an zu blinken Dr cken Sie bitte erneut diese Taste um den Headless mode zu verlassen 4A Das Flugger t sollte sich auf eine ebene Fl che befinden Die Li Po Batterie wird wie abgebildet i...

Страница 12: ...der Flugh he bleibt der Quadcopter auf der selben Flugh he stehen Dr cken Sie den Knopf erneut um den Modus zu verlassen 6 3B M chten Sie die H he des Copters einstellen wenn der Altitude Hold Modus a...

Страница 13: ...p LED am Copter blinken dann schalten Sie die 2 4GHz Fernbedienung ein und verbinden Sie mit dem Copter indem Sie den linken Hebel einmal nach oben und nach unten dr cken LED am Copter leuchtet dauerh...

Страница 14: ...attery is connected to the model Otherwise fire could emerge and damage your flying item The model is high tech device which contains precise technical elements Therefore please keep the model away fr...

Страница 15: ...you can also see on the display position 13 CF Mode Make sure that the copter is in front of you and facing forward Bind now the device Press the Headless mode in order to get there You will hear a s...

Страница 16: ...Press the button again to stop recording video the LED stops flashing and the green LED will stay constant Note Use the altitude hold mode during the photo or video recording to capture better pictur...

Страница 17: ...e information about the controls read the Instructions of the app 3 Control of Copter Live View When you connect your smartphone to the copter as described above you will see the live image from the c...

Страница 18: ...en oder im Handel unentgeltlich zur ckgeben Sie k nnen die Batterien auch per Post an den Verk ufer zur cksenden Der Verk ufer erstattet Ihnen auf jeden Fall das Briefporto f r den R ckversand Ihrer A...

Страница 19: ...Fernmeldebestimmung Bitte beachten Sie das g ltige Recht in Ihrem Land f r die Verwendung einer Fernsteueranlage DE AT BE CH CZ DK FI GB HU IE IS IT LI LU NL NO PL PT RO SE SI TR EE SK LV LT GR BG...

Отзывы: