background image

Assembly Instructions 

Assembly Stage 2 

 
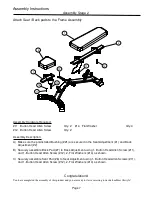
Attach Seat / Back pads to the Frame Assembly 


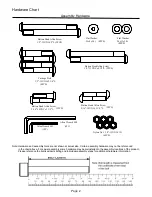
Assembly Hardware Required: 
#11  Button Head Allen Screw 

Qty. 2  #14  Flat Washer   

Qty. 4 

#12  Button Head Allen Screw 

Qty. 2 


Assembly Description: 


A)  Make sure the preinstalled Bushing (#21) are secured in the Seat Adjustment (#1) and Back 

Adjustment (#2). 


B)  Securely assemble Back Pad (#7) to Back Adjustment using 1- Button Head Allen Screw (#11), 

and 1- Button Head Allen Screw (#12), 2- Flat Washers (#14) as shown. 


C)  Securely assemble Seat Pad (#6) to Seat Adjustment using 1- Button Head Allen Screws (#11), 

and 1- Button Head Allen Screw (#12), 2- Flat Washers (#14) as shown. 


Congratulations! 

You have completed the assembly of this product and you are ready to start exercising toward a healthier lifestyle!   


Page 7 


1

2

7

11

12

14

11

12

10

6

Содержание LS 514N

Страница 1: ...tions and safety precautions before using this product Reference all safety guidelines and warning labels Retain product literature for future reference Safety Properly warm up and stretch before exer...

Страница 2: ...nded for internal home use only Do not use in a non residential environment Use in non recommended environments can lead to serious injury and will void all related warranties liabilities 8 Recommende...

Страница 3: ...uct Please reference the itemized parts listing and individual assembly steps for additional hardware information Button Head Allen Screw 1 2 13UNC 5 L 2PCS Flat Washer 25 8 2 0t 4PCS Carriage Bolt 1...

Страница 4: ...2 0t 12 14 Flat Washer 25 x 8 x 2 0t 4 15 Nylock Nut 1 2 x 12t 8 16 A06 0195 Transport Wheel 2 17 A06 0178 Rectangular End Cap 2 18 P06 0014 Bumper 1 19 P06 0064 Adjustable Bumper 1 20 P06 2374 Foot...

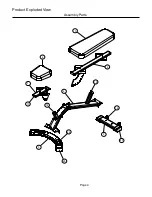
Страница 5: ...Product Exploded View Assembly Parts 1 2 3 4 5 6 7 16 17 18 19 20 20 26 Page 4...

Страница 6: ...embly step Assemble the equipment in a clean 4ft x 6ft flat area The same amount of space should be considered for assembled equipment usage Do not dispose of any packaging materials until assembly of...

Страница 7: ...2 15 Nylon Nut Qty 6 Assembly Description A Attach the Main Frame 4 to the Rear Stabilizer 3 and Front Stabilizer 5 using 4 Carriage Bolts 8 4 Flat Washers 13 and 4 Nylon Nuts 15 as shown B Securely a...

Страница 8: ...stment 1 and Back Adjustment 2 B Securely assemble Back Pad 7 to Back Adjustment using 1 Button Head Allen Screw 11 and 1 Button Head Allen Screw 12 2 Flat Washers 14 as shown C Securely assemble Seat...

Страница 9: ...d location It is recommended that more than one person assist in the movement of heavy strength equipment Training Tips How you start an exercise program depends on your physical condition If you have...

Страница 10: ...LS 514N...

Отзывы: