background image

2.4 Installation Guideline 

The device is in the storage state when it leaves the factory. Please follow the steps below 
to prepare for installation: 

1. Take the device and its accessories out of the box or plastic bag;                                           

2. Tear off the protective film from the radar/laser receiver;                                         

.


3. Remove the wire tie that binds the wire. 

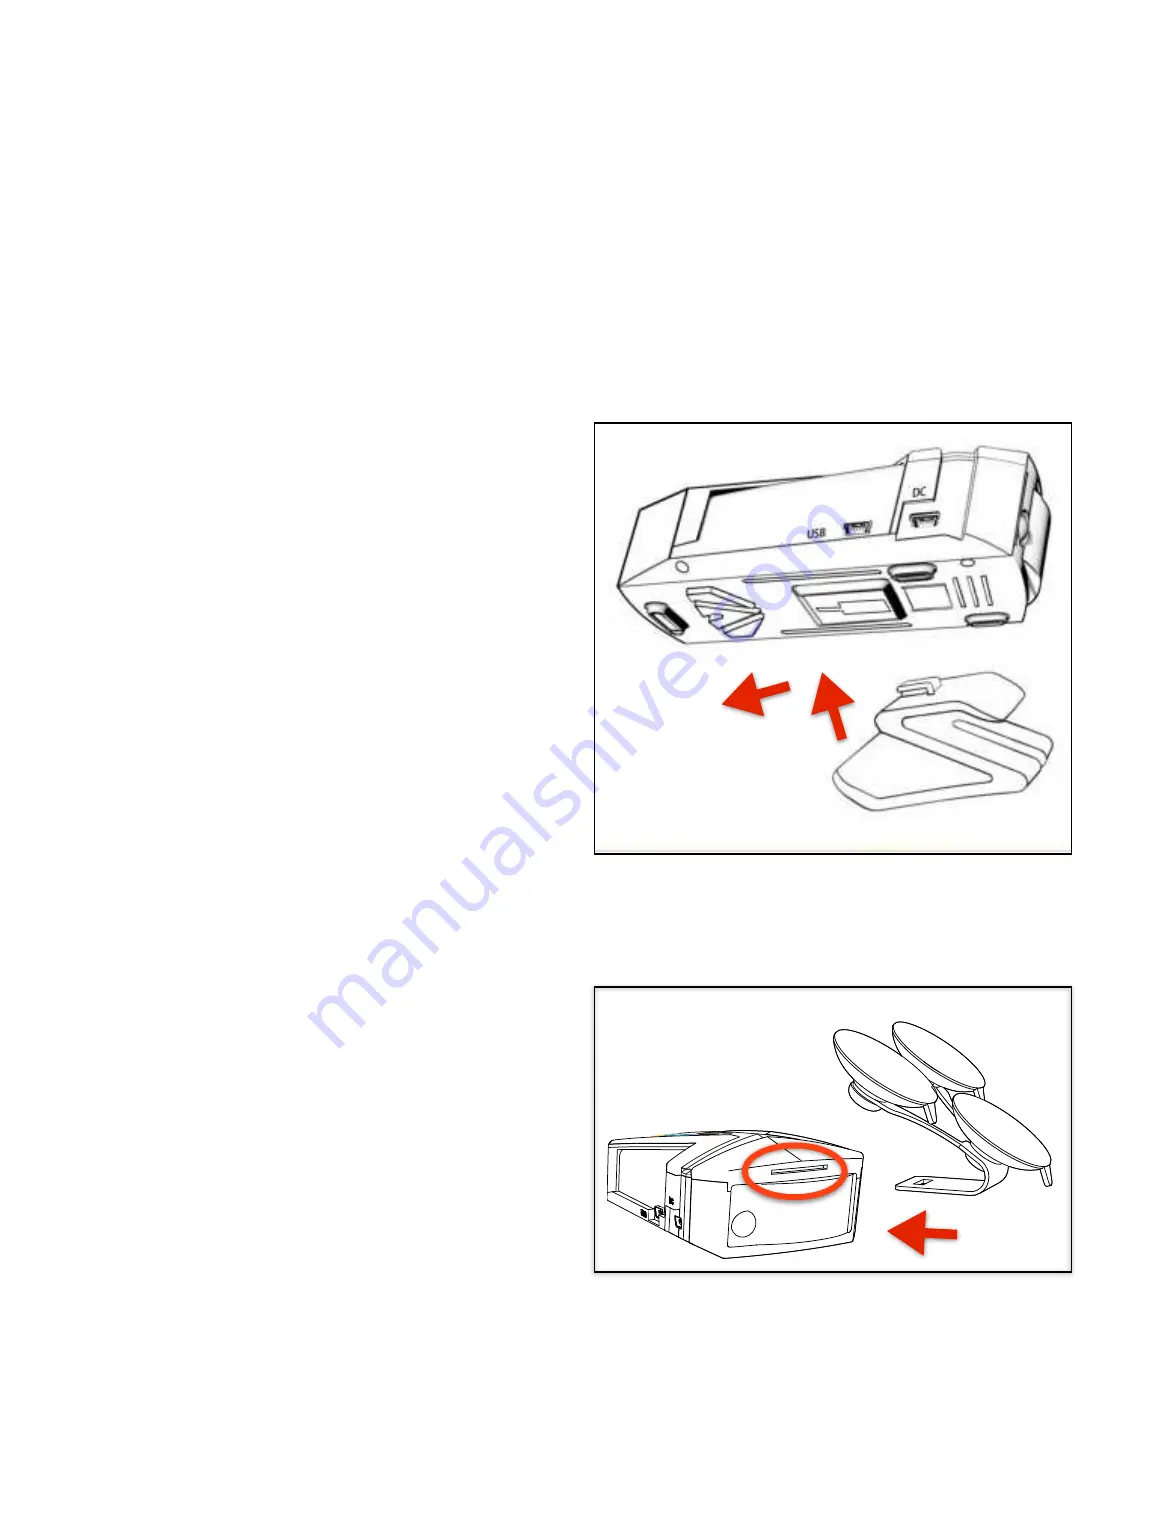
Sticking Bracket Installation 

1.  Aim  the  sticking  bracket  transfer  slide 
buckle  at  the  mount  buckle  on  the  device.                         


2.  Hold  the  device  and  sticking  bracket  with 
your  hands,  and  push  the  sticking  bracket 
buckle  into  the  device  buckle  to  lock;                                           


3.  Tear  off  the  protection  film  from  the 
bottom  of  the  sticking  bracket;                       

.                                            

4.  Stick  the  bracket  with  the  device  onto  the 
dash  board  and  make  sure  that  the  radar/
laser receiver faces outwards and the screen 
faces the driver.                                                

 . 

5.  Use  the  in-car  charger  to  connect  the 
device with the cigarette lighter socket.  


Triple Suction Bracket Installation 

1.  Aim  the  clip  of  the  triple  suction  bracket 
towards  the  hole  above  the  radar/laser 
receiver on the device;                                        

.


2.  Push  the  bracket  inwards  to  lock  the  clip;     
3.  Position  the  bracket  on  the  windshield,  
press and squeeze the air out and make sure 
that  the  radar/laser  receiver  faces  outwards 
and the screen faces the driver;                     

4.  Use  the  in-car  charger  to  connect  the 
device with the cigarette lighter socket.  

6

Содержание VP388T

Страница 1: ...USER MANUAL Multifunctional Radar Laser Detector 014C1C13 EN VP388T ...

Страница 2: ... to contact us support spedaltech com 1 DISCLAIMER AND SAFETY GUIDELINES 1 1 1 Disclaimer 1 1 2 Safety Guidelines 2 2 ACCESSORIES AND INTERFACES 3 2 1 In the box 3 2 2 Product Diagram 4 2 3 Display Interpretation 5 2 4 Installation Guideline 6 3 FUNCTIONS AND SETTINGS 7 4 APPENDIX 9 4 1 GPS Data Update Quick Update Guideline 9 4 2 Specifications 10 4 3 Warranty 10 ...

Страница 3: ... careful when operating in scenes where children are present By using this product you hereby signify that you have read this disclaimer carefully and that you understand and agree to abide by the terms and conditions herein The user promises to be responsible for his actions and all consequences arising therefrom The user promises to use this product only for legitimate purposes and agrees to all...

Страница 4: ...t poke the device and its accessories using sharp objects such as awl or scissor Do not disassemble repair or modify the device and its accessories by yourself Do not install use or place the device within the reach of any children under 16 Do not cut the charging cable Notice Damage caused to the dashcam as result of not obeying the warnings above is not covered by the warranty Cautions Turning o...

Страница 5: ...gent Notice Please use the SPEDAL original cable and accessories only Gifts and accessories are not covered by the warranty In the VP668 Series the VP668T Plus version will have an external antenna The content of this product package is subject to change without notice the actual package content shall prevail 3 Quick Guide Radar Detector In Car Charger Triple Suction Bracket Sticking Bracket 0 8m ...

Страница 6: ...2 2 Product Diagram 4 Front side Back side ...

Страница 7: ...2 3 Display Interpretation The display will have different informations on it Please refer to the following figures to understand its meanings 5 ...

Страница 8: ...ckle to lock 3 Tear off the protection film from the bottom of the sticking bracket 4 Stick the bracket with the device onto the dash board and make sure that the radar laser receiver faces outwards and the screen faces the driver 5 Use the in car charger to connect the device with the cigarette lighter socket Triple Suction Bracket Installation 1 Aim the clip of the triple suction bracket towards ...

Страница 9: ... frequency counting error 120db gain 8MHz Radar detector range radar receiving X 10 525GHz 50MHz K 24 150GHz 100MHz Ka 34 70GHz 1300MHz Digital frequency division processing technology control 23 85GHz 24 25GHz deviation within 8MHz Receivable bandwidth of K band pulse signal 23 85GHz 24 25GHz Receivable bandwidth of K band continuous wave signal 24 08GHz 24 18GHz can be modified K frequency 24 12 ...

Страница 10: ...rms under this speed value 2 In turbo mode you can mute the GPS spot alarms under this speed value 3 Other settings My highest speed 1 1 When the actual speed is higher than this value the device will alarm on overspeeding 4 GPS spot settings Spot alarm distance 1 Start point of GPS spot alarm 5 Radar settings K band KA band S band Laser band Radar anti interference Laser band sensitivity K band s...

Страница 11: ...the device USB port not DC port with the computer On Android Please scan the QR code on the right to visit our homepage and download the Spedal VP388 zip under support download Unzip the file and install the WMEDOG on your Android mobile phone Please follow the steps below to connect the device with the APP 1 Long press any button for 3 seconds to enter Update Mode 2 Please ensure the Bluetooth of ...

Страница 12: ...ements caused by the following conditions including but not limited to 1 Failure to follow instructions and improper use causing device failure or damage 2 Failure due to unauthorized disassembly modification or maintenance of equipment 3 Accidental damages caused by any natural disasters or other force majeure factors 4 Warranty period of the device has expired 5 Purchases from unreliable sources ...

Страница 13: ...can be determined by turning the equipment off and on the user is encouraged to try to correct the interference by one or more of the following measures Reorient or relocate the receiving antenna Increase the separation between the equipment and receiver Connect the equipment into an outlet on a circuit different from that to which the receiver is connected Consult the dealer or an experienced rad...

Отзывы: