background image

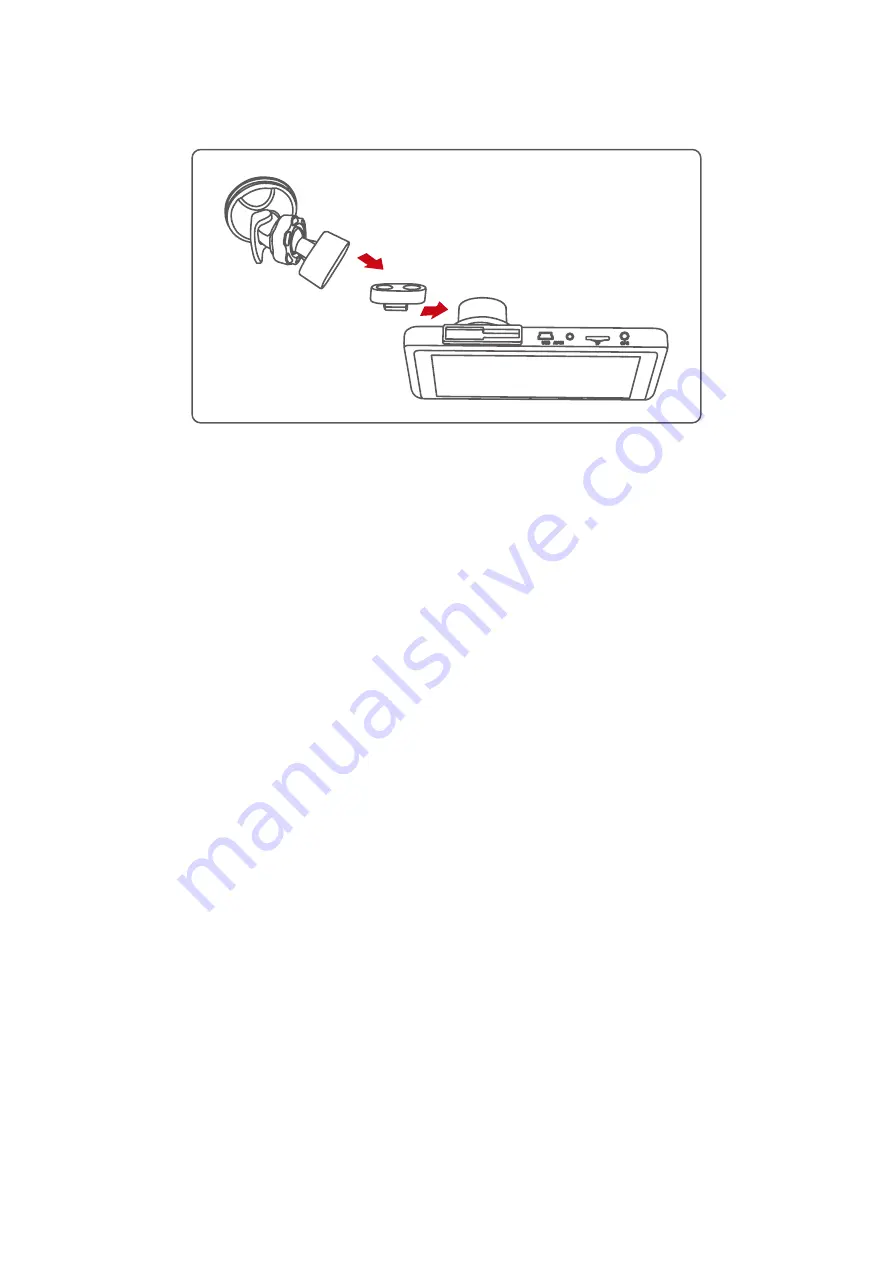
2�3�3 lnstallation Method

1. Aim the magnetic transfer slide buckle at the mount buckle on the device.
2. Hold the device and chuck bracket with your hands, and aim the mount at the chuck 

bracket on the device.
3. Select a proper position (such as the center of the rearview mirror), attach the suction 

mound to the windshield and rotate the mount clockwise to lock.
4. Adjust the recording angle (it is the best angle that the car front shows in the middle of 

the display).

Note: The suction mount can be replaced by the sticker mount� Select 

a proper position, tear the protective paper and paste into the front 

windshield (do not move it within 24 hours)

07

Содержание CL586

Страница 1: ...USER MANUAL MULTIFUNCTIONAL DASHCAM 004C1907 EN CL586 ...

Страница 2: ... 01 1 2 Safety Guidelines 02 2 ACCESSORIES AND INTERFACES 03 2 1 In the box 03 2 2 Product Diagram 04 2 3 Installation Guideline 05 2 4 Interfaces Introduction 08 3 FUNCTIONS AND SETTINGS 09 3 1 General Settings 09 3 2 Carlink and its settings 11 3 3 Drive recording and its settings 12 3 4 FM and its settings 13 3 5 Playback and its settings 14 4 APPENDIX 15 4 1 Specifications 15 4 2 Warranty 16 ...

Страница 3: ...nd wires Please be careful when operating in scenes where children are present By using this product you hereby signify that you have read this disclaimer carefully and that you understand and agree to abide by the terms and conditions herein The user promises to be responsible for his actions and all consequences arising therefrom The user promises to use this product only for legitimate purposes...

Страница 4: ...es using sharp objects such as awl or scissor Do not disassemble repair or modify the device and its accessories by yourself Do not install use or place the device within the reach of any children under 16 Do not cut the charging cable Notice Damage caused to the dashcam as result of not obeying the warnings above is not covered by the warranty 1 2 2 Cautions Do not press the lens forcefully to av...

Страница 5: ...hing is missing please contact Spedal or your local agent Multifunctional radar detector In Car charger Suction Mount Quick Guide Notice Please use the SPEDAL original cable and accessories only Gifts and accessories are not covered by the warranty The content of this product package is subject to change without notice the actual package shall prevail 03 ...

Страница 6: ...ature of the heatdissipating metal sheet can reach as high as 60 which is within normal range of working temperature Please do not touch the sheet surface for a long while to prevent being scalded GPS Input TF Card Slot AV IN Mount Locking Clip USB Power Input Touch screen Reset button Loudspeaker heat dissipating metal sheet Adjustable camera Power button 04 ...

Страница 7: ...e driver or in an unsafe area Install the device near the rearview mirror but not in a place blocking the driver vision Install the device within the wiper blade area to ensure clear capture on rainy days Do not install the device on the airbag cover or near the airbag operating range Do not install the device on the windscreen protection film to prevent damage to the film Install the device in a ...

Страница 8: ...ments Class 8 or above maximal 128GB Note Installing and removing the TF card in the recording mode may result in failure of recording videos and causing damage to the TF card Please turn off the device before inserting or unplugging the TF card Note When recording or snapping if the TF card is not inserted or the TF card is abnormal the device will broadcast an alarm sound of dididi and show a po...

Страница 9: ...per position such as the center of the rearview mirror attach the suction mound to the windshield and rotate the mount clockwise to lock 4 Adjust the recording angle it is the best angle that the car front shows in the middle of the display Note The suction mount can be replaced by the sticker mount Select a proper position tear the protective paper and paste into the front windshield do not move ...

Страница 10: ...e onto the dashcam Dashcam Photo and video shooting during drive process FM FM to transfer the sound of your mobile phone onto the car loudspeaker Playback Viewing of the photos and the videos Note For more detailed introduction of the device functions and settings please refer to chapter 3 FUNCTIONS AND SETTINGS of this manual 08 Carlink Settings 12 00 08 08 Sunday FM Playback Dashcam ...

Страница 11: ...en saver program during drive recording Options Off 1 minute 3 minutes Time setting Date and time settings Resolution Default is 1080P Front 1080P Rear Options 1080P F 1080P R 720P F 720P R Notice You can match suitable rear camera for this device Video duration Default is 1 minute Video duration when drive recording Options 1 minute 2 minutes 3 minutes Screen saver Time setting Resolution Video d...

Страница 12: ...eos activated by collision will be locked and can not be overwritten Options Off High Low Keyboard clicks Default is On Feedback sound of clicking Options Off On Language System language Options English Detusch 简体中 繁体中 本語 Firmware Version View the firmware version Flicker frequency Default is 50Hz Options 50Hz 60Hz Reset settings Reset all settings back to factory settings without deleting data fr...

Страница 13: ...n or Screen Mirroring on your mobile phone 6 Select the device name Spedal Carlink on your mobile 7 Screen and sound synchronization begin Note Some mobile brands allow the projection screen mirroring programs running in the background While some brands allows only simultaneous projection Please consult your mobile phone supplier to confirm if you need to keep your mobile phone screen always on du...

Страница 14: ...nlocked You can switch the status by clicking on the Lock file icon at the bottom of the screen 4 The video length sign will appear only when a video is being recorded You can change the video duration in settings 5 The function switch front and rear camera can only be used when an additional camera is connected to the device 12 1080P 2020 05 16 07 03 21 00 00 00 Video Length Lock File Status Audi...

Страница 15: ...M frequency 91 0MHZ from the dashcam Once you adjust the radio frequency on your car to the same level 91 0MHZ The car s loudspeaker will synchronize the sound from the dashcam which originate from your mobile phone In other word the users can play music or use navigation sound or any audio files on their mobile phones and the sound will come out from their car s loudspeakers through the FM transm...

Страница 16: ...98F TS FILE200516 082820 000097F TS FILE200516 082720 000096F TS 01 13 File Preview Click To Expand Current Page Total Page Selected File In Red Return Unlocked Locked Videos Photos Switch Files Of Front rear Unselected File In White Video Sequences Play And Pause Status Forward Play Pause Backward Lock Unlock Current File File Name Delete Return Video Duration Date Time FILE200516 075517 000059F ...

Страница 17: ...ications Display 5 0 full view IPS LCD screen Aperture F 1 8 Resolution 1080P Angle 120 USB Mini USB 2 0 Video format TS Photo format JPEG Storage device TF card Max support 128GB Operating temp 20 65 Storage temp 30 75 15 ...

Страница 18: ...al factory shall be paid by the product owner or the person sending the repair The company reserves the right to reject maintenance requirements caused by the following situations including but not limited to 1 Failure to follow the instructions in the manual and improper use may cause the machine to malfunction or damage 2 Failure due to unauthorized disassembly modification or maintenance of equ...

Отзывы: