SPECTRO iSORT Скачать руководство пользователя страница 1


Das verknüpfte Bild kann nicht angezeigt werden. Möglicherweise wurde die Datei verschoben, umbenannt oder gelöscht. Stellen Sie sicher, dass die Verknüpfung auf die korrekt  
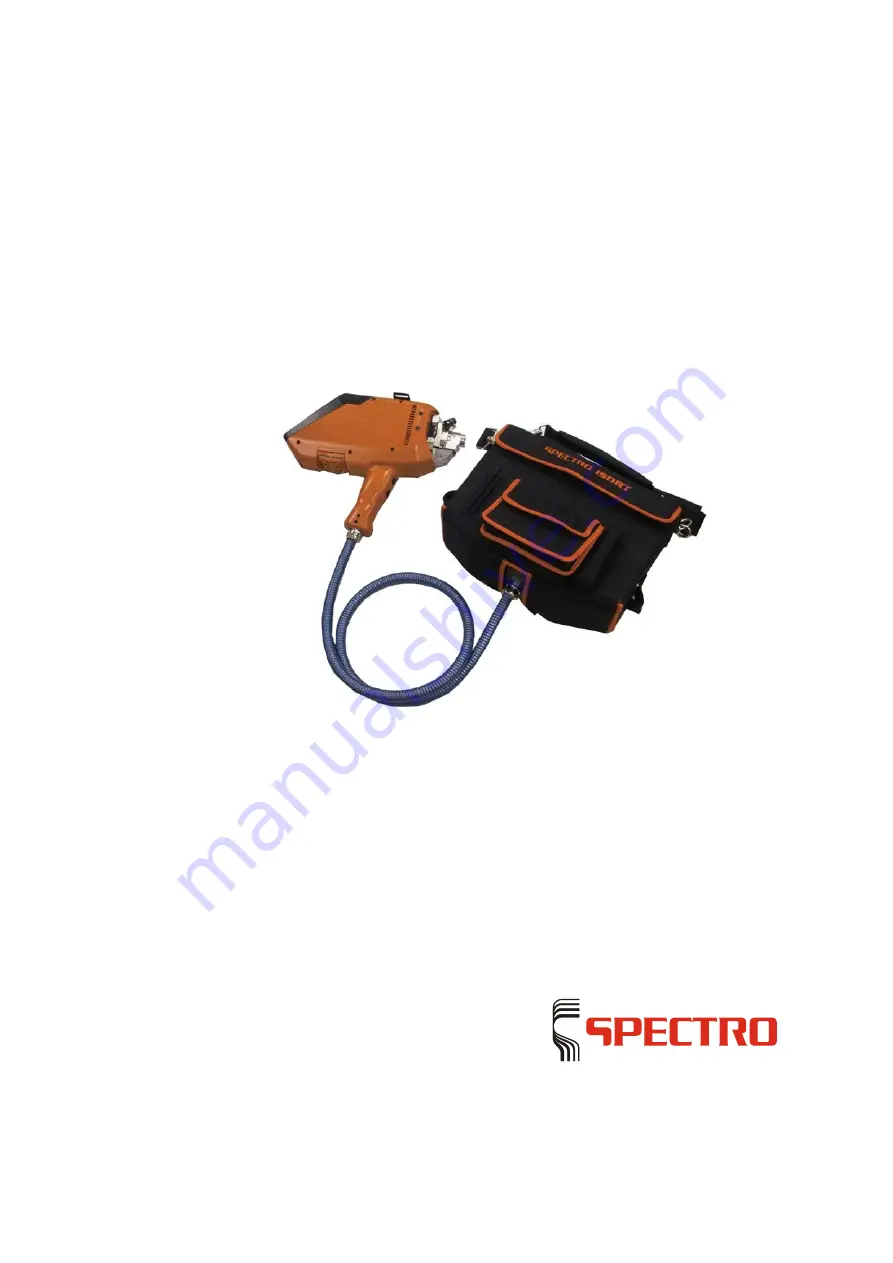


 SPECTRO iSORT  


 Mobile Spectrometer for Metal 

Analysis 


Original operating instructions 


Содержание iSORT

Страница 1: ...icht angezeigt werden Möglicherweise wurde die Datei verschoben umbenannt oder gelöscht Stellen Sie sicher dass die Verknüpfung auf die korrekt SPECTRO iSORT Mobile Spectrometer for Metal Analysis Original operating instructions ...

Страница 2: ...Das verknüpfte Bild kann nicht angezeigt werden Möglicherweise wurde die Datei verschoben umbenannt oder gelöscht Stellen Sie sicher das ...

Страница 3: ...en 15 5 3 Preparing the unit for operation 16 5 4 Switching the unit on 16 5 5 Switching the unit off 17 5 6 Carrying out the measurement 17 5 6 1 Preparing the measurement 17 5 6 2 Measuring 18 Example of measurement Approximate analysis 18 Example measurement approximate analysis with fingerprint 19 Example of measurement Sorting 19 Standardization of measuring unit ICALization 20 5 7 Replacing ...

Страница 4: ... 4 SPECTRO iSORT 23 08 2013 6 4 Changing cleaning the air filter probe 26 6 5 Cleaning sharpening the electrodes 26 7 Troubleshooting 27 8 Spare parts and consumables 28 ...

Страница 5: ...already stored in the unit s memory The measured values are compared with these data The results are displayed on the screen 1 2 Overview No Component No Component 1 Adapter electrode 8 Air filter probe 2 Sample probe 9 USB port PDA 3 PDA Personal Digital Assistant a small flat computer 10 On off switch excitation S source stand by 4 Housing spectrometer 11 On off switch power supply P 5 Bag spect...

Страница 6: ...ther information can be found in the supplied instruction manual of the battery pack and the charging station 1 3 1 Technical data Designation Value Capacity 24 V 3 3 Ah 1 3 2 Handling To change the battery pack proceed as follows 1 Unlock the battery pack and remove it 1 2 Put the charged battery pack into the holder 2 3 Push the battery pack in until it locks into place 1 3 Changing of the batte...

Страница 7: ...ave the unit maintained at the intervals specified by the manufacturer and document the maintenance activities This serves for maintaining the operational safety of the unit y Never tamper with the safety devices If you feel that a safety device does not work properly shut down the unit immediately y Absolutely observe the information labels provided on the unit y Only genuine spare parts may be u...

Страница 8: ...e national standards will not be exceeded y When the unit is switched on there is a risk of suffering an electric shock when the electrode is touched or when the sample is removed during a measurement Î Such an electric shock is not dangerous to a healthy person Low currents and voltages below the threshold values specified in EN61010 are involved here However consequential accidents may occur e g...

Страница 9: ...setting when the unit is supplied If the default setting is changed it is possible to trigger the spark cycle by pressing only the start button y The electric arc in the spark stand or in the sample probe adapter generates UV radiation Î Take suitable protective measures e g wear safety glasses whenever the spark stand opening or the adapter opening is not completely covered Note The plasma is ign...

Страница 10: ...cording to DIN EN 61010 1 Power input during sample testing 300 W Power input during stand by 10 W Power line fuse protection charging station 16 A slow blow Storage conditions 20 50 C 5 120 F Temperature range 5 40 C 40 105 F according to DIN EN 61010 1 Air humidity 80 max according to DIN EN 61010 1 Protection class IP 23 DIN 40050 ...

Страница 11: ... case 18 kg 39 7 lbs 4 2 Transport Caution Damage to unit y If you carry the unit on your body it may fall down and get damaged Î Make sure that the snap fasteners of the spectrometer bag are all closed Î Fasten the probe into the transport holder at the shoulder strap of the spectrometer bag when you do not perform any measurements Î Switch off the excitation source when you do not perform any te...

Страница 12: ...osive vapors Caution Measurement errors y Shocks to the unit during the measuring process may produce measurement errors Î You should therefore avoid shocks during the measurements y Measuring errors may result from temperature differences inside the unit Î Position yourself and the unit so that it cannot heat up on one side only y Avoid mechanical bumps ...

Страница 13: ...ement Î Must be pressed together with the Reset button during the entire measurement The double button operation is the default setting when the unit is supplied 3 Touch sensitive screen The unit software is controlled with the help of buttons on the screen 4 PDA ON OFF Switches the PDA on or off 5 Excitation S source stand by Sets the sample probe to stand by mode 6 ON OFF P power Switches the sp...

Страница 14: ...ay of sample probe PDA y The screen displays the measuring window Î The unit is ready for operation y The screen shows a red surface Î The unit is not ready for operation Î The software has switched to the safety mode no measurement has been performed for a long time Î Fault Î A measurement is carried out ...

Страница 15: ...urface may be damaged Touch the screen with a plastic pen or with your finger The surface of the screen reacts to touch touch screen Touch the buttons on the screen to navigate in the control system No Display Function 1 Program field Display of measurement results Î The display field depends on the loaded program 2 Menu line Display of program menus ...

Страница 16: ...d fine dust are firmly screwed in 2 Sling the unit from your shoulder 3 The unit is now prepared 5 4 Switching the unit on To switch on the unit proceed as follows 1 Set the P switch power to position 1 ON Î The unit is switched on 2 Press the ON OFF button of the PDA Î The program most recently used is started 3 Set the S switch source stand by to position 1 ON if the excitation has not been swit...

Страница 17: ...To switch off the unit proceed as follows 1 Switch off the excitation the LED of the source switch does not light 2 To do so set the P switch power to position 0 OFF Î A message is displayed on the screen of the PDA 3 The unit is now switched off 3 Press the ON OFF button of the PDA 3 The PDA is switched off 5 6 Carrying out the measurement 5 6 1 Preparing the measurement Before starting the measu...

Страница 18: ...follows to carry out a scan 1 Open the Tasks menu to call up a program for approximate analyses 2 Hold the sample probe adapter on the sample 3 Press the Start measurement button and the Reset button during the entire measurement Î The measurement is carried out automatically Î Make sure that the position of the probe and of the sample with regard to each other does not change A change in the spar...

Страница 19: ...surement is terminated automatically Î The sample probe status display lights up red during the measurement PDA screen Î The sample probe status display switches over to the measuring window when the measurement is complete Î If necessary the unit will ask you to carry out an ICAL standardization see page 20 Î The results are displayed on the screen 3 The measurement is now complete Example of mea...

Страница 20: ...rried out If these are bad as well the bad samples counter on the screen adds one point to its count Î The next sample can be measured 3 The measurement is now complete Standardization of measuring unit ICALization Note For ICAlisation the star electrode adapter must always be used However a stick electrode must be used as the electrode A reference sample is measured five times to perform standard...

Страница 21: ...obe 5 7 1 Sample probe parts overview No Display 1 Adapter Î for star electrode left Î for rod electrode right 2 Knurled screw for the adapter 3 Electrode 4 Housing with windows for the optical fiber 5 Electrode locking wheel 6 Knurled screw for turning the star electrode ...

Страница 22: ... off It takes 20 30 seconds until the excitation source is completely switched off If you want to use another electrode type you have to change the adapter To change the adapter proceed as follows 1 Switch off the unit 2 Loosen the knurled screw of the adapter 3 Pull out the adapter 4 Plug in the new adapter Î The adapter for the star electrode has a locking mechanism Î Press the adapter beyond th...

Страница 23: ...ion off It takes 20 30 seconds until the excitation source is completely switched off When using arc discharge silver of copper electrodes are used To change the electrode proceed as follows 1 Switch off the unit Î The LED of the source switch does not light 2 Loosen the electrode on the locking wheel Î The electrode is spring loaded For this reason hold the electrode tight 3 Pull out the electrod...

Страница 24: ...t of work Maintenance work to be carried out 1 Check of cleaning system Check whether the filter cartridges are properly installed 2 Cleaning the adapter See page 25 3 ICALization See page 20 If necessary Clean the windows of the sample probe and of the adapter See page 25 Every month Clean the air filter probe Every month or more often if necessary Every six months Cleaning system Fine dust filte...

Страница 25: ...e adapter 1 using the knurled screw 2 and pull it off Î Clean the light inlet window 3 of the sample probe with a cotton swab 2 Take the adapter and push the window holder 1 carefully out of the guide 3 Remove the light inlet window s 1 and the exposed O ring 2 Î Make sure not to touch the optical surfaces 4 Clean light inlet window using optical paper or a lint free soft cloth 5 Refit the light i...

Страница 26: ...replace the air filter proceed as follows 1 Remove the air filter cover 2 Replace the air filter or clean it 3 Re fit the air filter cover 3 The air filter has now been replaced 6 5 Cleaning sharpening the electrodes Clean the electrodes after work is complete The soft rod electrodes silver and copper must be newly sharpened when their tip is worn ...

Страница 27: ... defective Please contact your service center The unit can be switched on but no data are shown on the screen The PDA is not switched on Switch on the PDA The screen does not react to any entries The screen is defective Please contact your service center The screen does not react to any entries The screen is not properly adjusted Recalibrate the screen with the help of the software The unit does n...

Страница 28: ...ersed Turn the adapter so that one opening faces the optical fiber window The adapter is not locked in properly up to the stop Check adapter seat and correct it if necessary The electrode gap is not correct Adjust the electrode gap using the spacer 8 Spare parts and consumables You can find the spare parts and consumables for this unit under Support Parts Catalog on our website at www spectro com ...

Отзывы: