


O
O
2
2
D
D
1
1
1
1
M
M
U
U
s
s
e
e
r
r
’
’
s
s
G
G
u
u
i
i
d
d
e
e
Rev.1.4 (Oct. 2016)
13
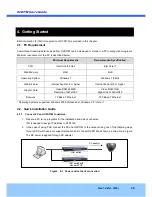
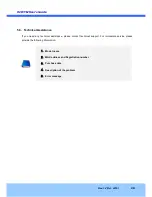
Relay Output
Relay output is provided for connecting alarm devices or for remote on/off control of devices such as light.
Relay is normal open and it will be closed upon alarm annunciation or remote on. The relay is capable
of switching
30V AC/DC, 2A
. For the application which needs power switching beyond this limit, use
additional relay switch as shown in the right of Figure 2-5.
* Left : switching requirement below 30V, 2A
* Right : switching requirement higher than 30V, 2A. Apply this connection when either voltage or
current exceed the limit.
Figure 2-5. RELAY Output connection
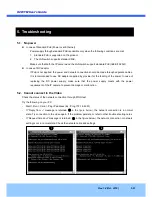
Sensor Input
Connect external alarm sensor. Examples of sensing devices are infrared sensor, motion sensor,
heat/smoke sensor, magnetic sensor, etc. Connect the two wires
of the sensors to “SNS In”. The sensor
type(NC/NO) can be set in admin page. Multiple sensor devices can be connected in parallel.
Figure 2-6. SENSOR input and connection of the sensor
Alarm
Out
Device
Power
Supply
( ~30V)
( ~ 2A)
(DC/AC)
Alarm
Out
Device
Power
Supply
(30V~ )
( 2A~ )
(DC/AC)
Optional
Relay
Switch
Power
Supply
( ~30V)
( ~ 2A)
(DC/AC)
Relay
Relay
Photo Coupler
NO/NC Type
Open Collector Type
Sensor
Device
Sensor1-
Sensor
Device
Sensor
Power
Supply
Sensor
Power
Supply
GND
+12V


