Speco D16DS Скачать руководство пользователя страница 28

28 


4-3-1.  Recording  Schedules 

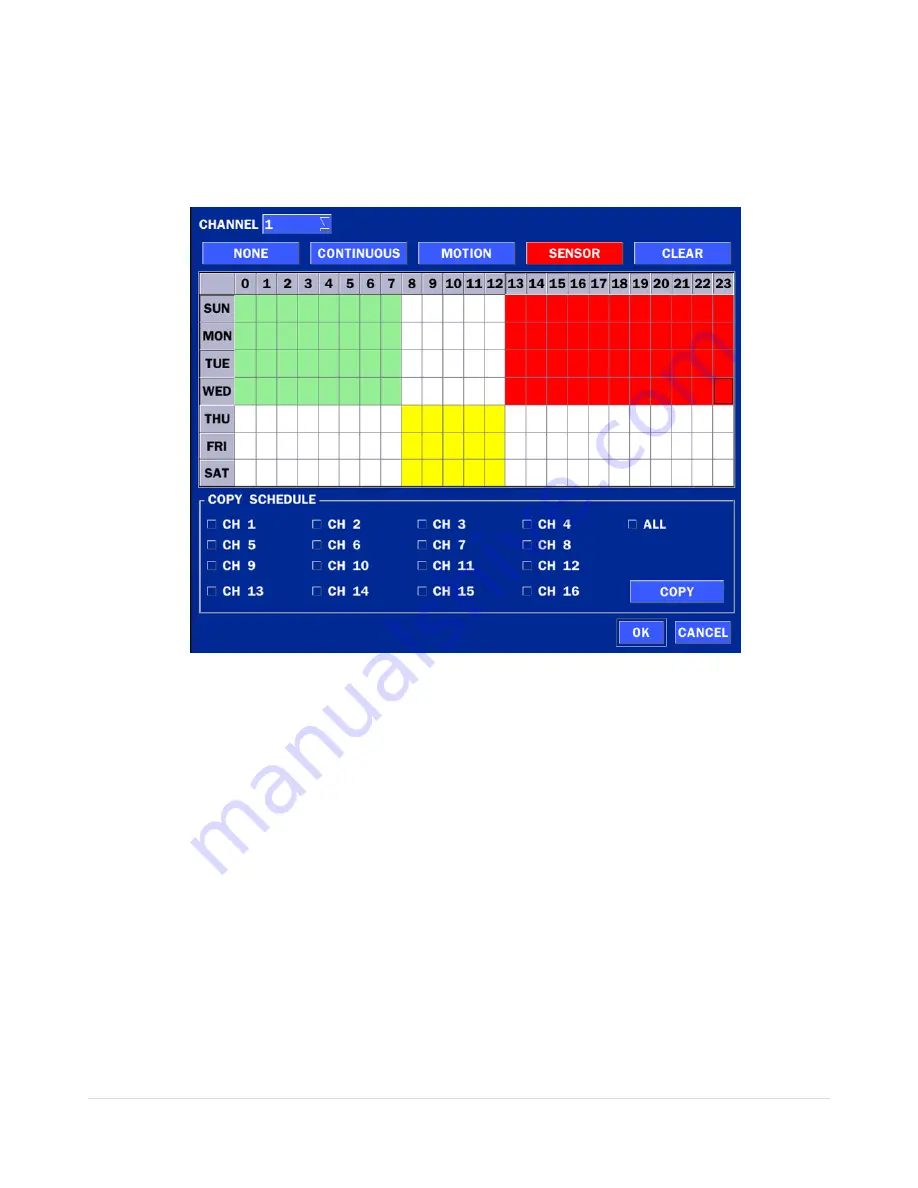
To  setup  a  recording  schedule,  select  SCHEDULE  in  the  RECORD  menu.  Navigate  through  the  menu 

items or change the settings using the mouse or the remote control. 

Select CHANNEL > select NONE, CONTINUOUS or MOTION > HIGHLIGHT AREA 

To copy a schedule to a different channel, select the channel from the COPY SCHEDULE menu. 


Figure 4.3.2. Schedule Recording Setup Screen 


NONE

: Disable recording (Displayed in White) 


CONTINUE

: CONTINUOUS recording (Highlighted in Green)


MOTION

: MOTION recording (Highlighted in Yellow) 


SENSOR

: SENSOR recording (Highlighted in Red) 


Содержание D16DS

Страница 1: ...Desktop D8DS D16DS Wall Mount D8WDS D16WDS 8 16 Channel Digital Video Recorder with 960H Resolution About This User s Guide Before operating the unit please read this user s guide thoroughly and reta...

Страница 2: ...or explosion Replace only with the same or equivalent type battery recommended by the manufacture Discard used batteries according to manufacturer s instructions This symbol indicates the presence of...

Страница 3: ...e air vents Do not restrict airflow of the unit doing so can damage the unit Only qualified and experienced personnel should perform installation and servicing Turn off the power of the DVR when conne...

Страница 4: ...re included as specified below DVR Unit Desktop D8DS D16DS Wall Mount D8WDS D16WDS Remote Control Battery 1 5V AAA x2 Quick Setup Guide Quick User Guide USB Mouse Software Manual CD Rack mount x 2 Scr...

Страница 5: ...SC 960H 480fps 240fps D1 480fps 240fps CIF 480fps 240fps PAL 960H 400fps 240fps D1 400fps 240fps CIF 400fps 240fps Recording quality grade LEVEL1 L LEVEL5 H Recording Mode Continuous Schedule Motion M...

Страница 6: ...itoring SW Live Search Backup Remote Setup PTZ control Features DLS Day Light Saving Yes EZSearch Thumbnail Preview Time Stamp over AVI Backup Yes EZRecord Yes EZSetup Yes EZNetwork Yes S M A R T Yes...

Страница 7: ...ules 28 4 4 Setup DEVICE Mode 29 4 4 1 Alarm Out 30 4 4 2 Digital Deterrent 30 4 4 3 Keyboard Controller PTZ Setup 32 4 4 4 Spot Out 33 4 4 5 Motion Zone Setup 34 4 5 Setup DISPLAY Mode 35 4 6 Setup N...

Страница 8: ...6 5 2 NSF Format 60 7 Network Access Using the Multi Sites Network Viewer 61 7 1 Overview 61 7 2 PC Requirements 61 7 3 Installation of the Program 62 7 4 Live Window 63 7 4 1 Main User Interface 63 7...

Страница 9: ...8 6 AVI Backup during Playback 85 8 Network Access Using the Web Browser Viewer 87 9 Network Access Using the Smart Phone Viewer 89 9 1 App Viewer for iPhone 89 9 1 1 Live 90 9 1 2 PTZ Control 91 9 1...

Страница 10: ...duling Simple and Easy Graphic User Interface Simple Schedule Recording HDMI Output VGA Output Password to secure installation authorization Network software supports 10 100Mbps USB 2 0 port for video...

Страница 11: ...e following logo will be displayed 2 After the logo select the language and set date and time as specified below 2 2 Setting Daylight Saving Time To enable Daylight Saving feature NTP synchronization...

Страница 12: ...12 2 Go to SETUP SYSTEM DATE TIME SETUP 3 Select ON from the DAYLIGHT SAVING dropdown menu 2 3 Setting NTP Network Time Protocol 1 SETUP SYSTEM NTP SETUP ON...

Страница 13: ...GMT 5 GMT 4 DC District of Columbia GMT 5 GMT 4 DE Delaware GMT 5 GMT 4 FL Florida GMT 5 GMT 4 FL Florida W GMT 6 GMT 5 GA Georgia GMT 5 GMT 4 HI Hawaii GMT 10 NA ID Idaho N GMT 8 GMT 7 ID Idaho S GMT...

Страница 14: ...lahoma GMT 6 GMT 5 OR Oregon GMT 8 GMT 7 OR Oregon E GMT 7 GMT 6 PA Pennsylvania GMT 5 GMT 4 RI Rhode Island GMT 5 GMT 4 SC South Carolina GMT 5 GMT 4 SD South Dakota E GMT 6 GMT 5 SD South Dakota W G...

Страница 15: ...tons D16DS D8DS Name Description Buttons 1 16 Select a channel from CH1 to CH16 Buttons from 9 to 16 is used as function keys on PTZ control mode To escape out of PTZ mode press the ESC button MENU Go...

Страница 16: ...Analog 960H cameras VIDEO OUT MAIN Composite Video Output SPOT Spot Monitor AUDIO IN OUT Four connectors for audio input and one connector for audio output RS 232C For engineering use only HDMI HDMI o...

Страница 17: ...e To move the playback postion 1 frame back FF To fast forward the recording PLAY PAUSE To play or to pause the recording in playback mode REW To rewind the recording ESC During setup To retun to the...

Страница 18: ...se and select setup from the submenu or press the setup button on the remote control Table 4 1 1 Live Screen and Quick Operation Window When the DVR prompts the LOG IN window enter the PASSWORD using...

Страница 19: ...o view the system information Software Version Storage Size IP Address MAC Address and DDNS Status LANGUAGE Select the display language using the mouse or the remote control Once a language is selecte...

Страница 20: ...DLS DLS cannot be applied if the date of BEGIN and END is the same CLIENT ACCESS Enable Disable remote access through the network NTP SETUP NTP Network Time Protocol which synchronizes the time of the...

Страница 21: ...ideo file is attached when the motion is detected The AVI file contains the 1 2 second s pre record and 1 second post record IP NOTIFICATION Enable disable sending e mail when the IP address is change...

Страница 22: ...priate mail server ID PASSWORD Enter the appropriate mail server PASSWORD MAIL TO Enter the desired email address to receive e mail reports MAIL FROM To set the email address sent to the destination h...

Страница 23: ...23 4 2 1 1 Help user to setup DATE TIME RECORDING Figure 4 2 3 EZ Record Setup Procedure 4 2 1 2 Help user to setup NETWORK setting Using an internet connection 1 2 3 4 5 1 2...

Страница 24: ...g an internet connection Select Auto Configuration or Manual Configuration and then click TEST button Figure 4 2 5 EZ NETWORK Setup Manual Configuration Screen Setup DDNS setting Refer to 4 6 2 DDNS F...

Страница 25: ...tup Manual Configuration Screen Select NO in case internet connection is not being utilized Select Auto Configuration or Manual Configuration and then click TEST button Select OFF for ENABLE DDNS and...

Страница 26: ...hannel for applying the following settings using the mouse or the remote control To change the values of all channels take the following steps Select the following to change the values of all channels...

Страница 27: ...ding is limited to 20 minutes POST EVENT RECORD Set the post event recording time duration for the specified channel 10 30 seconds AUDIO Enable disable audio recording for the specified channel SCHEDU...

Страница 28: ...rol Select CHANNEL select NONE CONTINUOUS or MOTION HIGHLIGHT AREA To copy a schedule to a different channel select the channel from the COPY SCHEDULE menu Figure 4 3 2 Schedule Recording Setup Screen...

Страница 29: ...igital Deterrent CONTROLLER PTZ Set the PTZ baud rate protocol and ID SPOT OUT Display the channels triggered by an event Refer to 4 4 4 SITE Select specified channel for motion zone setup MOTION ZONE...

Страница 30: ...to 4 MOTION ON Camera motion detection from 1 to 4 VIDEO LOSS ON Camera video loss detection from 1 to 4 HDD ERROR HDD Failure or Error ALARM DURATION Set alarm dwell time from 5 to 60 seconds BUZZER...

Страница 31: ...XPORT TO USB Export the sound file to USB RECORD Select a channel and set up the date and the duration Select START to export audio to Digital Deterrent Select the play button to hear message after ex...

Страница 32: ...s of PTZ camera to the RS 485 port on the rear panel Figure 4 4 3 1 Device Mode Setup Screen Figure 4 4 3 2 Device Mode Setup Screen Open the PTZ sub menu by selecting the submenu button Figure 4 4 3...

Страница 33: ...t SPEED Baud Rate and ID number Figure 4 4 3 4 Controller Selection Screen 4 4 4 Spot Out Figure 4 4 4 SPOT OUT Setup Screen Table 4 4 4 Menu Item in SPOT OUT Setup Screen Item Description SPOT ON EVE...

Страница 34: ...cted the motion zone grid screen is not displayed Only set the level of sensitivity for MOTION SENSITIVITY FULL ZONE The motion sensor is active on the whole screen PARTIAL ZONE The motion sensor is a...

Страница 35: ...ncy level of the On Screen Display OSD 0 100 MAIN MONITOR SEQUENCE Enable disable sequential display of video in full screen mode SEQUENCE DWELL TIME Set the dwell time of each single channel display...

Страница 36: ...Enter Subnet Mask that is assigned for the DVR GATEWAY When in Static Enter Gateway that is assigned for the DVR DNS PRIMARY When in Static Enter Primary DNS address that is assigned for the DVR DNS S...

Страница 37: ...IC IP address Subnet Mask Gateway and DNS are manually assigned by the user IP ADDRESS The fixed IP address of the DVR unit SUBNET MASK The subnet mask for the LAN GATEWAY The IP address of the Gatewa...

Страница 38: ...yond a router To access DVR beyond a router firewall you must open the proper TCP ports for live playback streaming for commands for remote backup and for audio streaming If these ports are not opened...

Страница 39: ...quality is limited to LEVEL 2 for better remote viewing on the mobile phone 4 7 Setup USER MANAGEMENT Mode In the SETUP menu select the USER MANAGEMENT tab Then the USER MANAGEMENT menu is displayed a...

Страница 40: ...en the given function is selected for all users ADMIN USER1 USER2 USER3 Selected Checkbox The user can access the function Blank Checkbox The user can not access the function USER NAME SETUP Change th...

Страница 41: ...ription OVERWRITE When enabled the DVR will continue recording and overwrite the oldest existing recorded data once the hard drive is full When disabled recording will stop once the hard drive is full...

Страница 42: ...T Set the alarm and beep by setting the HDD temperature limit Alarm will trigger alarm output Buzzer will trigger beeping from the internal speaker 4 9 Setup CONFIG Mode In the SETUP menu select the...

Страница 43: ...ings HDD overwrite Limit recording HDD serial number and HDD ERROR time will not be included LOAD FACTORY DEFAULT Press the button to reset the system to the factory default settings SOFTWARE UPGRADE...

Страница 44: ...when the USB flash drive is plugged the following message will pop up Remove the USB flash drive and select OK 5 Live Search and Playback 5 1 Live View In the Live screen video inputs from the cameras...

Страница 45: ...use Toggle from Audio 1 to 4 mute in order Indicates that alarm is set To set the alarm function press the Alarm button on the front panel Indicates that alarm output is activated Event indicator When...

Страница 46: ...front panel Motion alarm recording in progress Sensor recording in progress Right click the mouse and the quick operation window will be displayed as below Figure 5 1 2 Quick Operation Window Table 5...

Страница 47: ...button Click this button to enable manual recording Also known as Panic Record DISABLE ALARM OUT Select this option to enable disable Alarm outputs MANUAL DIGITAL DETERRENT Window where use can manua...

Страница 48: ...48 SYSTEM LOCK Lock Unlock Setup button SYSTEM SHUTDOWN Click this button to shutdown system...

Страница 49: ...TOSCAN Press the right key to start auto scan Press the left key to stop auto scan PRESET Select PRESET then press the left key A number input window will appear Set the number 3digits using the numbe...

Страница 50: ...the search screen menu select SEARCH menu on the screen using the mouse or press SEARCH icon on live screen Figure 5 3 Search Screen There are 7 ways of search menu such as EZSEARCH TIME LINE Calenda...

Страница 51: ...4 Minute Thumbnail Screen Figure 5 3 1 5 Play Mode Screen 1 When the EZSearch menu is selected the user can see a calendar which displays recorded dates with highlights Select a specific date on a ca...

Страница 52: ...above red box Press the PLAY button after selecting the specific time Press the PREV to return to the SEARCH window 5 3 3 Event Search The Event Search window is used to find stored video Figure 5 3 3...

Страница 53: ...ific instance by setting the date and time in the GO TO SPECIFIC TIME menu Use the mouse or the remote control to change the date and time value and press the PLAY button after setting If there is no...

Страница 54: ...format 5 4 Play Mode During playback of a recorded event the mode changes from SEARCH to PLAY While in PLAY mode you may return to the SEARCH screen by pressing the X button on the status bar Figure...

Страница 55: ...Copy button Return to the previous menu screen search window or exit from the Menu 6 Back Up 6 1 Still Image Backup onto USB Flash Drive Still images can be captured and archived onto a USB flash driv...

Страница 56: ...r all channels the DVR will ask whether to archive a Still Image a NSF or AVI and select the proper media type 2 Select USB STICK Flash Drive to back up less than an hour Select USB HDD Large Backup t...

Страница 57: ...ck mode press the EZCOPY button to launch the backup function 1 Press EZCOPY button on the selected channel or all channels 2 Then EZCOPY START time will display 3 Move time bar cursor to the time of...

Страница 58: ...begin searching and navigate through the days using the mouse or the remote control 2 Once you have selected the date press the NEXT button to open the list of stored data 3 Use the mouse or the remot...

Страница 59: ...ilter that the DVR copies DvrPlayer folder on USB flash drive with the video UMSDecoderFilter is exported to the DvrPlayer folder of the USB drive 2 Otherwise the video and time stamp over video can t...

Страница 60: ...NSF Format NSF format NSF format video can be played back using the HDplayer that the DVR copies to DvrPlayer folder on USB flash drive with video Use the mouse scroll to use digital zoom in and out...

Страница 61: ...7 2 PC Requirements Minimum PC Requirements Recommended PC Requirements Before installing the program check the PC specifications The DVR remote software may not perform correctly if the PC does not...

Страница 62: ...d double click SpecoTech Multi Client XXXX exe 2 Select a destination folder and click Next 3 Select the program folder and click Next 4 The installation status screen is displayed 5 After the install...

Страница 63: ...window to search and play videos that are recorded in the remote DVR SITE MANAGEMENT THUMBNAIL REFRESH Click this icon to refresh and renew thumbnail image of the connected sites SITE ADDITION Click...

Страница 64: ...he volume control bar to set the audio level MIC Use the microphone volume control bar to set the micro phone level PRESET TOUR SCAN MENU User can control PRESET TOUR SCAN MENU CHANNEL SPLIT To select...

Страница 65: ...c site CONNECT Click this icon to connect the selected site sites DISCONNECT Click this icon to disconnect the selected site sites SETUP Click this icon to setup configuration of SpecoTech Multi Clien...

Страница 66: ...ngle Channel Viewing 7 6 Setup of SpecoTech Multi Client Click the setup icon to setup the configuration of UMS Multi Client software The SETUP window is displayed as below 7 6 1 General Security Opti...

Страница 67: ...67 7 6 2 Event Event log can be archived and searched Event Log Specify the location to save event logs and select event to archive...

Страница 68: ...6 3 Record Record Setup You can set the recording conditions as the following Always Event or Auto record And you can also select target DVR DVRs and channel channels When you set the recording condi...

Страница 69: ...rd and the amount of disk space you want to allow the program to use for recording You can also select the option to overwrite data or stop recording when the maximum amount of disk space is full 7 6...

Страница 70: ...70 7 6 5 Language English French and Spanish is selectable 7 6 6 About About provides network client version information...

Страница 71: ...ng window is displayed as below Select the REMOTE SETUP Then the setup window is displayed The specified menu screen is displayed on the upper left of the screen Enter the password of the DVR when pro...

Страница 72: ...able disable sending e mail when the IP address is changed o MAIL BY SENSOR Enable disable sending e mail reports when an alarm event is triggered o MAIL BY MOTION Enable disable sending e mail when t...

Страница 73: ...SCHEDULE MOTION o PRE RECORD Sets whether to perform or not pre recording o POSE EVENT RECORD Sets the duration of the event recording o AUDIO Sets whether to perform or not audio recording o SECHDUL...

Страница 74: ...on and upload the sound file to DVR CONTROLLER Set the controller baud rate and ID PTZ Set the PTZ baud rate protocol and ID MOTION Setup the motion detection area and the sensitivity o SITE Select th...

Страница 75: ...as well as channel number on the screen OSD CONTRAST Adjust the character contrast on the screen MAIN MONITOR SEQUENCE Setting for automatically switching the displayed video SEQUENCE DWELL TIME Sets...

Страница 76: ...e user to setup a domain name manually o SUMBIT UPDATE Select ON to submit the settings o ezDDNS Enable ezDDNS to register the host name automatically NETWORK PORT When connecting multiple DVRs to the...

Страница 77: ...ding settings by overwriting the hard disk and the storage period for the recording data OVERWRITE Select on to continue recording by overwriting when the hard disk becomes full RECORD LIMIT Sets whet...

Страница 78: ...78 7 7 8 Remote Upgrade Shows the current Firmware version installed on DVR Browse Select BROWSE to locate the firmware file Upgrade Select UPGRADE to upgrade the firmware of the DVR...

Страница 79: ...ss Public IP address of a router that DVR is connected or Domain name o Port Number Default Port Number is 5445 o ID Input ID of DVR Default ID is admin o Password Input network password of DVR Defaul...

Страница 80: ...es 1 Select the site sites to modify from the directory window 2 Click NET FINDER button And then the following window will be displayed as below 3 Click MODIFY button And then the modified informatio...

Страница 81: ...sites to connect from the directory window 2 Click CONNECT button and then site sites displays display as connected 7 8 2 2 Disconnect 1 Select site sites to disconnect from the directory window 2 Cli...

Страница 82: ...tton And then a Capture window will be displayed as below 3 Set Save Path File Name and File Format And then click OK button 4 Still image is saved as set in Capture window 7 8 4 Recording Video on Lo...

Страница 83: ...ecorded as set in Record and Disk setup These video data can be searched and play backed with Local Playback 7 8 5 Local Playback and Remote Playback 7 8 5 1 Playback of Recorded Video on a Local PC 1...

Страница 84: ...le to where there is video data and press the PLAY button 7 Video data that is recorded on local PC will be play backed 8 Use the mouse scroll to digitally zoom in and out from a single channel displa...

Страница 85: ...DVR is play backed 7 8 6 AVI Backup during Playback You can back up the recorded videos in AVI format during playback 1 Double click the target channel to backup 2 Select the beginning time by using...

Страница 86: ...timeline scale bar will be marked in green 5 Click BACKUP And then the BACKUP window will be displayed as below 6 You can also set the beginning time and ending time on this window After selecting a c...

Страница 87: ...the Web Browser Viewer The DVR provides a live remote monitoring feature by web browser viewer NOTE Web Brower is only available for Internet Explorer 1 Check the IP address of the DVR from SETUP SYS...

Страница 88: ...88 5 The Web Browser Viewer will be displayed as below after the ActiveX installation 6 Click the CONNECT button on the Left upper corner of web viewer Then Connect dialog is displayed...

Страница 89: ...sword Input network password of DVR Default Password is 1111 7 Then the cameras connected to the DVR are displayed on the screen 8 Use mouse scroll to digitally zoom in and out from a single channel d...

Страница 90: ...Port and Web Port must be forwarded before adding a new site 3 Select a registered device and select LIVE Then click CONNECT button 4 The app will display the selected channel s Double tap the channe...

Страница 91: ...ew in 1channel mode Then use the iPhone zoom feature using two fingers to pinch the screen to zoom in or out on the video image User can also move the zoomed image around by touching the desired spot...

Страница 92: ...the DVR 3 Tap the menu button Then Playback menu icons will display 9 2 App Viewer for Android Phone 1 Enter the Android Market 2 Search Speco Player in the Android Market and install the Speco Playe...

Страница 93: ...monitor Then click START button 3 The app will display the selected channel s Double tap the channel screen to switch 1 channel display to 4 channels split display 9 2 2 Playback 1 Select the registe...

Страница 94: ...94 9 2 3 PTZ Control To control the PTZ function of the camera tap the channel screen then the channel name will be highlighted in Yellow Using the PTZ menu icons on the screen control PTZF...

Страница 95: ...APPENDIX Network Connection LAN 1 Install the network client software from the supplied CD 2 Check the IP address from SETUP SYSTEM DESCRIPTION or SETUP NETWORK of DVR 3 Run the network client softwa...

Страница 96: ...Name Input a name that properly describes a site IP Address Input IP address Port Number Default Port Number is 5445 ID Input ID of DVR Default ID is admin Password Input network password of DVR Defa...

Страница 97: ...mic IP address A current dynamic IP address is being associated with a static domain name 1 Go to SETUP NETWORK DDNS and set the DDNS SERVER to ON 2 Go to SETUP NETWORK DDNS HOST NAME Manually enter a...

Страница 98: ...SETUP menu DDNS NOTIFIY window will pop up 6 DDNS registration status can be checked from SYSTEM INFORMATION or SETUP SYSTEM DESCRIPTION DDNS STATUS 7 Check the NETWORK PORT Default 5445 WEB PORT Defa...

Страница 99: ...me Input a name that properly describes a site IP Address Domain name or Public IP address of a router that DVR is connected Port Number Default Port Number is 5445 ID Input ID of DVR Default ID is ad...

Страница 100: ...a loss caused by improper usage Use ONLY a new HDD or a HDD that is approved for the unit Turn off the DVR before plugging the E SATA HDD DO NOT disconnect the E SATA port while the DVR power is on Th...

Отзывы: